
DIY: Coolant Change
 10-02-2006, 03:36 AM
#1
The Professor
Thread Starter

DIY: Coolant Change
THIS DIY IS INTENDED TO SHOW YOU HOW TO TAKE OFF THE UNDERBODY TRAY FOR Rad change/ hose change/block draining.
To empty only coolant by itself you can just stick a phillips screwdriver in the hole in the underbody tray and it will drain out. No need to remove the underbody tray for just that.
Okay, this is a pretty simple project, but with the overflow reservoir being our only access to fill the radiator it becomes very time consuming. This is about a 4-6 hour project but I would allocate an entire saturday to it, plan on changing your oil while your at it, its right there anyway since your car is going to be jacked up.
Keep in mind that after doing this you are going to have about six gallons of antifreeze contaminated waste liquid after doing this, granted that you should have enough plastic containers from the "required materials" to store it all.
Tools needed:
-Phillips Screwdriver
-8mm socket (optional but makes undoing the plastic underbody tray much easier)
-10mm socket + extender
-drainpan, you can buy one of these from autozone or any other place for <$3
-ethylene glycol antifreeze, at least 2 gallons of the concentrate, or three gallons of the 50/50 premix.
-redline water wetter or royal purple ICE (optional)
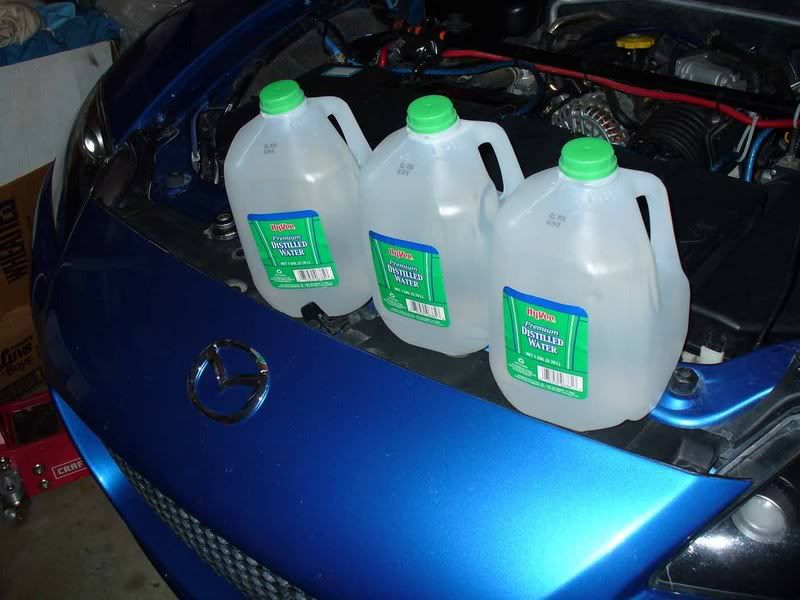
-5 gallons distilled water
-car jack + two jackstands
-goggles
-plastic gloves
Step 1: Jack up car, & allow to cool if it has been warmed up to operating temp recently.
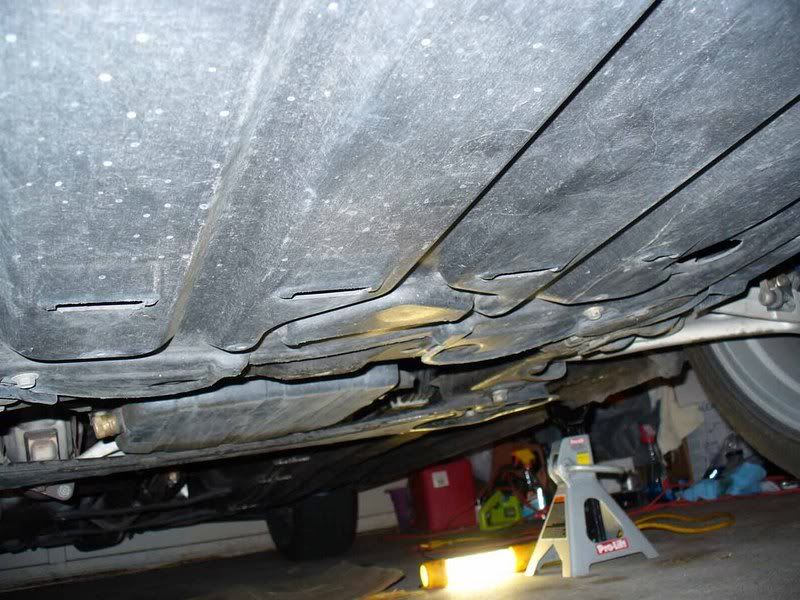
Step 2: remove center plastic underbody tray & the 8mm bolts along the plastic underbody trays in front of the wheels.
Underbody tray, the bottom is held on with plastic fasteners, 5 - 8mm bolts, 2 - 10mm bolts:
Plastic tray in front of wheels, remove the bottom 8mm bolts near the front on this also:
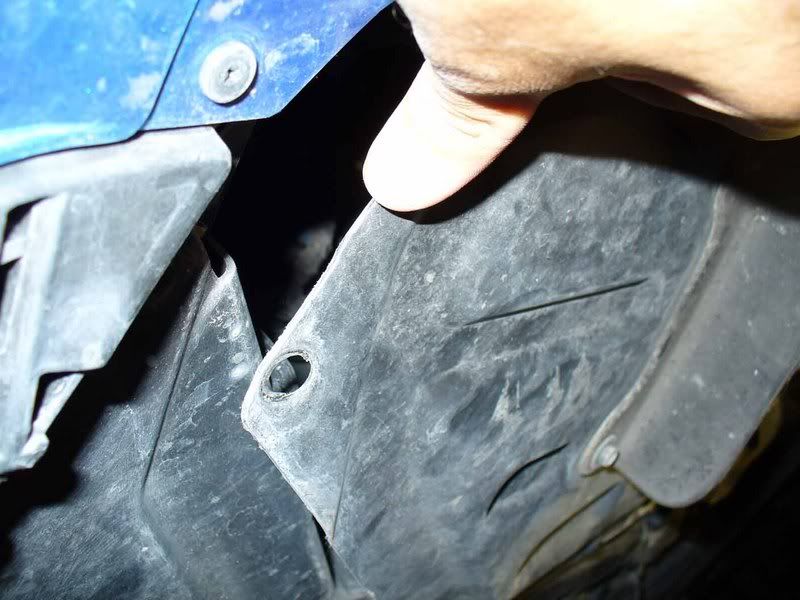
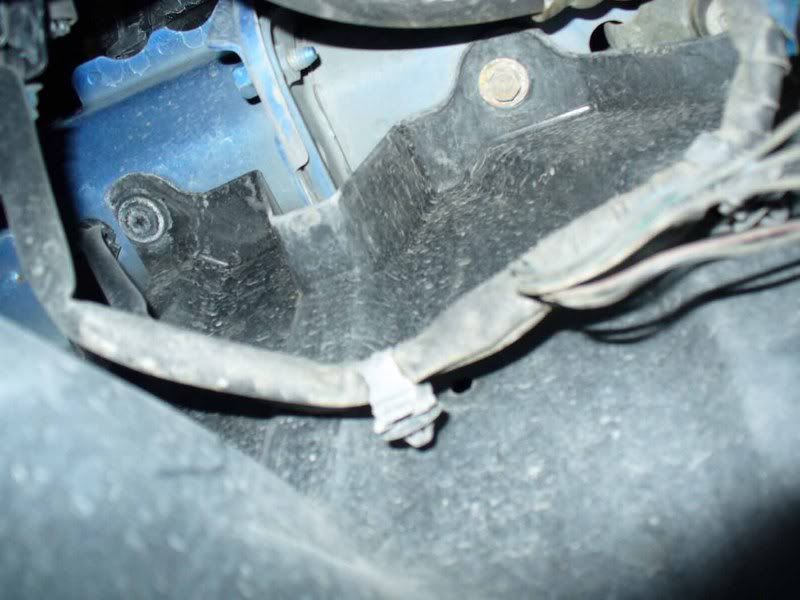
Besides the 8mms, the plastic fastners, and the 2 - 10mms at the rear of the tray, there are 2 - 10mm bolts + 1 plastic fastner on each side that hold the plastic tray up in the fender well, two are below the headlights and the other is right next to the front swaybar bushing. Be sure to unsnap the ABS wire holders and the headlight calibration system wire holders from the tray before dropping,
Okay so the tray is now out.

Step 3:
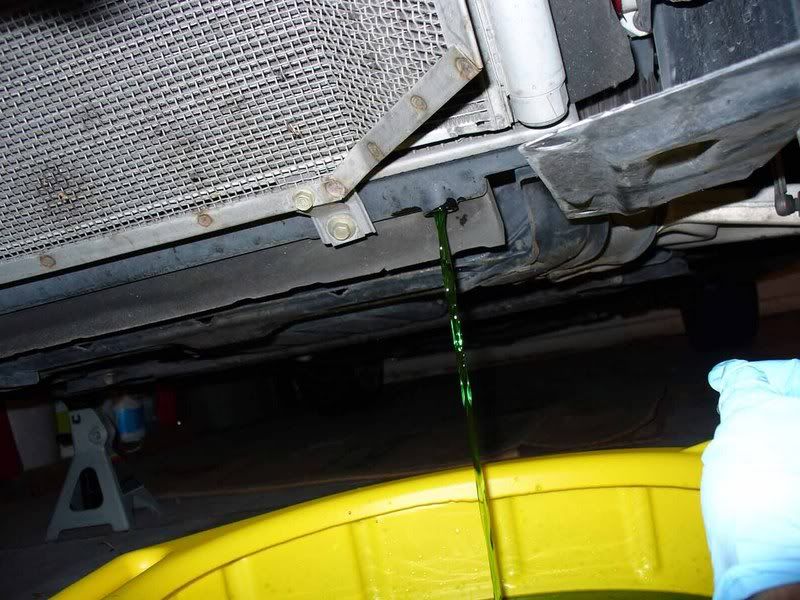
Put your hand carefully on the radiator, if it is hot then I suggest letting it cool because hot flluid will come out. (Racing Beat A/C condenser screen pictured)
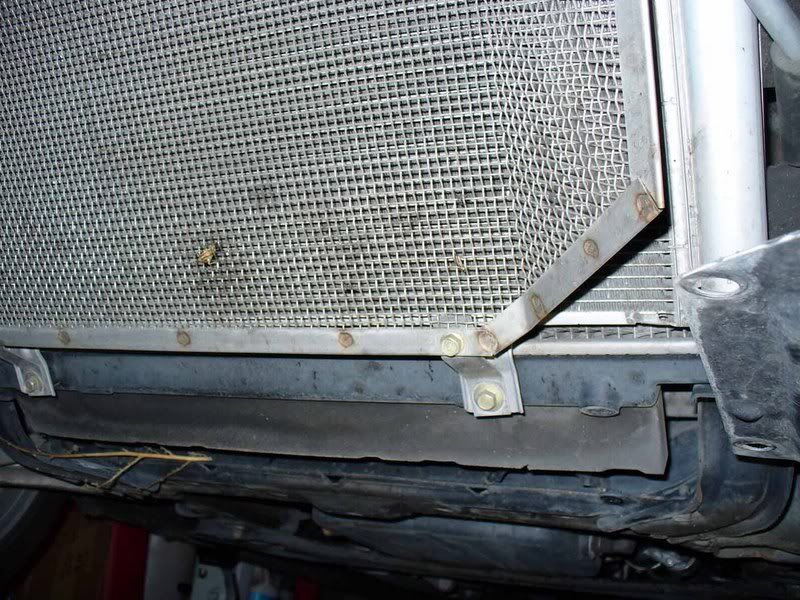
Find the radiator drainplug on the bottom right of the radiator and undo the plastic phillips screw. Antifreeze will come out, I suggest wearing the gloves and the goggles, because it will splash.
Step 4: allow to fully drain, then re-install the plastic drain plug screw
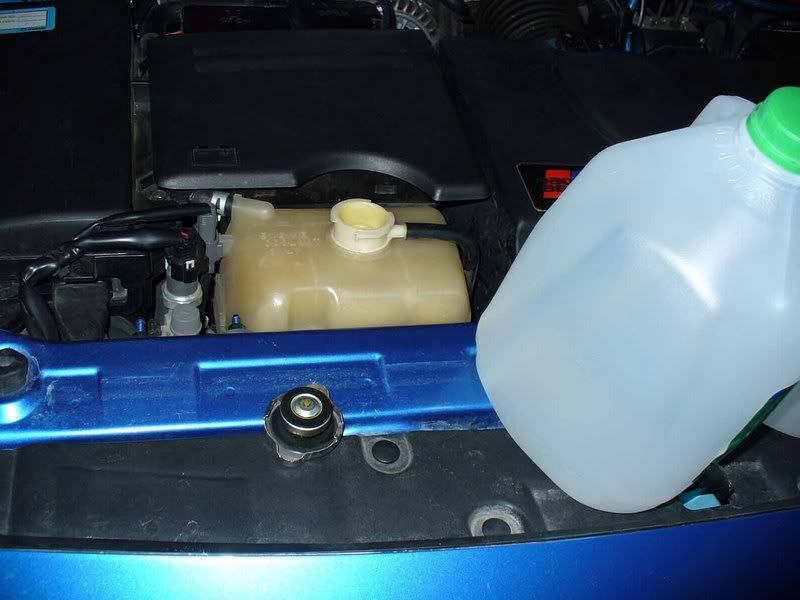
Fill overflow tank with distilled water up to the fill mark. The system won't fully drain since you have it jacked up, so it will only accept about 1 & 1/2 gallons depending on how much drains. So don't expect manual spec amounts of fluid in or out.
After the level is pretty stable at the F mark leave the pressure cap off and go and start the car. Come back quickly and check to see if the level went down, if so, refill to the F mark. Stay attentive and allow the car to reach operating temp at idle. Like I said, only 1 & 1/2 gallons or so will go in total though this process, don't expect to put it in all at once and be done with it.
After the car has reached operating temp, reinstall the pressure cap and rev it to 3.5K for about 15 seconds. Go and check the level in the filler tank. Then turn on the heater to full hot, and air setting of 4. rev to 3.5K for 15 seconds again.
Shut off car and allow to cool for about 30 minutes.
This was the first flush, but since we were only able to get half of the coolant out on each drain we must do another flush just like this.
So, repeat flush process again with distilled water only.
And optinally repeat the flush process a third time, I know I did
The filling and the cooling take the bulk of the time. There are easier quicker ways to do this but they are less environmentally friendly and make much more waste fluid.
Step 5: After you are satisfied with your level of rinising, plug the drain hole and fill the overflow with your coolant addative if you desire. Then fill with antifreeze, if you are using the concentrate, you should add about 1 & 1/4 gallons of this. If there is any room left in the system fill with distilled water.
Or just fill to the F with the 50/50 premix.
I put only 40% in mine because I wanted more cooling, but I don't drive mine in the winter. IF your car is going to see -15 temps on a regular basis I suggest the 50/50 concentration or more (up to %70)
Step 6: Re-install the underbody tray, dont forget to route the ABS and headlight calibration lines correctly.
your done!
To empty only coolant by itself you can just stick a phillips screwdriver in the hole in the underbody tray and it will drain out. No need to remove the underbody tray for just that.
Okay, this is a pretty simple project, but with the overflow reservoir being our only access to fill the radiator it becomes very time consuming. This is about a 4-6 hour project but I would allocate an entire saturday to it, plan on changing your oil while your at it, its right there anyway since your car is going to be jacked up.
Keep in mind that after doing this you are going to have about six gallons of antifreeze contaminated waste liquid after doing this, granted that you should have enough plastic containers from the "required materials" to store it all.
Tools needed:
-Phillips Screwdriver
-8mm socket (optional but makes undoing the plastic underbody tray much easier)
-10mm socket + extender
-drainpan, you can buy one of these from autozone or any other place for <$3
-ethylene glycol antifreeze, at least 2 gallons of the concentrate, or three gallons of the 50/50 premix.
-redline water wetter or royal purple ICE (optional)
-5 gallons distilled water
-car jack + two jackstands
-goggles
-plastic gloves
Step 1: Jack up car, & allow to cool if it has been warmed up to operating temp recently.
Step 2: remove center plastic underbody tray & the 8mm bolts along the plastic underbody trays in front of the wheels.
Underbody tray, the bottom is held on with plastic fasteners, 5 - 8mm bolts, 2 - 10mm bolts:
Plastic tray in front of wheels, remove the bottom 8mm bolts near the front on this also:
Besides the 8mms, the plastic fastners, and the 2 - 10mms at the rear of the tray, there are 2 - 10mm bolts + 1 plastic fastner on each side that hold the plastic tray up in the fender well, two are below the headlights and the other is right next to the front swaybar bushing. Be sure to unsnap the ABS wire holders and the headlight calibration system wire holders from the tray before dropping,
Okay so the tray is now out.
Step 3:
Put your hand carefully on the radiator, if it is hot then I suggest letting it cool because hot flluid will come out. (Racing Beat A/C condenser screen pictured)
Find the radiator drainplug on the bottom right of the radiator and undo the plastic phillips screw. Antifreeze will come out, I suggest wearing the gloves and the goggles, because it will splash.
Step 4: allow to fully drain, then re-install the plastic drain plug screw
Fill overflow tank with distilled water up to the fill mark. The system won't fully drain since you have it jacked up, so it will only accept about 1 & 1/2 gallons depending on how much drains. So don't expect manual spec amounts of fluid in or out.
After the level is pretty stable at the F mark leave the pressure cap off and go and start the car. Come back quickly and check to see if the level went down, if so, refill to the F mark. Stay attentive and allow the car to reach operating temp at idle. Like I said, only 1 & 1/2 gallons or so will go in total though this process, don't expect to put it in all at once and be done with it.
After the car has reached operating temp, reinstall the pressure cap and rev it to 3.5K for about 15 seconds. Go and check the level in the filler tank. Then turn on the heater to full hot, and air setting of 4. rev to 3.5K for 15 seconds again.
Shut off car and allow to cool for about 30 minutes.
This was the first flush, but since we were only able to get half of the coolant out on each drain we must do another flush just like this.
So, repeat flush process again with distilled water only.
And optinally repeat the flush process a third time, I know I did
The filling and the cooling take the bulk of the time. There are easier quicker ways to do this but they are less environmentally friendly and make much more waste fluid.
Step 5: After you are satisfied with your level of rinising, plug the drain hole and fill the overflow with your coolant addative if you desire. Then fill with antifreeze, if you are using the concentrate, you should add about 1 & 1/4 gallons of this. If there is any room left in the system fill with distilled water.
Or just fill to the F with the 50/50 premix.
I put only 40% in mine because I wanted more cooling, but I don't drive mine in the winter. IF your car is going to see -15 temps on a regular basis I suggest the 50/50 concentration or more (up to %70)
Step 6: Re-install the underbody tray, dont forget to route the ABS and headlight calibration lines correctly.
your done!
Last edited by staticlag; 04-06-2008 at 12:02 AM.

The following users liked this post:
SoloTSi97 (07-03-2017)


The following users liked this post:
yapakanichi (12-10-2018)
10-09-2006, 08:48 AM
#4
Originally Posted by dannobre
If you pop the lower rad hose, and use the radiator drain..and drain the block through the drain under the spark plugs....you will have less trouble getting it empty......
This should only take about 20 minutes
This should only take about 20 minutes
10-09-2006, 03:40 PM
#5
Registered

Join Date: Jul 2005
Posts: 403
Likes: 0
Received 0 Likes
on
0 Posts
i don't get it. why do you removed the tray covers on your wheel and underneath your car. when i was doing it, i jacked up the car and found the radiator drain plug without even touching the plastic trays.
 10-09-2006, 03:57 PM
#7
Originally Posted by terrypk1
i don't get it. why do you removed the tray covers on your wheel and underneath your car. when i was doing it, i jacked up the car and found the radiator drain plug without even touching the plastic trays.
If you had a short screw driver you wouldn't even have to use a jack and be able to drain it completly.
Last edited by bsteimel; 10-09-2006 at 04:13 PM.


 05-19-2007, 10:32 PM
#16
Argh I dunno how to say it. its one of the bolt on the driver side, it looks just like regular bolt. but once u loose it, everything will come out of the engine.
but I dont think its needed tho. Just flush it a few times with distilled water, or regular 50/50 coolant with stuff like Prestone Super Flush and it will be fine
I just changed my Radiator to a bigger one (KOYO) a few days ago(read my DIY), drain it, remove old rad, install new rad, fill it up, about 120 miles of driving, drain it, fill it up again. be happy.
 09-19-2007, 12:30 AM
#18
Administrator
iTrader: (7)

gotta do this next week.
I never see negative temps out here in SoCal. 60/40???
I never see negative temps out here in SoCal. 60/40???
09-19-2007, 02:41 AM
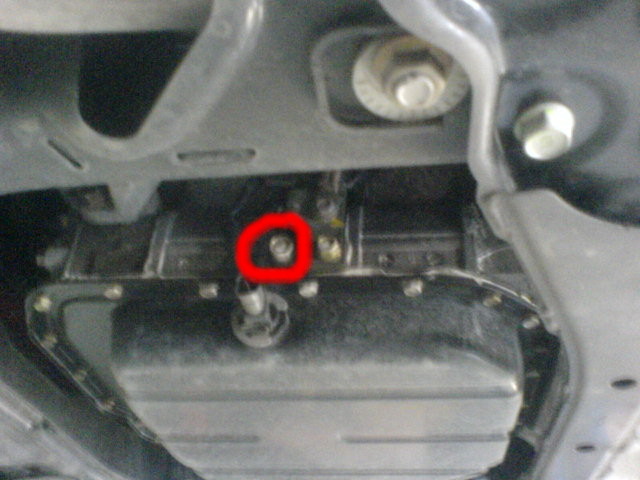
#19

The engine block coolant drain plug location pics are in this thread:
Coolant Change HELP - RX8Club.com
.
Coolant Change HELP - RX8Club.com
.
Last edited by TeamRX8; 05-13-2013 at 08:32 AM.
 09-19-2007, 09:47 AM
#22

