Hello....and I may have just completely screwed up my RX8
 11-22-2013, 10:44 PM
#1
New Member
Thread Starter

Join Date: Nov 2013
Location: Virginia
Posts: 7
Likes: 0
Received 0 Likes
on
0 Posts
Hello....and I may have just completely screwed up my RX8
Let me first start off by introducing myself....my name is Maggie. I love your forum it has been a wealth of information for me and I'm constantly learning new things.
However, I think I may have completely screwed up my 04 RX8. To make a very, very, VERY, long story short, I'd been having some problems with it starting, etc. Took it and got it scanned and it indicated a problem with the Crank Shaft Position Sensor. Prior to getting it scanned I had flooded it really bad and compounded the problem by doing all the wrong things I shouldn't have done. That was before I found your wonderful Forum. So I changed out the spark plugs, the old ones were pretty fouled up. But since I was still having the flashing CEL, I took it to get it scanned and that's when it indicated the CSPS problem and also misfire.
The guy at the Parts Store was really helpful and suggested I try cleaning it before replacing it and see if that helped. Now all I did was unbolt it and wipe it down, I never totally disconnected it. Unfortunately that did NOT help. So I went ahead and ordered the new CSPS.
Today I spent all day trying my best to disconnect that stupid thing that had to have been designed by an evil engineer that would never be required to perform maintenance. While I was trying one of the suggestions on here to use two screwdrivers, one to depress the tab while using the other to dislodge the sensor it came apart. By this time it was dark and I was so thrilled when finally it came loose!!! That was of course until I realized I had not just disconnected the sensor, but I had pulled the bloody wires right out of it. I KNEW I WAS IN TROUBLE THEN.......
So all I can say at this point is.......HELP!!!!!! I'm so hoping I didn't totally screw this up and have to spend lots of $$$ to fix it now. Any assistance is greatly appreciated.
However, I think I may have completely screwed up my 04 RX8. To make a very, very, VERY, long story short, I'd been having some problems with it starting, etc. Took it and got it scanned and it indicated a problem with the Crank Shaft Position Sensor. Prior to getting it scanned I had flooded it really bad and compounded the problem by doing all the wrong things I shouldn't have done. That was before I found your wonderful Forum. So I changed out the spark plugs, the old ones were pretty fouled up. But since I was still having the flashing CEL, I took it to get it scanned and that's when it indicated the CSPS problem and also misfire.
The guy at the Parts Store was really helpful and suggested I try cleaning it before replacing it and see if that helped. Now all I did was unbolt it and wipe it down, I never totally disconnected it. Unfortunately that did NOT help. So I went ahead and ordered the new CSPS.
Today I spent all day trying my best to disconnect that stupid thing that had to have been designed by an evil engineer that would never be required to perform maintenance. While I was trying one of the suggestions on here to use two screwdrivers, one to depress the tab while using the other to dislodge the sensor it came apart. By this time it was dark and I was so thrilled when finally it came loose!!! That was of course until I realized I had not just disconnected the sensor, but I had pulled the bloody wires right out of it. I KNEW I WAS IN TROUBLE THEN.......
So all I can say at this point is.......HELP!!!!!!
I'm so hoping I didn't totally screw this up and have to spend lots of $$$ to fix it now. Any assistance is greatly appreciated.
Last edited by RX8LuvHate; 11-22-2013 at 10:47 PM.

 11-22-2013, 11:18 PM
#3
New Member
Thread Starter
Join Date: Nov 2013
Location: Virginia
Posts: 7
Likes: 0
Received 0 Likes
on
0 Posts
I just can't believe I did this and I've searched to see if anybody other than me has ever done such a brilliant thing and if there's a fix already out there for it, but I haven't found anything yet. Guess I'm the only idiot to pull the whole freakin thing off from the wires.
 11-23-2013, 01:13 AM
#5
Administrator

welcome. sorry for your trouble. just to be precise- in this car its called the eccentric shaft position sensor or e-shaft sensor for short.
one thing to note for the future is that it's possible for the sensor to "out of sync" causing the misfire and cel without being broken and needing replaced. you can reset the eshaft sensor by doing the 20 brake stromp procedure
- turn the key to "on" without starting the car
- as quick as possible stomp the brake over and over at least 20 times. like its a race to see who can do 20 the fastest
- keep an eye on the oil pressure gauge, when it does a full sweep from left to right you have done enough stomps
- turn the key to off
the "memory" of the sensor "profile" has now been erased from the computer. it will learn the correct profile as the engine turns on the next start.
this will also reset your fuel trims so your car will run differently until those are reacquired
11-23-2013, 01:17 AM
#6
Administrator
for anyone finding this thread in the future the eshaft reset procedure for a 09-02011 rx-8 is different
disconnect negative battery cable/terminal.
press brake fully once
reconnect battery
reset your dsc
disconnect negative battery cable/terminal.
press brake fully once
reconnect battery
reset your dsc
11-23-2013, 10:39 AM
#7
New Member
Thread Starter
Join Date: Nov 2013
Location: Virginia
Posts: 7
Likes: 0
Received 0 Likes
on
0 Posts
Hmmm, I know it was dark. May be when there's more light tomorrow, could you take a picture of the damage?
welcome. sorry for your trouble. just to be precise- in this car its called the eccentric shaft position sensor or e-shaft sensor for short.
one thing to note for the future is that it's possible for the sensor to "out of sync" causing the misfire and cel without being broken and needing replaced. you can reset the eshaft sensor by doing the 20 brake stromp procedure
- turn the key to "on" without starting the car
- as quick as possible stomp the brake over and over at least 20 times. like its a race to see who can do 20 the fastest
- keep an eye on the oil pressure gauge, when it does a full sweep from left to right you have done enough stomps
- turn the key to off
the "memory" of the sensor "profile" has now been erased from the computer. it will learn the correct profile as the engine turns on the next start.
this will also reset your fuel trims so your car will run differently until those are reacquired
one thing to note for the future is that it's possible for the sensor to "out of sync" causing the misfire and cel without being broken and needing replaced. you can reset the eshaft sensor by doing the 20 brake stromp procedure
- turn the key to "on" without starting the car
- as quick as possible stomp the brake over and over at least 20 times. like its a race to see who can do 20 the fastest
- keep an eye on the oil pressure gauge, when it does a full sweep from left to right you have done enough stomps
- turn the key to off
the "memory" of the sensor "profile" has now been erased from the computer. it will learn the correct profile as the engine turns on the next start.
this will also reset your fuel trims so your car will run differently until those are reacquired
I am so hoping that when I post the pic the response I get is "Oh no worries Maggie, that's easy to fix", but somehow I have this knack for getting into these messes.
I'll go out now and get a pic of what I did and hopefully it'll help with recommendations on a fix. Thanks again.
11-24-2013, 02:00 AM
#8
New Member
Thread Starter
Join Date: Nov 2013
Location: Virginia
Posts: 7
Likes: 0
Received 0 Likes
on
0 Posts
Okay so here's a pic (sorry kind of blurry) I took showing the wires that came out of the connector or pigtail of the Eccentric Shaft Position Sensor. I spent most of the day trying to get them back into the holes in the connector without any success. I spoke with the Parts Guy at Advanced Auto who has been a great deal of help and he said more than likely I'd have to order the end piece (connector).
[IMG]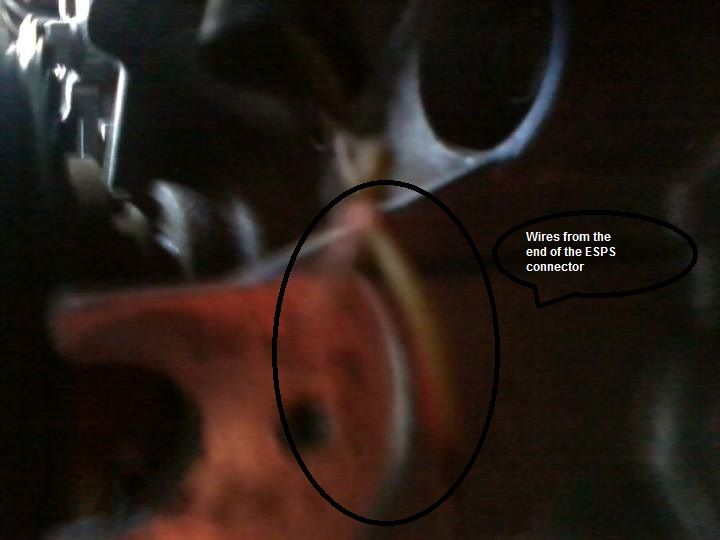 [/IMG]
[IMG]
 [/IMG]
11-24-2013, 02:00 PM
[/IMG]
11-24-2013, 02:00 PM
#9
Always Reading
iTrader: (1)

Join Date: Sep 2012
Location: Redmond, WA
Posts: 112
Likes: 0
Received 0 Likes
on
0 Posts
Not too hard to fix, you'll need the connector, the pins themselves, and the seal caps.
Compare this connector against what you tore off:
Home � Shop � Connectors / Harnesses � Connector by # of positions � 2 Way � 2 way SSC Sensor Connector, black
if it looks like a match, order the connector, plus the pins and seals under the "mating parts" section.
A little assembly required.
EDIT: Incorrect connector!
Last edited by tpb7463; 11-25-2013 at 01:09 PM.
11-24-2013, 08:03 PM
#10
New Member
Thread Starter
Join Date: Nov 2013
Location: Virginia
Posts: 7
Likes: 0
Received 0 Likes
on
0 Posts
Not too hard to fix, you'll need the connector, the pins themselves, and the seal caps.
Compare this connector against what you tore off:
Home � Shop � Connectors / Harnesses � Connector by # of positions � 2 Way � 2 way SSC Sensor Connector, black
if it looks like a match, order the connector, plus the pins and seals under the "mating parts" section.
A little assembly required.
Compare this connector against what you tore off:
Home � Shop � Connectors / Harnesses � Connector by # of positions � 2 Way � 2 way SSC Sensor Connector, black
if it looks like a match, order the connector, plus the pins and seals under the "mating parts" section.
A little assembly required.


 11-25-2013, 01:00 PM
#11
05 RX8 Sold///05 Evo VIII
iTrader: (5)
Join Date: Feb 2009
Location: New Berlin, WI
Posts: 457
Likes: 0
Received 0 Likes
on
0 Posts
On the end that plugs into the sensor there are locking tabs that need to be removed. Once you disengage the locking tabs the copper pins have to be pushed out.
I recommend taking it to a professional to get this done since they can be quite a PITA and if you ruin the connector body you'll be looking at a new wiring harness unless you can source a new connector.
Unless you can successfully tackle this by removing the pins and resoldering them to the appropriate wire and installing the correct connector receptacle.
Small dental picks will greatly aid in this procedure.
View my posts for making a PnP connector. That'll help you understand what I'm talking about.
https://www.rx8club.com/series-i-aft...2/#post4400194
Last edited by viprez586; 11-25-2013 at 01:15 PM.
11-25-2013, 01:08 PM
#12
Always Reading
iTrader: (1)
Join Date: Sep 2012
Location: Redmond, WA
Posts: 112
Likes: 0
Received 0 Likes
on
0 Posts
Sorry about that, that connector is obviously not the right one.
Here we go (second one from the top):
SMSL
There are two gauge sizes available--read off the size on the wire before ordering. Or, use a wire gauge to determine the size.
Here we go (second one from the top):
SMSL
There are two gauge sizes available--read off the size on the wire before ordering. Or, use a wire gauge to determine the size.
Last edited by tpb7463; 11-25-2013 at 01:18 PM.
11-25-2013, 01:37 PM
#13
05 RX8 Sold///05 Evo VIII
iTrader: (5)
Join Date: Feb 2009
Location: New Berlin, WI
Posts: 457
Likes: 0
Received 0 Likes
on
0 Posts
Sorry about that, that connector is obviously not the right one.
Here we go (second one from the top):
SMSL
There are two gauge sizes available--read off the size on the wire before ordering. Or, use a wire gauge to determine the size.
Here we go (second one from the top):
SMSL
There are two gauge sizes available--read off the size on the wire before ordering. Or, use a wire gauge to determine the size.
They might have something not listed on they're site from http://www.spoolinup.com
This guy is super cool and shipped fast!
11-25-2013, 03:49 PM
#14
New Member
Thread Starter
Join Date: Nov 2013
Location: Virginia
Posts: 7
Likes: 0
Received 0 Likes
on
0 Posts
Thank you tpb and viprez very much for all your help. If I'm not mistaken and I've read this correctly, I believe the wire is 14 gauge (AWG) based on searching this site and finding a similar thread where someone else needed the same pigtail connector I need.
https://www.rx8club.com/rx-8-parts-s...nector-242030/
I'm just curious, can I use the coolant sensor pigtail, if it's the same? Also am I understanding correctly that the wire sizes are the same for both the coolant pigtail connector and the ESS pigtail connector?
I was really hoping to get this fixed in time for Thanksgiving so I could drive it to go visit my daughter, but I don't see that happening with shipping time etc.
Thank you again for all your advice, its been a great help to me, and I greatly appreciate it!!!!
11-25-2013, 04:56 PM
#15
05 RX8 Sold///05 Evo VIII
iTrader: (5)
Join Date: Feb 2009
Location: New Berlin, WI
Posts: 457
Likes: 0
Received 0 Likes
on
0 Posts
Yeah, it looks like the same connector.
You could theoretically then cut the connector off the coolant resiviour sensor and splice that in to get your car running temporarily until you get a new connector for the coolant sensor. But now your hacking 4 wires instead of the 2.
Make sure you use heat-shrink butt connectors.
Crimp the wires, then pull on them gently to double check they're crimped good. Apply light heat to melt them to make them weatherproof.
Also put some dielectric grease on the pin side of the connector so next time the connector will easily slide on and off the sensor.
Like these GB Xtreme Butt Splice Terminals at Menards
Last edited by viprez586; 11-25-2013 at 04:58 PM.
11-26-2013, 04:35 PM
#16
New Member
Thread Starter
Join Date: Nov 2013
Location: Virginia
Posts: 7
Likes: 0
Received 0 Likes
on
0 Posts
Yeah, it looks like the same connector.
You could theoretically then cut the connector off the coolant resiviour sensor and splice that in to get your car running temporarily until you get a new connector for the coolant sensor. But now your hacking 4 wires instead of the 2.
Make sure you use heat-shrink butt connectors.
Crimp the wires, then pull on them gently to double check they're crimped good. Apply light heat to melt them to make them weatherproof.
Also put some dielectric grease on the pin side of the connector so next time the connector will easily slide on and off the sensor.
Like these GB Xtreme Butt Splice Terminals at Menards
Thank you so much for all your advice and help. Hope you have the best Thanksgiving celebration ever!! I know I'm definitely thankful for the help I've gotten from this forum.


Thread
Thread Starter
Forum
Replies
Last Post
akagc
RX-8's For Sale/Wanted
7
08-11-2015 07:07 PM