Question regarding a Post replace Clutch Kit.
 11-10-2014, 10:56 PM
#1
Registered
Thread Starter

Join Date: Oct 2014
Posts: 38
Likes: 0
Received 0 Likes
on
0 Posts
Question regarding a Post replace Clutch Kit.
So I recently got my (2004 rx8 6sMT) Clutch kit replaced, because the Bearing was going out. When the vehicle came back into my care i noticed (and have read that) the shifter was lower.(caused by the bolting of the "tension bracket"??) And the vehicle itself sounded different and shifting was more tense. Let me try to explain, When turning the car on the sound produced while neutral clutched pressed, depressed, and driving sounded completely more solid, More humm or the rotary than raspy ricer sound. As well as the shifting from gears was a little harder/Heavier, but with no problems. As i was told you can adjust the height of the shifter by lifting the transmission and adjusting the bolts underneath. Now the question is... Does this affect the car in anyway having it lower or higher in terms of mechanically? I had them move the shifter back up this way, and the "Purity in sound" diminished, shifting felt easier on the stick(by amount of force to move it) Is there any suggestions or proven facts about any of this. I could really use any solid information from experience.
(Oh the amazing feeling of that new clutch kit, The smoothness it creates as I take my Beautiful rx8 around)
(Oh the amazing feeling of that new clutch kit, The smoothness it creates as I take my Beautiful rx8 around)
 11-11-2014, 02:06 AM
#2

It is important to properly align the powerplant frame...it hold the correct relationship between the transmission and the differential
If it wrong the driveline will be missaligned and could lead to more noise, vibrations or component failure
If it wrong the driveline will be missaligned and could lead to more noise, vibrations or component failure
11-11-2014, 08:11 AM
#3
Registered
Thread Starter
Join Date: Oct 2014
Posts: 38
Likes: 0
Received 0 Likes
on
0 Posts
So, how do i set it in the correct alignment?
ADD: how is it suppose to be done, and what is the effects and sound to know its done right?
ADD: how is it suppose to be done, and what is the effects and sound to know its done right?
Last edited by nemesistyx; 11-11-2014 at 08:16 AM.
11-11-2014, 09:51 AM
#5
Registered
iTrader: (2)

Join Date: Oct 2007
Location: Pacific Northwest
Posts: 16,684
Likes: 0
Received 252 Likes
on
110 Posts
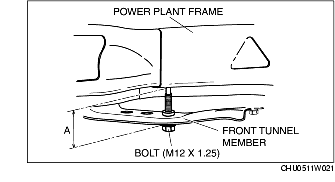
The spec is 1.8 to 2.2 inches from the removable brace to the bottom of the PPF at the transmission tail.
Basically, you can use a jack on the end of the PPF to raise or lower the transmission tail until it is at the distance needed, then torque the nuts down appropriately, which has a pretty big torque number (I don't recall the number off-hand). The torque is not so much holding the PPF and transmission together, but resisting the lateral pull created by the transmission tail sagging. If the nuts aren't torqued enough, they will slip laterally as the transmission and PPF sags back down.
I find that if the car is on jackstands (vs a lift), the scissor jack on some blocks of wood works best, since the PPF edge fits the jack's notch, and you can make easy small adjustments to the elevation of the jack to get it right.
11-11-2014, 09:55 AM
#6
Registered
iTrader: (2)
Join Date: Oct 2007
Location: Pacific Northwest
Posts: 16,684
Likes: 0
Received 252 Likes
on
110 Posts
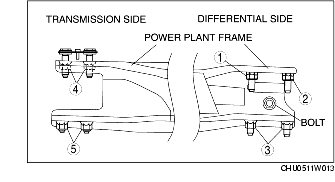
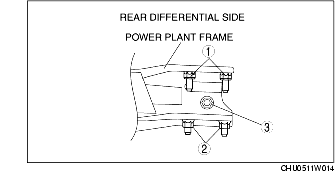
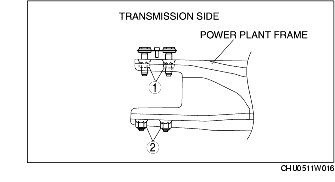
And if you didn't tighten the PPF bolts in the correct order, then you will need to loosen them all up and do that too. That will help pull everything into line. Start from the diff (if you removed the PPF completely), rear most bolts first, moving forward.
 11-11-2014, 10:30 AM
#8
Registered
Thread Starter
Join Date: Oct 2014
Posts: 38
Likes: 0
Received 0 Likes
on
0 Posts
Wow RIWWP to the rescure with more info =D. Such a helpful person. Any Diagrams or manuals for this?
So the mech did that clutch kit replacement, RIWWP. They found the release bearing to be worn and a problem to get out. Clutch/plate/flywheel all had burns on them, Minor but there. Clutch was a bit dusty/fuzzy. But in regards to this post they put it all back together and the PPF was sitting so low that i couldnt shift without moving my fingers up off the shifter.
So when it comes to the checking of this ___ The back should be tightened/put on first and lined up straight... Using the jack to get the measurement for the front bolts to sit it in place.
If i missed anything let me know ( 1.3 - 2.2 Inch from the removable brace ) <-- I do not know exactly what you mean by this. Basically the Front end of the PPF, and the Fall off point of the Tail end of the transmission right where the bolts are? Possible for some quick Paint (prog) pointers haha
11-11-2014, 10:36 AM
#9
Registered
iTrader: (2)
Join Date: Oct 2007
Location: Pacific Northwest
Posts: 16,684
Likes: 0
Received 252 Likes
on
110 Posts
This will help you: M A Z D A
TRANSMISSION/TRANSAXLE -> MANUAL TRANSMISSION[Y16M-D] -> TRANSMISSION REMOVAL/INSTALLATION [Y16M-D]
At the bottom of the document it has the bolt tightening order as well as a diagram of the measurement from the brace to the transmission.
The measurement to the brace, it's the brace that sits right under the transmission tail, you remove it to remove the PPF and driveshaft, so you have to reinstall it for this step.
Initial installation order WITHOUT torquing
Then for torquing:
Then
TRANSMISSION/TRANSAXLE -> MANUAL TRANSMISSION[Y16M-D] -> TRANSMISSION REMOVAL/INSTALLATION [Y16M-D]
At the bottom of the document it has the bolt tightening order as well as a diagram of the measurement from the brace to the transmission.
The measurement to the brace, it's the brace that sits right under the transmission tail, you remove it to remove the PPF and driveshaft, so you have to reinstall it for this step.
Initial installation order WITHOUT torquing
Then for torquing:
Bolt, nut number
Tightening torque
1, 2
126.0-154.0
{12.9-15.7, 93.0-113}
3
74.5-93.2
{7.60-9.50, 55.0-68.7}
Tightening torque
1, 2
126.0-154.0
{12.9-15.7, 93.0-113}
3
74.5-93.2
{7.60-9.50, 55.0-68.7}
Tightening torque
126.0-154.0 N�m
{12.9-15.7 kgf�m, 93.0-113 ft�lbf}
126.0-154.0 N�m
{12.9-15.7 kgf�m, 93.0-113 ft�lbf}
Last edited by RIWWP; 11-11-2014 at 10:40 AM.
11-11-2014, 10:57 AM
#11
FULLY SEMI AUTOMATIC
iTrader: (9)

awwwww 8club bromance. how cute and just in time for your divorce pearl lol

Thread
Thread Starter
Forum
Replies
Last Post