When you click on links to various merchants on this site and make a purchase, this can result in this site earning a commission. Affiliate programs and affiliations include, but are not limited to, the eBay Partner Network.
Finally received the custom manifold turbo flanges. This T4 is for the REW manifold. The reason for the radius machining on the edges won’t seem obvious on why it was done as such until the manifold itself is revealed, but it mostly has to do with how short the piping is from the exhaust port discharge to turbine housing entry. Still proceeding in slower baby steps than I had originally envisioned, but that’s the current reality for the time being …
For the Renesis manifold design something similar was done on a divided T3 flange, but serving a different purpose though for a similar reason; keeping the manifold as short/compact as possible for turbo fitment in the centered low-mount position.
That happened with the fuse about 2-3 years back. Car wouldn't start, seemed to not have power, so I checked the fuses and they looked fine.
So I started probing the 12 volt from the battery to the front, and found I wasn't getting continuity through one of the fuses. I replaced it with another cheap fuse and it worked. I believe I even put that extra fuse in there in case it happened again, which it obviously did to you.
I never liked that entire fuse setup but never found a better solution that didn't involve a lot of work....
The lil� engine that shouldn�t still be running fired right off for the first time in over 5 months (since it was last run on the dyno). Got it warmed up, out of the trailer, and situated in the garage without any drama at all. Which is a relief considering the first several months of ownership 😂. Praying for most of that situation to be behind me now.
Oh man!
Well good thing I have that in spades when it comes to builds. Especially when work gets in the way. I have the wackiest of work arrangements so my projects get put way behind every time. Then pile on having several other hobbies and more than one car project. Helps with my lack of attention. Just move to another one. Lol
Still a very cool project.
Managed to find some time to get the BW S369SX-E turbo off to verify fitment for the BW S262SX-E Hybrid turbo. A direct fit on the exhaust side. Compressor inlet and discharge sizes are different, but it’s just changing the air filter on the inlet and silicone coupler on the discharge. Otherwise it will all bolt in without having to do any fabrication rework. Pretty stoked on it being that simple, but it’s only temporary until the low mount manifold is built. Which I was verifying measurements and such for it too, and a direct compact fitment down there appears to be very doable.
In theory the hybrid turbo should be good for around 525 whp maximum, but with really good spool-up. The goal is 475-ish, mostly for traction management purposes. One thing is for sure though; the battleship exhaust system on this car has got to go. The downpipe with resonator must weigh 40 - 50 lbs, holy smokes .
.
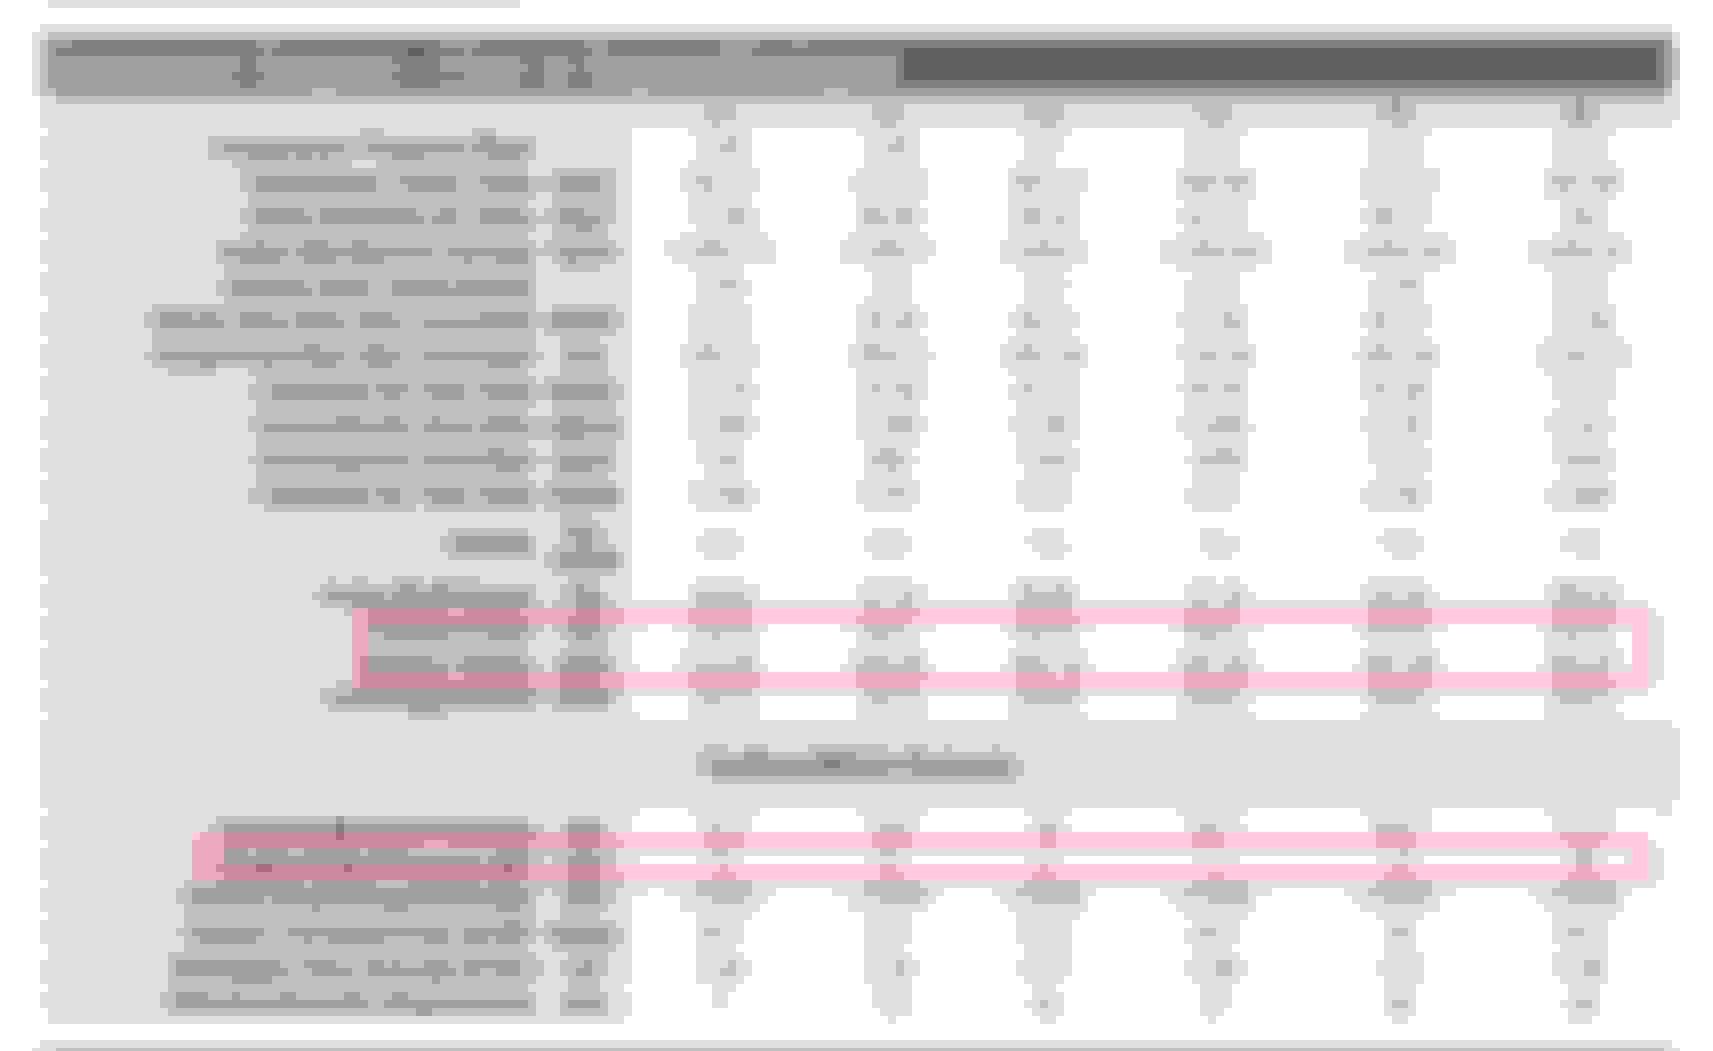
not real big on Matchbot projections i.e. GIGO, but if the hybrid turbo torque curve is anywhere near as flat as is being estimated I’d be ecstatic to say the least. This is based on the S362SX-E compressor wheel map projected against the S257SX-E turbine wheel map for the hybrid combination with 24 psig boost from start to finish.
Point 1 is 3,300 rpm and Point 6 is 7,900 rpm; 4600 rpm power band width. Which would be all I could ever hope and pray for to say the least. Some EMAP indicated on the very top end as would be expected, but within an acceptable limit for full E85 fuel. SCCA rules don’t allow alcohol injection for competition use, but not really expecting it to be an issue.
made some more progress, but minor and slow going due to reworking and addressing various items as considered appropriate for my standards
tapped and cleaned the turbo flange mounting threads and installed a proper ARP stainless stud with 12 pt nut kit, getting what was on there to come off was a bit of a headache, I�m also not shy about lathering every bolt and stud thread in nickel antiseize, including every one on the turbo assembly as well. It just makes everything easier and less hassle later. It�s a pay me now or a lot more later scenario I�m all too familiar with.
fitted the turbo along with new compressor discharge silicone coupler; was a bit more work to align than anticipated, but some adjustment to the other connections and piping between it and the IC got it there. A minor setback is the turbine housing supplier did an absolutely pathetic attempt of porting the dual T3 ports out to the T4 dual port size. So I�ll need to spend an hour or two getting that reworked properly to ensure efficient exhaust gas flow into the new turbo.
Working on repositioning the EPS controller from in front of the turbo inlet air filter off to the side on the forward right fender well where the factory pcm box originally was located. This allowed me to fit a much larger/longer AEM dryflow air filter and sock to the turbo inlet and also potentially allow some more cool intake air reach it. The K&N filter that was on the other turbo was too small imo and was a bit restrictive and hampering the performance some. The new filter has at least 2x more flow area. i may hold up securing the EPS controller permanently until after doing the low-mount turbo manifold because all the area where the current forward-mount turbo is positioned will be wide open.
More or less need to configure the oil supply and drain connections. These are straightforward direct fitment, but I want to rework the turbo oil supply piping to position the pressure gauge/flow restrictor further away from it. The original close proximity to the turbine is overheating the pressure gauge. It was in bad shape when received so I replaced both it the FP regulator gauges, but now the oil gauge is showing a recurring problem and needs to be addressed.
Have an ongoing nuisance engine oil leak on the upper rear LH side of the engine at the oil pressure switch/sender. I have no tolerance for oil leaks and as hard as it is to access it, this is going to get fixed one way or another. Looks like the oil pan may need to be pulled and resealed too, but will assess it further after the other one is fixed first.
Also noticed that the AC compressor is installed despite not being functional. So am going to jettison that chunk of weight to free up more engine bay space and simplify things getting rid of the pulley/belt system too.
Also on the list is relocating the IGN-1A ignition from the front of the engine over to the subframe/chassis directly across from where the spark plugs are. Which dumping the AC compressor will allow more airflow into that side of the engine as well. More importantly, it will allow much shorter, direct plug wires rather than them snaking around from the front and also reduce exposure of the rest of the engine wiring system to the high lead tension electromagnetic interference of them. I often feel like this is overlooked by many people and the energy output of the IGN-1A coils shouldn�t be underestimated. The shorter and more direct the high tension leads are the better.
Have an ongoing nuisance engine oil leak on the upper rear LH side of the engine at the oil pressure switch/sender. I have no tolerance for oil leaks and as hard as it is to access it, this is going to get fixed one way or another. Looks like the oil pan may need to be pulled and resealed too, but will assess it further after the other one is fixed first.
Let me give you younger men some good advice; going top shelf often isn�t necessary, but it *never* pays to be too cheap �
not sure if I�m going to just screw the factory oil pressure sensor back in by itself with some proper thread sealer and call it a day or go buy a braided hose with the appropriate fittings to set it up with both the factory and gauge oil pressure sensors mounted remotely.
With the Adaptronic Select ECU piggybacked onto the Mazda pcm the factory sensor is required for the engine to run. However, one way around that would be to spoof the signal for the OE sensor to always read good and then use the gauge sensor. Think I�d rather stay with the OE sensor as intended and have it go into limp mode if the oil pressure goes off though. It will be safer this way until swapping in the standalone ecu with a proper engine safety protocol.
Yeah, I think that needs just a bit more massaging; you want it right, do it yourself �
Decided to put the Mazda oil pressure sensor back where it belongs for the time being.
Because I received notice that the Adaptronic Modular ecu just shipped out to me. Once I replace the Select and piggybacked Mazda ecus with it the OE oil pressure sensor can then be swapped out with the real oil pressure sensor for direct input into Modular ecu and dash display gauge.
Side note; paid $4.07/Gallon for E85 fuel the other day = sad panda
.
Correct me if I'm wrong; but is the threads into the REW block for the oil pressure sender 1/8" BSPT rather than NPT? Meaning a thread adapter is needed to use the RX8 pressure sender which is 1/8 NPT or am I out to lunch?
Last edited by RotaryMachineRx; 05-25-2022 at 02:54 PM.
I was thinking that all Mazda are 1/8” BSPT, including the Renesis?
Been having other things keeping me from getting back to it. Helping other people fix their vehicles, obligations for graduation parties and so on. Was looking forward to the upcoming 3-day Labor holiday weekend to hopefully finish up.
After looking at is some more am sending that turbine housing with the crap porting job back for a refund and grinding out the unported one they sent me instead. One issue is that my HF generator isn’t starting despite having had sufficient additive in the gas. It will kick on for a few seconds using starter fluid, but then die. So the carb seems to be gunked up internally. I need it to run my air compressor for the air die grinder. Otherwise I’ll need to go buy an electric die grinder and use my smaller generator instead. The shop I’m working in only has lights and no outlets, but fortunately does has climate control.
Pretty much have everything else needed to get it all back together once I get the turbine housing port matched to the T4 port exhaust manifold though.
edit: did some searching, pretty confident it’s 1/8” BSPT threads. Was pretty sure that junk brass adapter with oil sensors I posted a pic of was a BSPT type; a dime a dozen on Amazon’s crap chinese junk network.
.
I was thinking that all Mazda are 1/8” BSPT, including the Renesis?
edit: did some searching, pretty confident it’s 1/8” BSPT threads. Was pretty sure that junk brass adapter with oil sensors I posted a pic of was a BSPT type; a dime a dozen on Amazon’s crap chinese junk network.
.
You are wrong, I believe I got that BSP to NPT t-fitting was purchased on the Ebay crap chinese junk network.
Its so hard to work on that area with the engine in so I left it for the next time the engine was out. Didn't expect the motor to stay in as long as it did.
You are wrong, I believe I got that BSP to NPT t-fitting was purchased on the Ebay crap chinese junk network.
Its so hard to work on that area with the engine in so I left it for the next time the engine was out. Didn't expect the motor to stay in as long as it did.
It�s the same network for both
It really wasn�t that hard, but did take some persistence and determination.
.
I�m not sure why you would say that; they should all be 1/8� BSPT, the sensor and the threaded port in the rear iron.
Pretty sure the same thing applies for the coolant temp sensor; all are BSPT, just a larger size than the oil pressure sensor. .
Interesting, someone was trying to tell me that my Rx8 Sender being threaded into the REW block were an incorrect thread match (being told the Rx8 sender is NPT). Trying to find more info on this but it's not as simple to find as one might think lol.
Nope For the life of me my google skills must have been off when I was looking into this lol. Thanks Team, not sure why I was struggling to find this direct answer at the time.
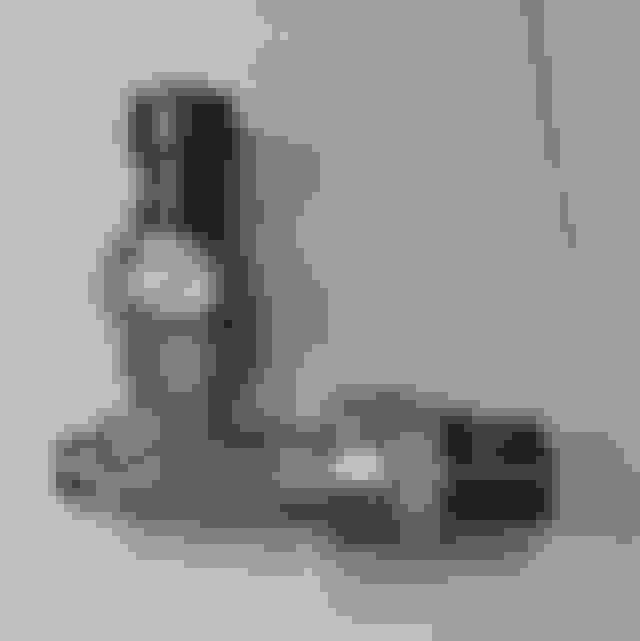
Sparing the excuses, wasn�t able to get out to the shop and verify this yet. However, based on the standard adapter configuration compared to the previous picture of what the former owner installed on the REW engine; which has the OE oil pressure sensor on the end position and an aftermarket oil pressure gauge sensor on the T position, along with many forum posts, I�m concluding that the Renesis oil pressure sensor is a BSP thread.
It doesn�t make sense for Mazda to have changed it since my understanding is that the BSP fitting matches the Japanese pipe thread standard.
I would agree, my Rx8 dash sender is threaded right into it and I'm not having any sort of leaks, so I'm thinking I was just the victim of a bit of misinformation.
 04-06-2022, 10:54 PM


 .
.


 For the life of me my google skills must have been off when I was looking into this lol. Thanks Team, not sure why I was struggling to find this direct answer at the time.