New Sub and Amp Setup.....NICE
 04-12-2004, 07:22 PM
#26
Stuck in a love triangle

Im still usingthis disgusting setup sinceIm so lazy.
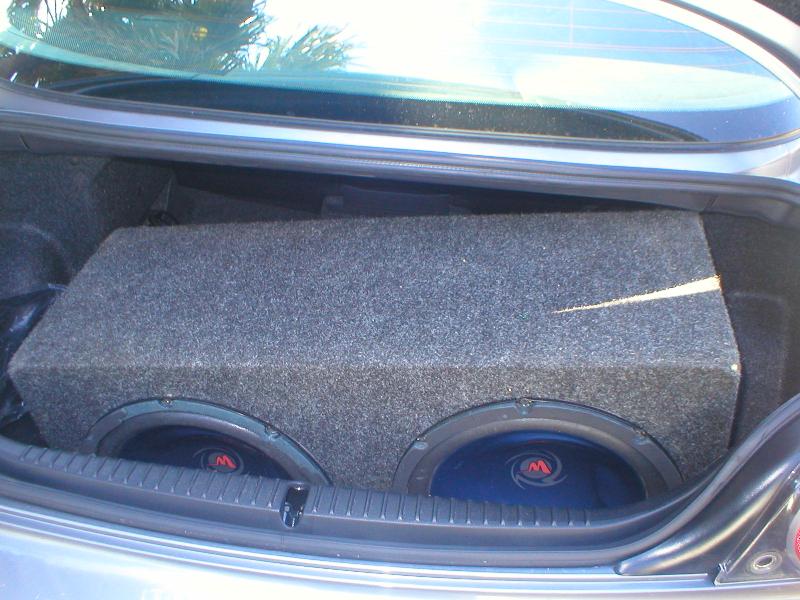
Ugly as hell I know--but the bass experience is still incredible. I think its time for me to switch to something nice and clean like yours eventhough I still havent needed to use any trunk space of my car to this day. I just dont think Icould find something smaller than what I have that couldhit as hard as those two 12s Ive got there inthat angle.
Ugly as hell I know--but the bass experience is still incredible. I think its time for me to switch to something nice and clean like yours eventhough I still havent needed to use any trunk space of my car to this day. I just dont think Icould find something smaller than what I have that couldhit as hard as those two 12s Ive got there inthat angle.


 04-13-2004, 06:12 AM
#31
FREE ADVICE!

I recently installed a single 10" subwoofer in the trunk, pointing straight up. I built a sealed speaker box out of �" MDF board in accordance with the specs accompanying the Kicker speaker. Also installed a 200 watt Orion amp in the trunk.
Although it's not as powerful as some setups I have seen, it does a fine job of boosting the power of the base stereo system (notice I didn't say BOSE....LOL).
The music is clear and PLENTY powerful. Ask my neighbors! :D
PLETHERA....I ran the power cable through a rubber boot already feeding a wire harness through the firewall about 6" above the foot rest. It wasn't TOO difficult...started a hole with an awl, then carefull pushed a clotheshanger wire with a loop, through the rubber boot, then pulled the power cable back through. Then routed it high up in the dash, securing it to other cable harnesses with cable ties. From there, I routed it under the center console (had to remove it), through the back opening into the trunk, and under the trunk carpet to an opening I created to the amp.
IN accordance with tech recommendations from the place I bought the equipment, I hooked the amp up *directly to the wires feeding the back two stock 6" speakers. Originally, I had removed the CD player to connect an REM wire to the back, but discovered there was NO REM connector on the factory installed stock system. The CD player was the biggest PAIN IN THE *** of the whole operation. It took me a solid 3 hours to get that damn thing out! I wound up connecting the REM wire to a switched terminal the fuse box, meaning it only has power when the ignition is turned on. The REM wire tells the amp to power up, since the power cable is a direct lead from the battery.
It would have been much easier with help, but I had a day off and my girls were in school or at work, so I went solo.
Hope this helps...
*Most aftermarket receivers provide preamp output from RCA jacks. In this case, an RCA patch cable carries the signal from the receiver to the amp. If your receiver does not have preamp outputs, many amplifiers feature speaker-level inputs, which have built-in converters which step the speaker-level signal down to a preamp-level signal acceptable to the amp.
You can access the speaker-level signal by stripping a small section of your vehicle's right and left speaker wires, and splicing in wires that lead to your amp, via the converter.
Last edited by Razpewton; 04-13-2004 at 07:01 AM.
 04-13-2004, 09:59 AM
#33
Registered
Thread Starter

Join Date: Mar 2004
Location: Jacksonville, FL
Posts: 714
Likes: 0
Received 0 Likes
on
0 Posts
It could be better, but I wasn't going to win competitions just wanted a little more thump than the Music hall that the Bose system provides. This set up leaves the room I wanted and adds the thumb I had to have!
 04-13-2004, 10:19 AM
#35
Registered User

Join Date: Mar 2004
Location: Houston, TX
Posts: 146
Likes: 0
Received 0 Likes
on
0 Posts
Hey Grim, any DIY tips on making that cover for your amp? I have all the tools but am handyman challenged when it comes to that sort of thing. Maybe some measurements and close up pics. Where do you get that carpet stuff that inside a trunk anyways? One more.... where do your 5" neons get their power at? Thanks for helping out the handicapped.
04-13-2004, 10:35 AM
#38
Humpin legs and takin nam

Join Date: Nov 2003
Location: Clearwater, Fl
Posts: 2,433
Likes: 0
Received 0 Likes
on
0 Posts
I've had mine done for a while, i got lazy and used a large sheet of plywood to cover the hole. I could have fabricated something better but like i said, im lazy 
Originally posted by TracerRX-8
Poor Grim.... He's like, "Damn dudes! I was just showing you all my set-up now you all want me to come to your houses and set up yours!" LOL
Poor Grim.... He's like, "Damn dudes! I was just showing you all my set-up now you all want me to come to your houses and set up yours!" LOL
04-13-2004, 01:36 PM
#39
Registered
Thread Starter
Join Date: Mar 2004
Location: Jacksonville, FL
Posts: 714
Likes: 0
Received 0 Likes
on
0 Posts
No measurements because I had a shop help me, That is where you can get the plexi and carpet from, the amp is "floating" inside the hole, the cover is not resting on it. The cover is a seperate piece of mdf with a piece of plexi inserted into it and is mounted to the sides of the hole. The rack is a seperate piece with a mirror attached to the bottom and then the neons mounted to the wood part of the rack, the neons get power when the amp turns on so they are always on. They draw very little current so that wasn't a problem. The wood part of the amp rack is towards the middle of the amp to have it appear to float. That was the idea I wanted to portray. The boxes are made smaller than spec obviously which losses some sound because of that. But like I said not trying to win competitions.
As far as a DYI for the cover, cut a piece of MDF the exact size of the whole. then cut out the size of plexi you want. Cut a hole in the MDF a little smaller than the size of the plexi. Router out a slot in the MDF to allow the plexi to slide into this way it is all one piece. then carpet the MDF. Get some L brackets and attach them to the MDF and then to the car.
Hope this helps.


Thread
Thread Starter
Forum
Replies
Last Post
Learners_Permit
Series I Interior, Audio, and Electronics
8
09-27-2015 07:38 PM
AMOC
SE RX-8 Forum
1
09-09-2015 05:14 AM