Winning Blue Mazdaspeed Kit and Full Radio Replacement
 11-26-2006, 04:49 PM
#1
Registered
Thread Starter
Join Date: Mar 2004
Location: Jacksonville, FL
Posts: 714
Likes: 0
Received 0 Likes
on
0 Posts
Winning Blue Mazdaspeed Kit and Full Radio Replacement
Well after 5 weeks of waiting for all the damage done by the tire I collided with and then dealing with everything electronic getting stolen. I have finally gotten my car back with almost everything complete.
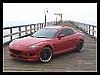
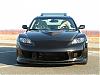
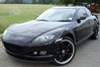
First I had the front and rear bumper replaced from the tire damage with new Mazdaspeed front and rear. Had to order the sides seperately, so I put those on this weekend. Not too bad of a job, took about 3 hours.
Next, since everything was stolen I decided to do a completely new system and take the plunge replacing the headunit with a double din Alpine IVA-W200. I relocated the stock radio to the trunk to allow easy access for time setting and in case the radio was to come on for some reason. All the wires were extended 4 feet into the glove box (about 40 total wires, 4 harnesses). All wires were soddered as well.
I also ordered the Alpine Bluetooth adapter, TV Tuner and iPod Adapter. All of these integrate very well with the headunit! You will see in the pictures below the microphone, TV Antenna and iPod.
I also decided to go with the reverse camera mounted in the third brake light. I bought the same one flyboyindy and Rotary Rasp suggested. Still waiting on getting this working to get a picture of the view.
For the Sub and Amp I went with the Boston Acustics G2 10" and GT22 Amp.
Still in progress:
Finish painting the dash piece the same piano black as the stock piece (will be finished tomorrow).
Add custom Plexiglass piece in front of the Sub and Amp with LED tubes to illuminate the trunk with the lid is open.
Build custom iPod holder to either be placed in the center console where the iPod currently is, or in the glove box next to the radio.
Carpet the inside of the glove box to hide the stock radio.
Connect reverse camera to headunit (still working on this)
Hoping to have all of this completed this week!! Here are some before and after pictures.
These are BEFORE:


 11-26-2006, 09:13 PM
#7
T-29 years and counting
iTrader: (3)
Join Date: Apr 2005
Location: North Fontana, CA.
Posts: 3,062
Likes: 0
Received 0 Likes
on
0 Posts
i like the location of the back up camera, never seen it there does the break light still work? does the picture get effected by the light? cant wait to see the finished head unit. do you have any pictures of the location of the after market location? Congradulations on the much much sweater ride!
11-27-2006, 08:56 AM
#11
Registered
Thread Starter
Join Date: Mar 2004
Location: Jacksonville, FL
Posts: 714
Likes: 0
Received 0 Likes
on
0 Posts
The brake light will not work any longer, unless i work on a way to have a different type of light put there to help light the area for the camera in low lighting. The camera is a night and day camera so hopefully there will be no need for extra light. The camera is not hooked up yet due to some power issues I couldn't figure out, so the audio shop will be finishing the installation when they put in the finished dash piece.
I can take some closer pictures of the headunit if thats what you are asking for, let me know what you want a picture of.
I can take some closer pictures of the headunit if thats what you are asking for, let me know what you want a picture of.
Originally Posted by lesper4
i like the location of the back up camera, never seen it there does the break light still work? does the picture get effected by the light? cant wait to see the finished head unit. do you have any pictures of the location of the after market location? Congradulations on the much much sweater ride!
11-27-2006, 08:57 AM
#12
Registered
Thread Starter
Join Date: Mar 2004
Location: Jacksonville, FL
Posts: 714
Likes: 0
Received 0 Likes
on
0 Posts
Sure PM me any questions and I will beb glad to help!
Originally Posted by scremn8
when you get this done send me all your info. i might want to do the same thing.. 
12-08-2006, 12:31 PM
#14
It's just a flesh wound!
Join Date: Mar 2006
Location: Jackson, Mississippi
Posts: 82
Likes: 0
Received 0 Likes
on
0 Posts
Thanks!
James,
Just seeing this. Thanks for the kind words. You were great to work with. I'm sorry things didn't work out as well, but that's not your fault at all. I'm really happy for you. Hope things are still going well.
Happy Holidays!
Michael
Just seeing this. Thanks for the kind words. You were great to work with. I'm sorry things didn't work out as well, but that's not your fault at all. I'm really happy for you. Hope things are still going well.
Happy Holidays!
Michael
 12-08-2006, 04:47 PM
#16
Good work man, when you get the head unit are done it will look kick a$$, i guess you will have to get a custom bezel made in the grey plastic for maby the piano stuff, or CF. The MS kit looks nice. You should get some clear corner it would accent it nice. I like the wheels you have on there
02-04-2007, 02:09 PM
#17
Registered
Thread Starter
Join Date: Mar 2004
Location: Jacksonville, FL
Posts: 714
Likes: 0
Received 0 Likes
on
0 Posts
Well I finally got off my lazy a$$ and took some pictures of the completed Radio replacement as well as the new led footwell lights and new position for the start button.
02-04-2007, 04:03 PM
#19
the bukkake master!
i like the look of the center dash you did a great job. only thing that seems to be strange is the footwell lights. maybe its just how the pics came out but does the light disperse more than that. its looks like it only lights up one spot.

 02-05-2007, 04:51 PM
#23
Registered
Thread Starter
Join Date: Mar 2004
Location: Jacksonville, FL
Posts: 714
Likes: 0
Received 0 Likes
on
0 Posts
The footwell lights are a little direct but the light filters around the whole floor area, the pictures were taken during the day in my garage so they may be a little decieving.
The lights are custom made LED panels for both the front foot well areas.
The surround is custom made for the Alpine headunit. Took a couple weeks to get it right and because of the piano black still needs a little more sanding and painting to get it perfect. I only notice the blemishes because I look at it everyday.

