HELP. Taillight Condensation
 06-18-2008, 09:44 AM
#1
Registered User
Thread Starter

Join Date: Feb 2008
Location: upstate NY
Posts: 6
Likes: 0
Received 0 Likes
on
0 Posts
hey guys i was wondering how you would get condensation out from the drivers side taillight. dealer said i would need a new taillight, but i figured its just the cover. it may be crackeD? or insecurely fastened? anyhow whats the safest method to get it off and prevent the condensation from building?

 06-18-2008, 11:06 AM
#3
It's Not Easy Being Green
iTrader: (1)

Join Date: Apr 2008
Location: Akron, OH
Posts: 1,846
Likes: 0
Received 0 Likes
on
0 Posts
hey guys i was wondering how you would get condensation out from the drivers side taillight. dealer said i would need a new taillight, but i figured its just the cover. it may be crackeD? or insecurely fastened? anyhow whats the safest method to get it off and prevent the condensation from building?
2) It's covered under warranty so if you are still under warranty stop by your dealer
3) If it's not covered under warranty there are multiple methods of fixing it. Pick one you like and can do yourself or that you can get done by someone else.
GL
06-18-2008, 11:21 AM
#4
Administrator
iTrader: (7)

^^^ yup, search is your best friend. There's links to a TSB available that shows it's covered under warranty.
07-17-2008, 06:22 PM
#5

i really hope you did not drill your tail light. it will not fix the problem of moisture getting in your tail light. i just had to get a gasket for my drivers side and hopefully will be making a DIY. i've already had to do the passenger side and its as good as new.

 but i'll have to fix it properly now as it has got worse
  07-17-2008, 08:49 PM
#7
My 8 looks like a Smurf
iTrader: (4)

Join Date: Sep 2007
Location: Ottawa, ON, Canada
Posts: 1,742
Likes: 0
Received 0 Likes
on
0 Posts
Honestly... taking a drill to a taillight with this price tag when you can buy a gasket for $25 that fixes the problem? Ouch.
I had the same problem and the new gasket works very well.
I had the same problem and the new gasket works very well.
07-17-2008, 10:26 PM
#10
My 8 looks like a Smurf
iTrader: (4)
Join Date: Sep 2007
Location: Ottawa, ON, Canada
Posts: 1,742
Likes: 0
Received 0 Likes
on
0 Posts
I'm sorry but this is all that comes to mind:

Drilling holes may help with water, but what about the condensation? I had about an inch of water and constant condensation in mine. The revised gasket took care of it... not a drop of moisture after the latest storm.
Drilling holes may help with water, but what about the condensation? I had about an inch of water and constant condensation in mine. The revised gasket took care of it... not a drop of moisture after the latest storm.
07-18-2008, 05:44 PM
#12
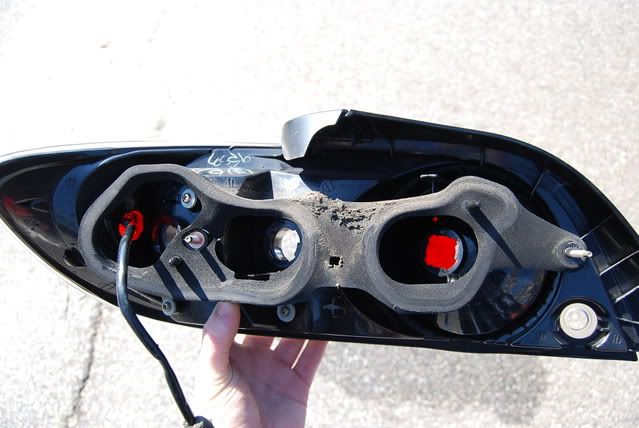
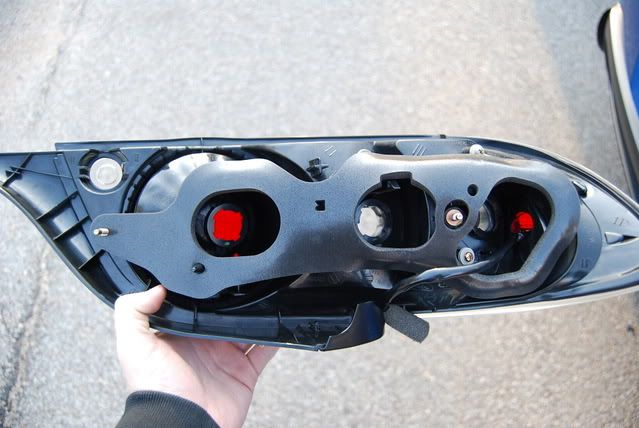
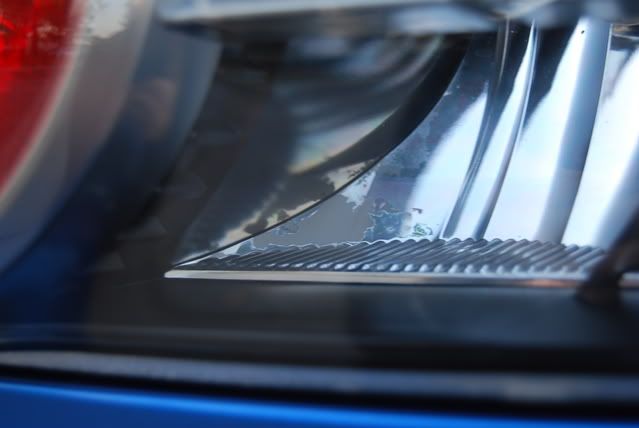
the problem is water coming in through the old gasket. drilling holes is not gonna fix water getting in, only lets the water that does get in drain out. that water still causes damage to your taillight housing. here's what it does to the chrome plating.
09-29-2008, 01:43 AM
#13
Registered User

Join Date: Aug 2008
Posts: 24
Likes: 0
Received 0 Likes
on
0 Posts
mine was a fishbowl toO!
i took it out moved it from side to side up and down till i found were the water was coming in at..got all the water out but still condinsation! took a hair dryer blew it through the bulb pockets! till there was no condensation in the tail light! then got clear silicone ran a fine bead around were the water was getting in at!!!
Havent had a problem sence!!


 09-30-2008, 02:24 PM
#17
ಠ_ಠ

Join Date: Aug 2007
Location: Under the Dumbarton Bridge
Posts: 2,228
Likes: 0
Received 6 Likes
on
5 Posts
It's a brute force solution when theres an elegant solution thats not significantly more work.
09-30-2008, 07:37 PM
#18
!boom*ChiKA#wAH^wAH!

Join Date: Jul 2007
Location: j-ViLLE, Flo.RyDa
Posts: 79
Likes: 0
Received 0 Likes
on
0 Posts
YES FISH BOWL !! FTW! jus like the other lazi bastards like myself drilled a hole...its no where near noticable but i think i need more holes cuz it still humidifies a lil bit.... lol.. sorry i was really no help but SEARCH is...
09-30-2008, 11:53 PM
#19
that is because you never fixed the problem which is the gasket. now you have holes in it though, so you're still gonna have condensation if you change the gasket. now the only way is to get a new tail light or plug the holes too.
10-01-2008, 09:59 AM
#20
Need for Speed Satisfied

Join Date: Mar 2008
Location: Monroe, CT
Posts: 343
Likes: 0
Received 0 Likes
on
0 Posts
I drilled as well lol. What gasket are you talking about. When I did mine, I tried finding the problem, but it seemed to be in a deep part of the light near one of the bungs for the bulbs. I THINK it was the reverse bulb. Can't remember off hand, I did this about two or three months ago. But The holes do make a world of difference. I get minimal condensation now right after a big rainstorm or car wash, but its usually gone pretty quick. I'll see how well it works over the winter though, lots more water round then by me lol
10-01-2008, 12:31 PM
#21
Registered User

Join Date: Jul 2008
Posts: 205
Likes: 0
Received 0 Likes
on
0 Posts
My solution, kinda ghetto but worked. What I did:
1: ORDERED A NEW GASKET
2: Waited for it to get delivered
3: Removed taillight and old gasket
4: took shopvac put a 1/2 or 3/4 inch piece of PVC flexible tubing on the end of the shopvac hose, and duct taped it there.
5: Used the PVC hose to because it fit through the light hole in the tail light
6: Sucked the Fishbowl dry.
7: Removed the PVC and covered the center hole with ducttape.
8: put the shopvac hose on the tail light hole and sucked air through the tail light for about 10 minutes to get the rest of the condensation out, and dry it since your pulling air through the entire length of the light as well as sucking the moisture out.
9: put the new gasket on.
10: cleaned the body of the car where the light mounts. Cleaned off all the dirt and pollen and whatnot.
11: Put the tail light back on.
12: Be satisfied with a forever dry taillight now.
BTW the new gasket is about three times as thick as the old one!!!!
But the driverside is now fogging up on me since I did the passenger side. So looks like i'm going to be fixing that one now too.
If your out of warrenty just spend the $60 or so on two new gaskets and may as well do both sides at the same time.
10-01-2008, 04:30 PM
#22
Registered User

Join Date: Jan 2007
Posts: 79
Likes: 0
Received 0 Likes
on
0 Posts
holes lame, new gasket(s) kewl. Check TSBs.
you can also air dry your tail light. may want to consider rinsing inside of light before re-installig with distilled water to help avoid water spots on the inside.
you can also air dry your tail light. may want to consider rinsing inside of light before re-installig with distilled water to help avoid water spots on the inside.
10-02-2008, 09:42 AM
#23
I drilled as well lol. What gasket are you talking about. When I did mine, I tried finding the problem, but it seemed to be in a deep part of the light near one of the bungs for the bulbs. I THINK it was the reverse bulb. Can't remember off hand, I did this about two or three months ago. But The holes do make a world of difference. I get minimal condensation now right after a big rainstorm or car wash, but its usually gone pretty quick. I'll see how well it works over the winter though, lots more water round then by me lol