
change coil springs in the driveway?
 05-14-2005, 03:29 PM
#1

Hey All,
What do you think about an old dude changing his own front/rear coil springs in his driveway? I want to put the RB's in but Charlie (at mazcare) is a long way off. How long would it take me. I never have put coils in before. Borrow the tools from autozone (spring compressor is all i would need I think). Heck if Charles and friends(including me a little) can put a new flywheel in the parking lot I'm thinking I can do the springs.
Does RB springs front and back require a re- alignment? Probaly need one anyway. Running OEM tires (poor me). 8 hrs sound right?
God Bless this forum!
Olddragger
 05-14-2005, 04:15 PM
#2
www.evoperform.com
well, i used to run hondas myself b4 i got my 8, and doing the springs werent any problem doing em in a driveway(did at least 15-20 sets for friends), though i am not sure how much different the 8 is yet, havent gotten my eibachs yet. me and a friend could knock out a car in under 2 hours using hand tools and no spring compressor (not exactly reccomended, but it could be done with no injuries), so by yourself maybe 4 hours,
and yes, always get an alignment done after any suspension work
and yes, always get an alignment done after any suspension work
05-14-2005, 05:48 PM
#3
Registered User

Join Date: Jan 2003
Location: SF Bay Area
Posts: 1,286
Likes: 0
Received 0 Likes
on
0 Posts
As long as your driveway is level enough and you put jack stands under the car then no problem. That's how I did mine.
________
Coach Handbags
________
Coach Handbags
Last edited by PUR NRG; 05-01-2011 at 06:02 AM.
 05-14-2005, 06:43 PM
#5
Registered

Join Date: Jan 2003
Location: Augusta, GA
Posts: 286
Likes: 0
Received 0 Likes
on
0 Posts
I did my Racing Beat suspension, Springs and Sways in about 6- 1/2 hours. Do you have an impact wrench or air ratchet? If so, that will cut the spring "compressing and releasing" time down quite a bit. I bought one of the electric impact wrenches from Harbor Freight for $40 and it was a real time saver.
You'll also need a $15 Spring Compressor
After you install the springs, get a "performance alignment" with you in the car. You'll appreciate the sharper turn-in and better handling on Track Days.
You'll also need a $15 Spring Compressor
After you install the springs, get a "performance alignment" with you in the car. You'll appreciate the sharper turn-in and better handling on Track Days.
 05-14-2005, 07:48 PM
#7

couple of tips for you
you have to take the upper front control arms loose from both chassis mounting points to get the front strut assembly out
in the rear it's a bit more complicated. You have to take the rear sway bar endlinks loose from the lower control arm on both sides and twist the sway bar up out of the way. You also have to take the rear lower control arm loose from the spindle assembly (the same one you unbolted the endlinks from); unscrew the nut until it is flush with the top of the stud and give it a good whack or two with a 2.5# hammer and it will pop loose from the spindle assy. Mark the camber eccentric to the frame and then undo the nut enough to allow the lower rear control arm to drop down fully out of the way. The rear strut assembly wll only drop part of the way out, you have to rasie the rear suspension with a jack for it to have enough clearance to drop the rest of the way out.
You also can't fully bolt in the upper front control arms and camber eccentric end of the lower rear control arms until after you have everything back together including the wheels with the the car back on the ground or else you'll pre-load the bushings in the wrong orientation. The suspension c0ontrol arm bushing ends have to be in the normal static position before being tightened fully
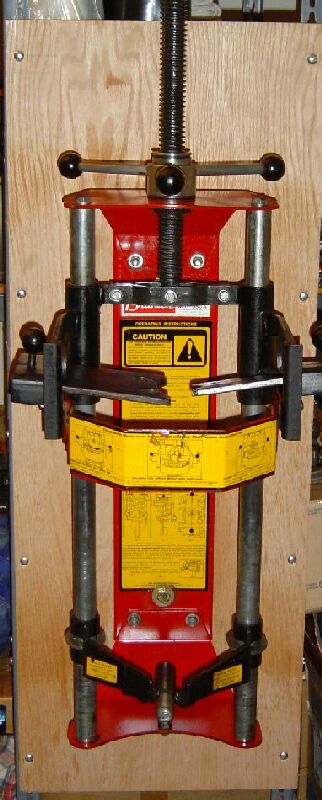
It's all fresh in my mind, I just got done doing it. I'm fortunate to own one of these as well as my own alignment equipment otherwise you'll have to take them somewhere to get the springs compressed and off the struts if you don't have a spring compressor. Hopefully you know that you cannot just screw the nut off the top without first compressing the spring, at least not if you want to continue living :
you have to take the upper front control arms loose from both chassis mounting points to get the front strut assembly out
in the rear it's a bit more complicated. You have to take the rear sway bar endlinks loose from the lower control arm on both sides and twist the sway bar up out of the way. You also have to take the rear lower control arm loose from the spindle assembly (the same one you unbolted the endlinks from); unscrew the nut until it is flush with the top of the stud and give it a good whack or two with a 2.5# hammer and it will pop loose from the spindle assy. Mark the camber eccentric to the frame and then undo the nut enough to allow the lower rear control arm to drop down fully out of the way. The rear strut assembly wll only drop part of the way out, you have to rasie the rear suspension with a jack for it to have enough clearance to drop the rest of the way out.
You also can't fully bolt in the upper front control arms and camber eccentric end of the lower rear control arms until after you have everything back together including the wheels with the the car back on the ground or else you'll pre-load the bushings in the wrong orientation. The suspension c0ontrol arm bushing ends have to be in the normal static position before being tightened fully
It's all fresh in my mind, I just got done doing it. I'm fortunate to own one of these as well as my own alignment equipment
otherwise you'll have to take them somewhere to get the springs compressed and off the struts if you don't have a spring compressor. Hopefully you know that you cannot just screw the nut off the top without first compressing the spring, at least not if you want to continue living :
Last edited by TeamRX8; 05-14-2005 at 08:02 PM.
05-14-2005, 08:49 PM
#8
Thanks, all,
lot of good points and I appreciate it. Kurt Bob I agree Harbor Freight may be a good starting point. Did anyone change shocks along with the springs?
I also might should buy a 6 pack for celebration AFTER the job is done! Any trick in settling the springs in?
olddragger
lot of good points and I appreciate it. Kurt Bob I agree Harbor Freight may be a good starting point. Did anyone change shocks along with the springs?
I also might should buy a 6 pack for celebration AFTER the job is done! Any trick in settling the springs in?
olddragger
05-14-2005, 09:07 PM
#9
ride 'm hard, cowboy 
installing new struts at the same time is the same amount of work. You still have to tear down the stock assemblies for the hardware and mounting pieces unless you go buy all new parts. If you did buy all the new parts then you could have the new struts/springs already fully assembled and then just swap them out, which would save some time. Not sure if it's worth the cost of all the parts though
installing new struts at the same time is the same amount of work. You still have to tear down the stock assemblies for the hardware and mounting pieces unless you go buy all new parts. If you did buy all the new parts then you could have the new struts/springs already fully assembled and then just swap them out, which would save some time. Not sure if it's worth the cost of all the parts though
Last edited by TeamRX8; 05-14-2005 at 09:24 PM.
05-14-2005, 11:53 PM
#10
Registered User

Join Date: Apr 2005
Posts: 71
Likes: 0
Received 0 Likes
on
0 Posts
If you are replacing the shocks too you might as well get a set of coilovers.
I replaced my entire set with Tein Basic Coilovers last week. Did the job pretty much by myself in my garage. I am no expert when it comes to cars and I pretty much followed the directions posted in the DIY forum. There are 2 threads - one on just installing lowering springs and another on installing JIC Coilovers but both are helpful. You can get a spring compressor relatively cheap at Autozone or Sears, can't remember the exact price but it's under $30. They are only used to keep the springs compressed while you take apart the spring/shock assembly. It took me about 6 hours to do by myself. Well I actually needed my wife just to help me for a few minutes when reinstalling - I needed someone to thread the nuts on the top of the new coilovers while I held them up into place from under the car. It speeds things up a little if you have a floor jack. It's also good to have a torque wrench (for reinstall of sway bar, engine bay strut bar, and top nut on shock) but for most of the bolts you just do hand tight plus a little.
The rears are more difficult than the fronts so I did them first. Once I finished the rears the fronts seemed like a cakewalk. I could've had a shop do the install for about $500 but I really wanted to learn to do this myself.
05-15-2005, 08:39 AM
#11
M0D Squad -charter member
Join Date: Jan 2003
Location: Alabama
Posts: 1,498
Likes: 0
Received 0 Likes
on
0 Posts
OD,
My advice is to do the fronts first, as you have much more spring to compress. Once I got to the rears, I was pleasantly surprised how quickly they went.
If you have ANY thought of changing shocks, now is the time to do it. I chose not to, because most comments about the stock shocks have been positive.
Quite doable on your own, by yourself. Let us know how it goes.
(from the one who helped Charles R Hill put the flywheel in my car in the parking lot)
And thanks oldragger for your assistance too.
05-15-2005, 09:26 AM
#12
Registered

Join Date: Jan 2004
Posts: 181
Likes: 0
Received 0 Likes
on
0 Posts
Originally Posted by olddragger
Does RB springs front and back require a re- alignment? Probaly need one anyway. Running OEM tires (poor me). 8 hrs sound right?
God Bless this forum!
Olddragger
God Bless this forum!
Olddragger
Originally Posted by TeamRX8
in the rear it's a bit more complicated. You have to take the rear sway bar endlinks loose from the lower control arm on both sides and twist the sway bar up out of the way. You also have to take the rear lower control arm loose from the spindle assembly (the same one you unbolted the endlinks from); unscrew the nut until it is flush with the top of the stud and give it a good whack or two with a 2.5# hammer and it will pop loose from the spindle assy. Mark the camber eccentric to the frame and then undo the nut enough to allow the lower rear control arm to drop down fully out of the way. The rear strut assembly wll only drop part of the way out, you have to rasie the rear suspension with a jack for it to have enough clearance to drop the rest of the way out.
05-15-2005, 10:00 AM
#13

I was able to do mine alone and without removing any of the control arms. Using a manual spring compressor and leverage in the right spots was all it took.
O.D., you know I would drive down for the weekend to help you if I could. It would be just as easy as the flywheel swap on rxeighter's car.
CRH
O.D., you know I would drive down for the weekend to help you if I could. It would be just as easy as the flywheel swap on rxeighter's car.
CRH
05-15-2005, 01:36 PM
#14
You know this is one thing I like about this car. Bunch of good guys out there willing to help with other owners questions/challanges. Thanks guys. Looks like she is going up on the stands soon to get this done. Undecided if I will put Koni's on. I just wonder if I would get that much benefit out of the koni's since I only track about 2-3 times a year. I think maybe the driver needs more work than the car.
rxeightr glad that wheel still working for ya. Ya'll still get our "hardass" award for doing it like yall did. Man that was good.
Charles-- You the man. Sure you are not southern? (no offense to anyone). If I called I know you would be here and I would do the same. I think you have accomplished one of your goals--that is--to help educate people that they can do the work themselves on this car. Don't be scared of it!
Well better tell the wife. Any advice on THAT!
ps Charles --everyday gets better.
05-15-2005, 05:02 PM
#15
Registered
Join Date: Jan 2004
Posts: 181
Likes: 0
Received 0 Likes
on
0 Posts
I just noticed you're in Ga. Where are you? I live up in Lawrenceville if you need some help.
As far as the wife goes, just buy a ton of **** at one time. See, you're going to get yelled at either way so you might as well knock it all out in one shot.
On the struts, I am happy with the Mazdaspeed units. They have a ton more rebound damping and have improved the handling a lot. Not bad for $440 shipped. Just make sure you do not purchase them from mazdaparts.com
05-15-2005, 09:47 PM
#16
Hey Darkducati
ha! lololol! man that was the best advice yet! Now why the heck didnt i think of that.? Buy all the stuff at one time and get it over with! Everyone pay attention !
By the way man I live in Macon. Have a sister in law in Gainsville. You need to join up with our little group at Road Atlanta dude. We are also getting into edurance karting!
Olddragger
05-16-2005, 01:27 AM
#17
Originally Posted by darkducati
This is not correct. You can unbolt the rear upper control arm on the rear suspension at the subframe and the rear sway bar as described. If you pull the suspension down after unbolting the shock from the lower control arm, you can then pull the strut towards the rear of the car and the strut will fall out. Seriously. It works great.
I don't see that your method makes my method incorrect, just two different ways to skin a cat. In fact, I don't see either one taking more time or being any more difficult than the other. I actually could have just undid the one camber eccentric end on the rearward lower rear arm rather than pop the other end off the spindle, but didn't realize this until after thinking about it later. That's experience for you.
I do think that it's easier to pull the arm than try to wrangle the strut out of there. It's not that much work, but it is a whole lot less aggravation. I would also be careful about pulling the rear suspension downward past it's droop point because I know of situations where CV carriers have been damaged, halfshafts popping loose from the differential, etc. I'm not saying that's the case here, just a cautionary note.
Last edited by TeamRX8; 05-16-2005 at 01:33 AM.
05-16-2005, 06:00 AM
#19
I don't see how with that big metal tube on top, you're the only person I know of who can do it this way
I did look at the service manual it states to remove the rearward upper rear control arm so I'll concede that my way may not be the best afterall
I did look at the service manual it states to remove the rearward upper rear control arm so I'll concede that my way may not be the best afterall
05-16-2005, 12:12 PM
#20
Are you thinking/talking about the towers in the trunk that shroud the dampers?
As far as manuals and instructions go, sometimes the installation engineers have it wrong. Let me cite a couple examples. First, the instructions in the Racing Beat oil cooler screen installation call for using soapy water to slide the screens behind the shrouds in front of the oil coolers. I chose to save a bunch of time and just remove the push-pins that hold the shrouds in place, locate the new screens, and pop the shrouds and pins back in place. I decided this because the pins that hold the shrouds in place are the exact same ones that hold the front fascia to the wheelwells so I was already familiar with how they worked by virtue of the fact that I was able to get to the coolers. Second, I have the Mazda red footwell lights and illuminated shifter **** and in both cases the installation instructions are far more complex than they needed to be. The **** calls for using the included shifter boot but I was able to feed the connector through the factory boot and re-use it. The wire routing for the footwell lights calls for removal of the carpet on the driver's side and installing the wire run under the carpet. I just used the included tie-wraps to route the wire along behind the dash and locate it in place. In both cases the installs went easier and the parts work as intended.
Careful contemplation of the task at hand often exposes simpler methods to achieve the same ends.
CRH
BTW, I e-mailed Racing Beat and Mr. Mederer said they would update their installation instructions to reflect my suggestion.
Last edited by Charles R. Hill; 05-16-2005 at 12:22 PM.
05-16-2005, 10:22 PM
#21
yes, the support shrouds on the rear shocks.
I agree that most methods in any number of manufacturer service manuals are not needed or incorrect. Ask any tech and they'll tell you they do what is quickest and most efficient for them rather than following the manual step by step
I agree that most methods in any number of manufacturer service manuals are not needed or incorrect. Ask any tech and they'll tell you they do what is quickest and most efficient for them rather than following the manual step by step
05-17-2005, 12:40 AM
#22
The support shrouds are removable by taking out the cross-bolts from inside the trunk that connect them to the tower supports. I didn't see them at first and when I did, I discovered one of the bolts to be cross-threaded. There are two on each tower.
CRH
CRH
05-17-2005, 07:50 PM
#23
Charles
I thank you for that short cut. sounds like it would save a lot of time and effort.
Planning this out guys, May order the springs in a couple of weeks.
Oh by the way I have to buy the wife something when I get the springs. So I told her Ok as long as she would have to work on it for 3-4 hrs before she could use it! That didnt go over to well.
OD
05-17-2005, 08:44 PM
#24

Old Dragger and Charles, I feel as if both of you are brothers! We have consistently thought alike! I will continue to follow your postings and learn from the masters (you two). Thanks for the education, as I plan to follow both of your footsteps as far as NOZing the car and installing the springs (and later a flywheel) in my driveway.