DIY: Battery relocation to trunk
 02-27-2013, 02:18 AM
#226
Registered

9K, I've had a look at your photo, and the point you have used for your battery earth is not a good location.
I know that Mazda mount a couple of small earth points there, but those little earth points don't have very much current running through them, so they don't really matter to much. Don't forget we are talking 100amps plus when you are winding over the starter motor, and if you have a few bad connections in the starting circuit, that current draw could end up being double.
Think of this as an arc welder and thats the sort of current we are talking about.
Your battery earth needs to be mounted on solid Chassis rail, not a point which is only held in posistion by a couple of small spot welds.
That whole section that you have mounted your battery earth too is only spot welded to the chassis. You need to have a direct connection to the main chassis rails.
Be aware that a lot of screw type battery connections, like that used in a lot of car audio setups, might look pretty, but are not that good at actually making good connection with the battery cable. A lot of them use a grub type of screw, which is good for ripping the cable strands to bits. Crimp connections are a lot better and more permanent. Better still crimp and soldered.
9K, Here is something else to try, crab hold of that earth cable in that photo and pull it upwards, with a reasonable amount of force. If you can move the terminal under the bolt with that bolt done up tight, then you know that you need to mount that terminal onto a mount which has a lot bigger bolt.
Hope this is helpful.
Rotaman
Last edited by Rotaman; 02-27-2013 at 02:29 AM.
 02-27-2013, 03:00 AM
#227
Registered

Join Date: Apr 2009
Posts: 918
Likes: 0
Received 0 Likes
on
0 Posts
DieHard Platinum / Odyssey / Enersys are all the same thing.
EnerSys Signs Multi-Year Contract to Provide Sears Holdings... -- re> READING, Pa. and HOFFMAN ESTATES, Ill., Feb. 27 /PRNewswire-FirstCall/ --
EnerSys Signs Multi-Year Contract to Provide Sears Holdings... -- re> READING, Pa. and HOFFMAN ESTATES, Ill., Feb. 27 /PRNewswire-FirstCall/ --
+1 Like
02-27-2013, 03:02 AM
#228
Registered
Join Date: Apr 2009
Posts: 918
Likes: 0
Received 0 Likes
on
0 Posts
But then again...
electricity is still constrained to resistance of wires, quality and condition of the cables used...
go for it and let me know...
02-27-2013, 03:07 AM
#229
Registered
Join Date: Apr 2009
Posts: 918
Likes: 0
Received 0 Likes
on
0 Posts
Do not use any shock bolts as an earth point, they are very poor points to use as an earth, as there is movement and over time can work loose.
If you are going to mount your battery in the boot, which is a good place to put a battery, due to it being far away from heat. Batteries do not like being in a hot eviroment.
Also if you mount the battery in the right place in the boot, it can help with better weight distribution. But dont mount the battery all the way in the back of the boot, as this then just becomes a swinging weight, the further to the rear of the car that you mount it. Mount it as close to the back of the rear seat as possible and run an earth point down to the chassis just under the rear seat, or some where solid that you can weld a good earth mount to the chassis.
The best earth mount is only to the chassis, and to do this properly you will probably have to have a earth mount welded onto the chassis somewhere reasonably close to the battery.
Running an earth cable all the way to the front is only a waste of money and will only lead to a greater resistance for current flow from the battery to the starter.
A good chassis mounted earth point is far better then any long run cable.
I'm sorry to say this but some of you need to go back to school and learn some of the basics of 12V systems before you start playing about with any of your cars electrical system.
With a 12V system, you need to run as big a battery cable as you can fit in your car, if you are running it from the boot. This is especially true if you are also running high powered stereo setups.
If our cars were 24v then we could get away with a battery cable of about half the size due to having twice the voltage, doesn't need to produce as much current to do the same thing.
As an example in my own car which has a large Odyssey battery and 00 gauge battery cable run to the engine bay into a handmade distribution block and then about 2gauge cable from the distribution block to the starter motor.
Also 4gauge run from the distribution block to the cars fuse compartment.
Also from the battery I have a short run of again 00 gauge earth cable down to a custom earth mount under the rear seat ( not directly under obviously ) to the chassis.
I have never had a problem starting my car and it runs a high powered stereo as well.
My car will still start first time, even with my battery down to 10volts.
This is due to a good battery and the starter motor being able to draw high current through a very high quality battery cable.
The only down side to the sort of set up my car has is the extra weight. It may not be much, but it is a bit.
This is easily overcome as my car is turboed.
I hope some of what I have written is helpful.
Rotaman
What Odyssey are u running on?
pc925 or pc1200?
im on pc925 with 0ga wires.. (thick) have not put any earthing yet..
any pics to share of ur setup?
02-27-2013, 03:52 AM
#230
Registered
I'm using the larger PC1230 which is one of the more moden pastic case batteries models.
I will have to take some photos and post them up.
My distribution block sits behind the water washer bottle and is up against the firewall.
I ended up making my own distribution block, as I couldn't find one that I liked that would fit in the confined space I had available.
Rotaman
I will have to take some photos and post them up.
My distribution block sits behind the water washer bottle and is up against the firewall.
I ended up making my own distribution block, as I couldn't find one that I liked that would fit in the confined space I had available.
Rotaman
Last edited by Rotaman; 05-19-2016 at 05:02 AM.
02-27-2013, 03:35 PM
#231

So here is the car starting up after my drive home from work (fully warmed up, about 20 minute drive)
At battery
At Alternator
Battery voltage doesn't drop much on cranking which is expected. Alternator drops to about ~9.5v at the lowest but the starters in these cars are pretty beefy and this is probably common for people that don't have relocations.
At battery
At Alternator
Battery voltage doesn't drop much on cranking which is expected. Alternator drops to about ~9.5v at the lowest but the starters in these cars are pretty beefy and this is probably common for people that don't have relocations.

 02-27-2013, 04:20 PM
#233

Test the voltage from the positive battery terminal to the positive on the starter during cranking. Do the same with the negative battery terminal to the engine ground during cranking. That will tell you if your voltage drop is across the positive or negative half of the circuit. But it sounds to me like your car is starting just fine. You should hear mine with the 6 awg.
The following users liked this post:
hufflepuff (03-07-2018)
02-27-2013, 04:41 PM
#234
Registered
paimon, if its winter time where you are and your car starts as easily as it seems to in the video's you posted, then I would say your setup is fine.
Rotaman
Rotaman
02-27-2013, 04:46 PM
#235
Test the voltage from the positive battery terminal to the positive on the starter during cranking. Do the same with the negative battery terminal to the engine ground during cranking. That will tell you if your voltage drop is across the positive or negative half of the circuit. But it sounds to me like your car is starting just fine. You should hear mine with the 6 awg.
Yea its winter time here, never had a problem starting all winter. Sometimes i get a slightly slower crank when the car has been sitting outside (at work), but doesn't take even 2 seconds to start.
02-27-2013, 08:14 PM
#240
k just tried it with her.
roughly 0.10mV (most likely noise) between two ground points during crank
roughly 283mV between positive lead and alternator
didn't get starter yet, probably will this weekend when i have some time
btw, ground to alternator w/ a 3 second crank, didn't drop below 9.8?V
roughly 0.10mV (most likely noise) between two ground points during crank
roughly 283mV between positive lead and alternator
didn't get starter yet, probably will this weekend when i have some time
btw, ground to alternator w/ a 3 second crank, didn't drop below 9.8?V
02-27-2013, 10:51 PM
#242
Registered
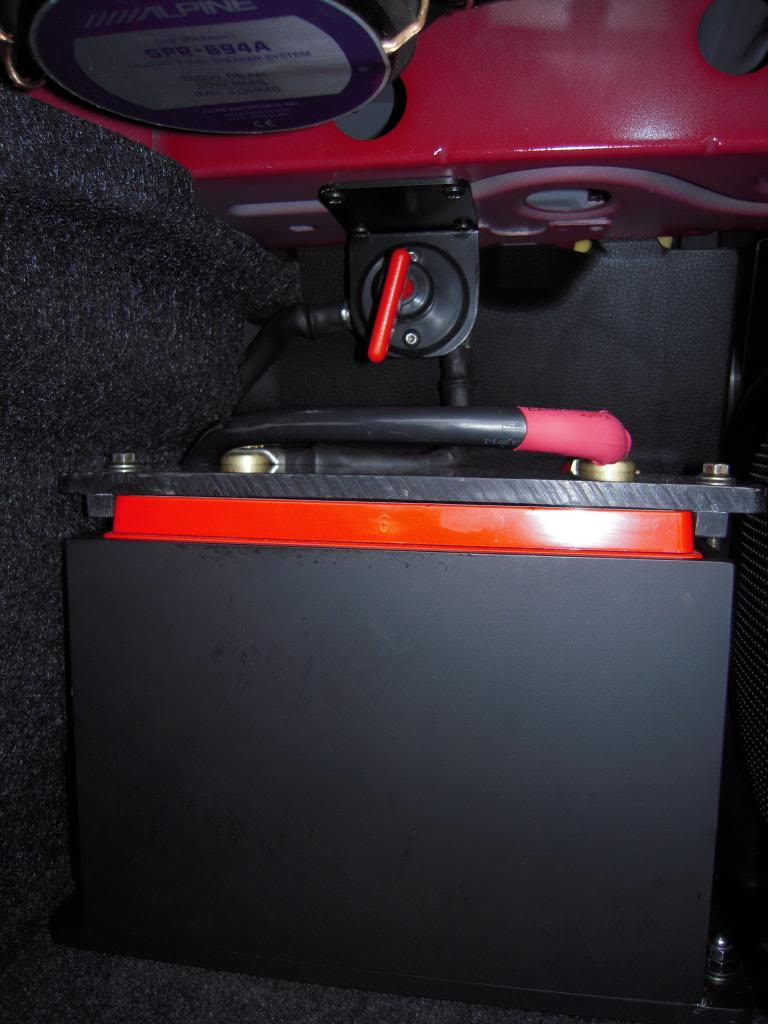
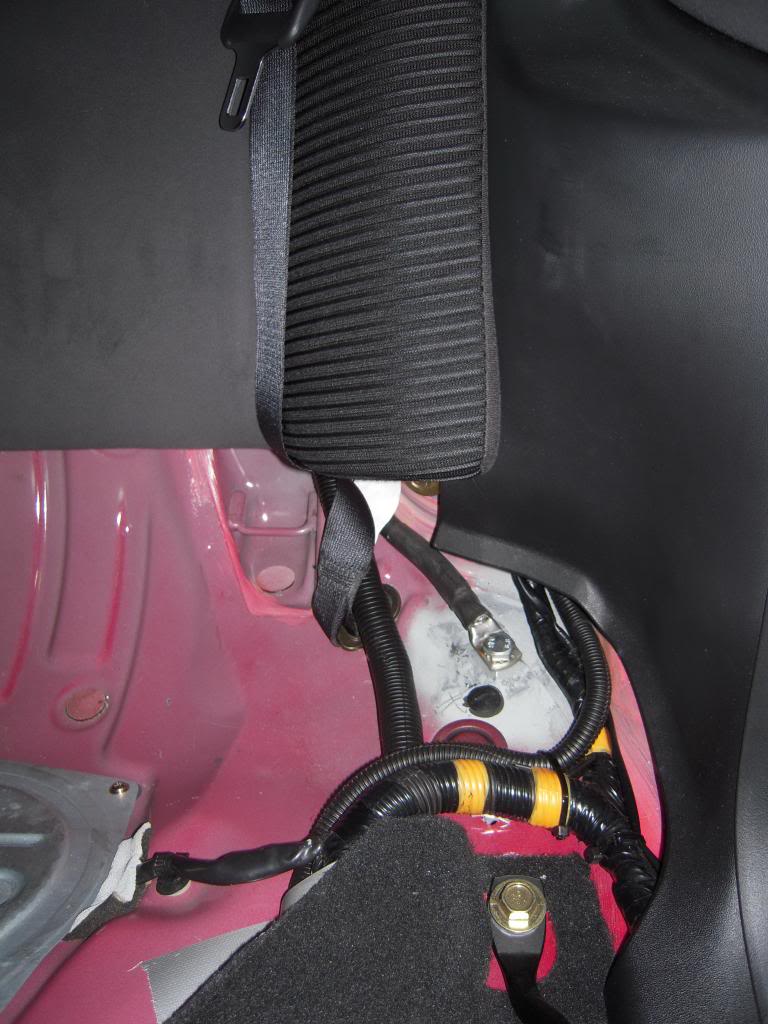
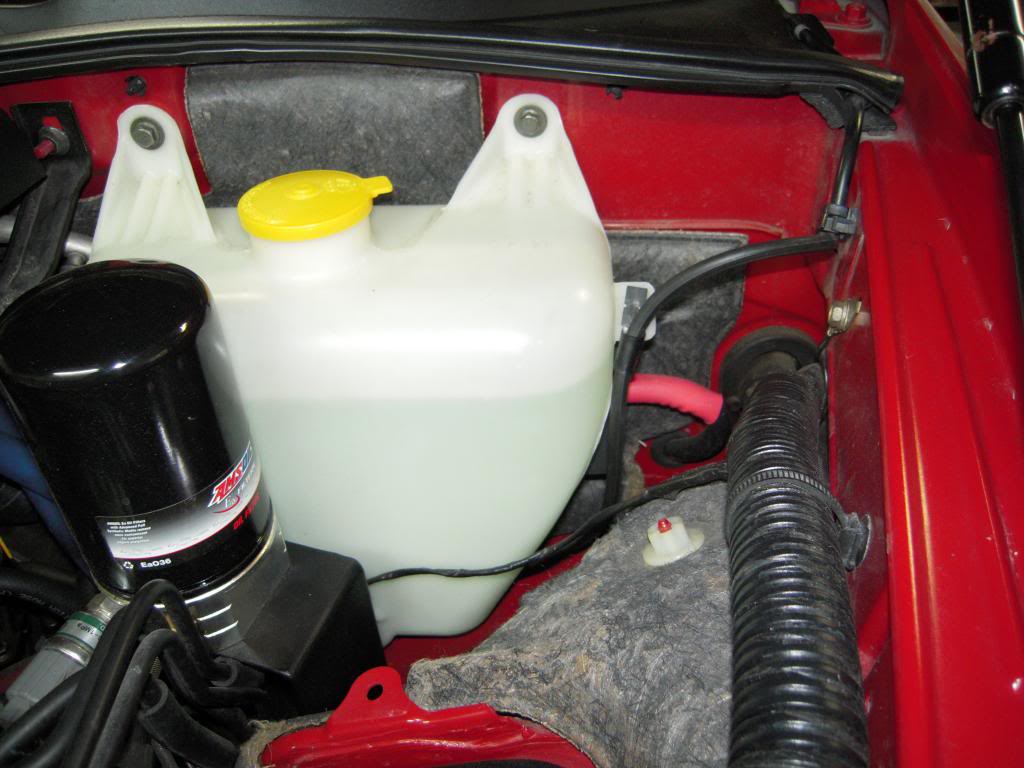
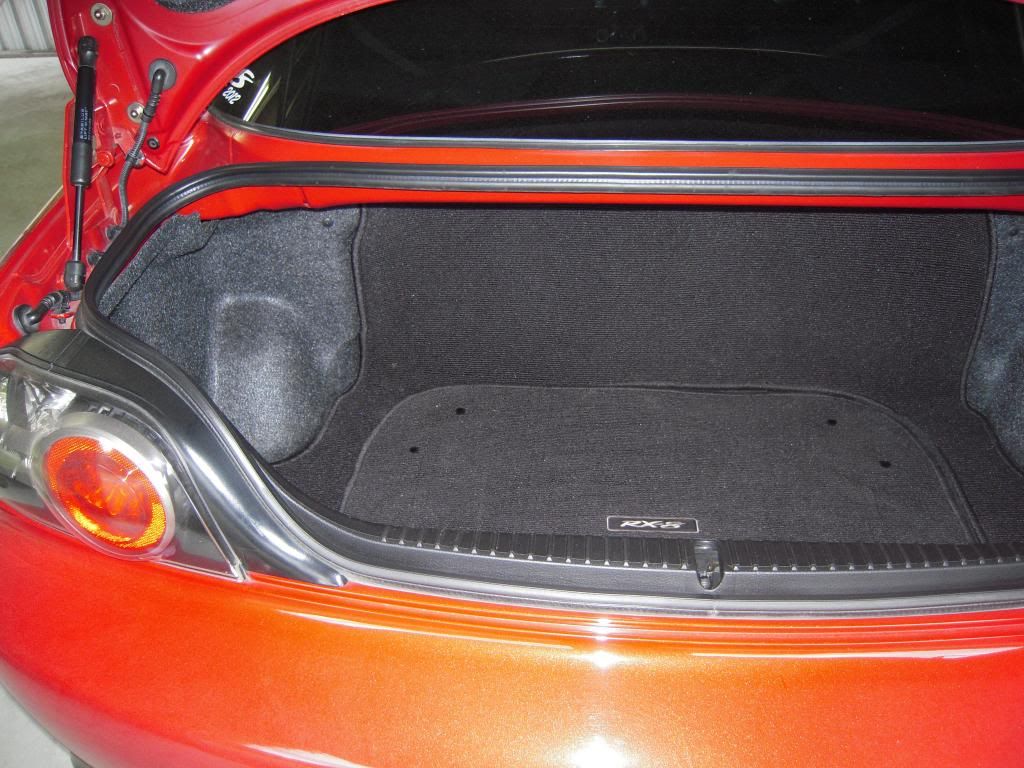
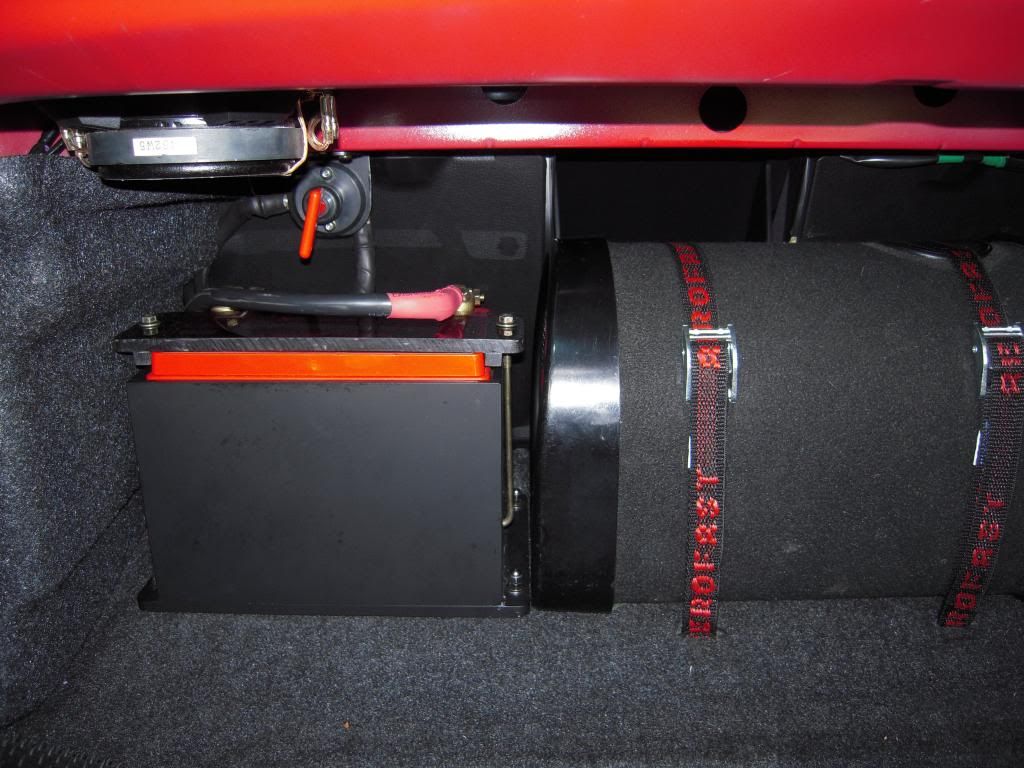
Here are a few photos of my battery setup as it is today. My car is a JDM model, so remember this is right hand drive.
First photo of the boot with every thing in place

Second photo with carpet removed for access to battery etc.

Third photo is close up of custom made battery box and quick cut off.
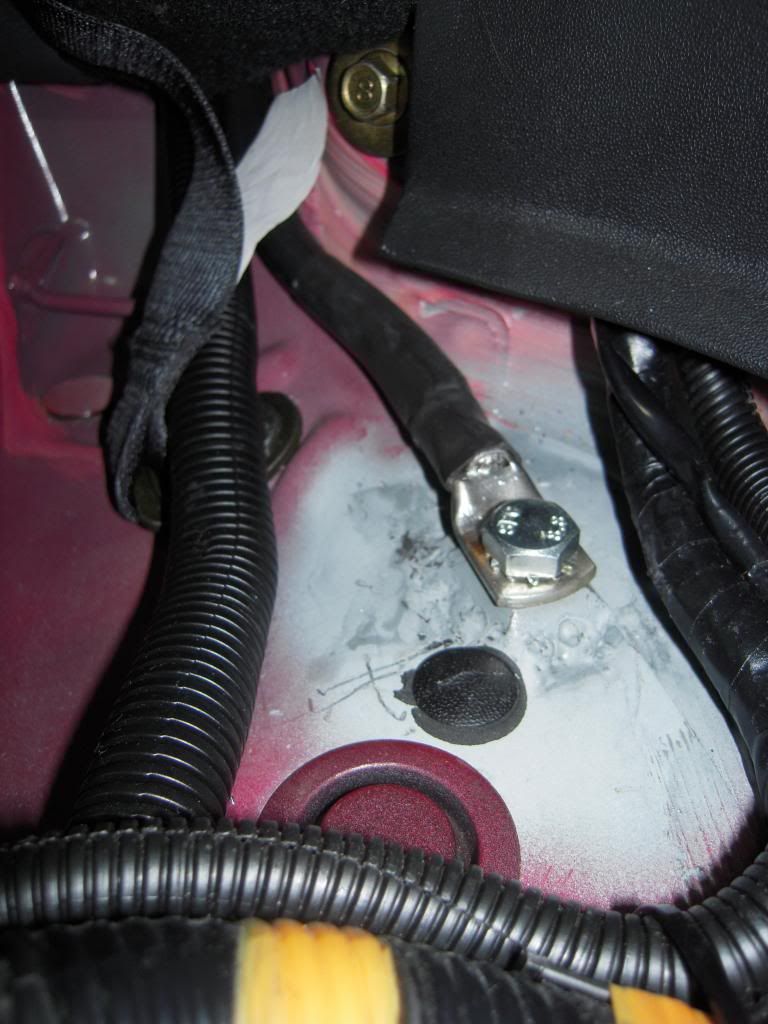
fourth photo is underneath back seat - earth mounting point, this is welded to the chassis. The positive cable is the one next to it covered with the protective plastic covering.
fifth photo is close up of earth mounting point. Welding in that area was differcult, so not the prettiest welding.

Six photo is in engine bay where you can see where the positive cable comes through the grommet in the firewall and tucks up behind the washer bottle.
Seventh photo is of custom made distribution block which has single 00gauge input and 1x 2 gauge ( to starter motor ) and 1x 4 gauge output ( to fuse box ).
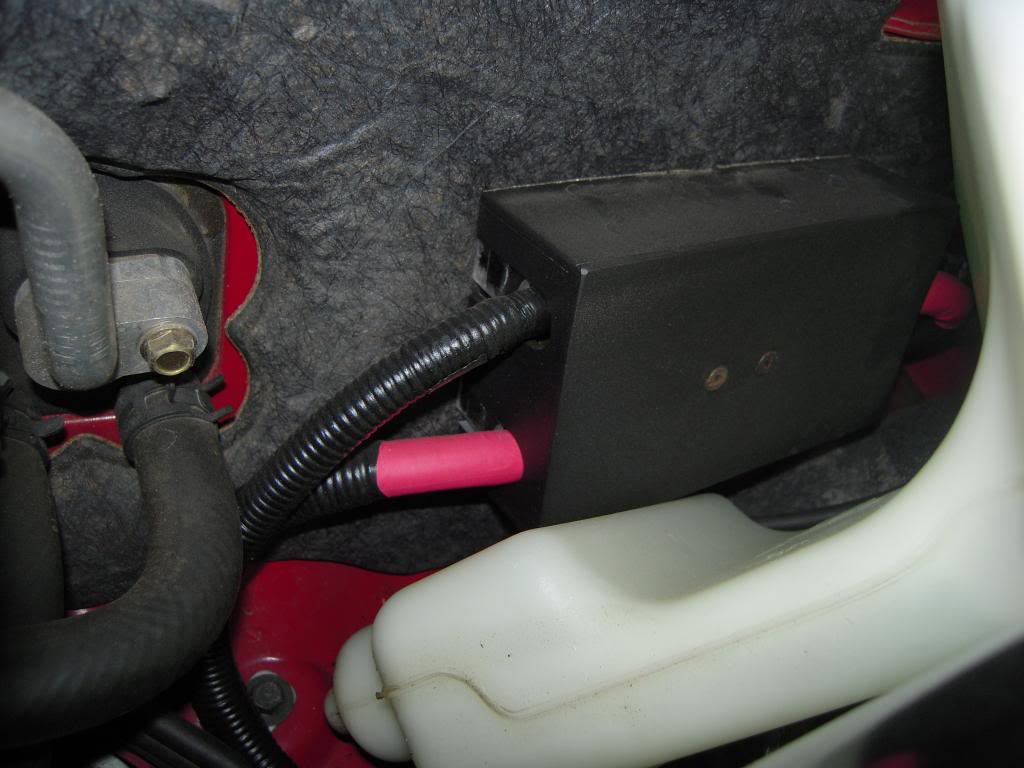
Hope this is helpful for someone.
Rotaman
First photo of the boot with every thing in place
Second photo with carpet removed for access to battery etc.
Third photo is close up of custom made battery box and quick cut off.
fourth photo is underneath back seat - earth mounting point, this is welded to the chassis. The positive cable is the one next to it covered with the protective plastic covering.
fifth photo is close up of earth mounting point. Welding in that area was differcult, so not the prettiest welding.
Six photo is in engine bay where you can see where the positive cable comes through the grommet in the firewall and tucks up behind the washer bottle.
Seventh photo is of custom made distribution block which has single 00gauge input and 1x 2 gauge ( to starter motor ) and 1x 4 gauge output ( to fuse box ).
Hope this is helpful for someone.
Rotaman
Last edited by Rotaman; 02-27-2013 at 10:55 PM.
The following users liked this post:
hufflepuff (03-07-2018)
02-28-2013, 12:26 AM
#243
rev it up

How did you screw in the battery tray. I had a lot of difficulty in putting a bolt through in that location due to the lack of access from under the car. I ended up mounting my battery next to the tail light which is not ideal for weight distribution.
02-28-2013, 01:03 AM
#244
Registered
How I mounted the battery box and sub tube was reasonable easy.
I pulled the carpet out and mounted a piece of 12mm ply wood down to the floor in that top area behind the seats.
I have 4 x 6mm bolts that come up through the ply and the carpet and this allows me to drop the battery box down over the bolts.
The only unfortunate part is because of the lack of room under that area, I have to fit the battery into the battery box and lift it all into posistion in one go.
Lifting 20kgs of weight with your arms stretched out and leaning into the boot is not easy.
Rotaman
02-28-2013, 01:13 AM
#245
rev it up
how is the plywood secured to the floor.
I did not want to simply use self tapping screws as the weight of the battery will probably rip the battery tray off in an accident.
I did not want to simply use self tapping screws as the weight of the battery will probably rip the battery tray off in an accident.
02-28-2013, 04:39 AM
#246
Registered
Join Date: Apr 2009
Posts: 918
Likes: 0
Received 0 Likes
on
0 Posts
Here are a few photos of my battery setup as it is today. My car is a JDM model, so remember this is right hand drive.
First photo of the boot with every thing in place
Second photo with carpet removed for access to battery etc.
Third photo is close up of custom made battery box and quick cut off.

fourth photo is underneath back seat - earth mounting point, this is welded to the chassis. The positive cable is the one next to it covered with the protective plastic covering.

fifth photo is close up of earth mounting point. Welding in that area was differcult, so not the prettiest welding.
Six photo is in engine bay where you can see where the positive cable comes through the grommet in the firewall and tucks up behind the washer bottle.

Seventh photo is of custom made distribution block which has single 00gauge input and 1x 2 gauge ( to starter motor ) and 1x 4 gauge output ( to fuse box ).

Hope this is helpful for someone.
Rotaman
First photo of the boot with every thing in place
Second photo with carpet removed for access to battery etc.
Third photo is close up of custom made battery box and quick cut off.
fourth photo is underneath back seat - earth mounting point, this is welded to the chassis. The positive cable is the one next to it covered with the protective plastic covering.
fifth photo is close up of earth mounting point. Welding in that area was differcult, so not the prettiest welding.
Six photo is in engine bay where you can see where the positive cable comes through the grommet in the firewall and tucks up behind the washer bottle.
Seventh photo is of custom made distribution block which has single 00gauge input and 1x 2 gauge ( to starter motor ) and 1x 4 gauge output ( to fuse box ).
Hope this is helpful for someone.
Rotaman
Nice !!!
im using Odyssey PC925 and like skc, have it bolted down just right behind the left taillight. I have yet to earth it to any chasis ;( but i did purchase the Okada Project plasma lift to "stabilize" currents but have yet to fix it.. any comments on this?
I do have the updated starter and my alternator wa changed 1 and half years ago. A talked with Lotus Distributors the other time, they did mention and felt that the Rx-8 alternator was abit small for the car.
im not sure how true is this but their current Lotus are equipped with Odyssey Batteries and have no issues with starting and they stated that it might be the small alternator.
I see you have a distribution block. i thought those are needed if you an amp.. do u ?
02-28-2013, 01:46 PM
#247
Registered
The piece of ply I have in the back there runs the full width of the car and is screwed down to the floor at multiple points, it will never rip off the floor.
I use that same piece of ply to hold down my subtube as well.
Yes I do have a large 4 channel amp in the car, but the distribution block is not used for that. The amp gets its power direct from the battery.
Must admit I don't know anything about the Okada Project plasma lift, but it looks like a type of CDI unit.
If you are looking into CDI units, try M&W in Australia, they make CDI's especially for Rotaries. Very good products.
Rotaman
