DIY: Battery relocation to trunk


 11-14-2012, 12:18 AM
#154
SARX Legend
iTrader: (46)

Dude have you seen the welding cable that Hoss-05 got that I am using? It is super flexible and the copper strands are like hairs. Plus it is double shielded, chemical resistant, etc. It is not light though.
11-14-2012, 06:24 AM
#156

 11-14-2012, 07:55 AM
#157
I wasn't saying I was going with the OFC cable 9k  I am doing the cable yard stuff...just still deciding on what to go with (single wire vs double wire?)
If I have to ground the battery in the truck I might as well save $ and make 1 positive run from the nose to the trunk and then 2 short runs (battery to shock and engine bay "terminal" to chassis)
I am doing the cable yard stuff...just still deciding on what to go with (single wire vs double wire?) If I have to ground the battery in the truck I might as well save $ and make 1 positive run from the nose to the trunk and then 2 short runs (battery to shock and engine bay "terminal" to chassis)
 That double wire stuff is cool as hell.
11-14-2012, 10:22 AM
That double wire stuff is cool as hell.
11-14-2012, 10:22 AM
#161

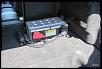
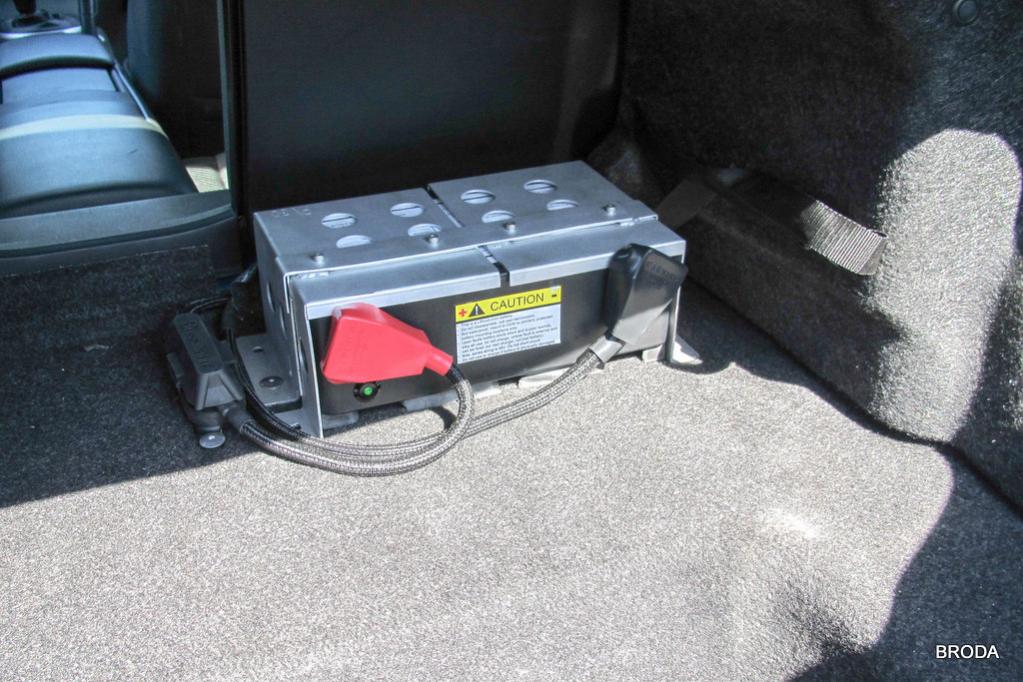
I relocated my battery to the trunk 8 months ago; here are some notes on my experience:
6 AWG Positive
I used a single 6 gauge fine-strand welding cable from the engine bay to the trunk. It works fine, and the car starts reliably, but the voltage drop across the 6 gauge positive is over 2 volts during cold cranking, which makes the car crank a little slower than usual. Even with a 7 lb battery, the car fires up every time, but if I had to do it again, I would go with 4 gauge.
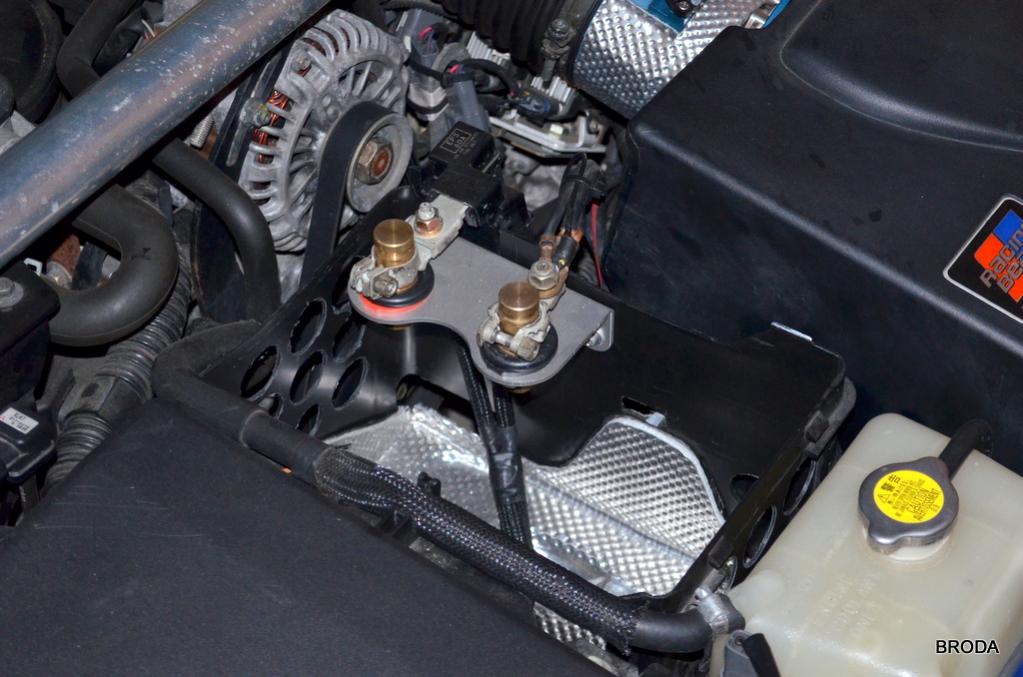
Remote Battery Posts
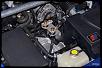
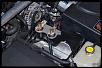
I wanted a neat, tidy looking place to mount the OEM battery terminals, so I mounted a set of remote battery posts under the hood in the stock battery location. It looks good (imho), but the brass battery posts are very heavy. If I did it again, I'd use hollow posts.
Cable Routing
As many others have done, I drilled a hole behind the windshield washer reservoir and ran the positive battery cable down the passenger side door threshold below the plastic cover. Be very careful drilling through the fire wall, as there is a wiring harness right next to where you want the hole.
Chassis Ground
I grounded the battery to an OEM chassis ground near the rear seat belt mount. I don't have a pic, but it is behind the plastic interior panel adjacent to the rear seat back. This was also done with 6 gauge fine-strand welding cable, but the cable length is very short. The voltage drop from the negative battery terminal to the engine block during cranking is less than 0.2 V.
Fuse
I added a 125A fuse on the positive cable less than 12" from the battery. I wasn't sure if 125A would be enough, but it hasn't blown yet in 8 months of driving.
That's it. This week the battery is coming back out for winter storage. Two years on the Voltphreaks VPH900, and it's still rock solid.
6 AWG Positive
I used a single 6 gauge fine-strand welding cable from the engine bay to the trunk. It works fine, and the car starts reliably, but the voltage drop across the 6 gauge positive is over 2 volts during cold cranking, which makes the car crank a little slower than usual. Even with a 7 lb battery, the car fires up every time, but if I had to do it again, I would go with 4 gauge.
Remote Battery Posts
I wanted a neat, tidy looking place to mount the OEM battery terminals, so I mounted a set of remote battery posts under the hood in the stock battery location. It looks good (imho), but the brass battery posts are very heavy. If I did it again, I'd use hollow posts.

Cable Routing
As many others have done, I drilled a hole behind the windshield washer reservoir and ran the positive battery cable down the passenger side door threshold below the plastic cover. Be very careful drilling through the fire wall, as there is a wiring harness right next to where you want the hole.
Chassis Ground
I grounded the battery to an OEM chassis ground near the rear seat belt mount. I don't have a pic, but it is behind the plastic interior panel adjacent to the rear seat back. This was also done with 6 gauge fine-strand welding cable, but the cable length is very short. The voltage drop from the negative battery terminal to the engine block during cranking is less than 0.2 V.
Fuse
I added a 125A fuse on the positive cable less than 12" from the battery. I wasn't sure if 125A would be enough, but it hasn't blown yet in 8 months of driving.
That's it. This week the battery is coming back out for winter storage. Two years on the Voltphreaks VPH900, and it's still rock solid.
The following users liked this post:
hufflepuff (03-07-2018)
 . Not sure if the S2's layout is a bit different back there. Any chance you could get a pic?
The following users liked this post:
rob babicki (07-21-2021)
 11-14-2012, 01:10 PM
#169
https://www.rx8club.com/do-yourself-...p-power-16217/
Several other companies make similar brackets for similar money.
11-14-2012, 01:15 PM
#170
I don't have any pics, but I used the same location as eXentric suggests in this thread:
https://www.rx8club.com/do-yourself-...p-power-16217/
https://www.rx8club.com/do-yourself-...p-power-16217/
11-14-2012, 01:17 PM
#171
SARX Legend
iTrader: (46)
Thanks, I just ordered this
JEGS Performance Products 10314K JEGS Remote Battery Jumper Terminal Mounting Bracket
Houston, you can have that other bracket I bought if you want it.
JEGS Performance Products 10314K JEGS Remote Battery Jumper Terminal Mounting Bracket
Houston, you can have that other bracket I bought if you want it.
11-14-2012, 01:27 PM
#172
11-14-2012, 01:30 PM
#173
Thanks, I just ordered this
JEGS Performance Products 10314K JEGS Remote Battery Jumper Terminal Mounting Bracket
Houston, you can have that other bracket I bought if you want it.
JEGS Performance Products 10314K JEGS Remote Battery Jumper Terminal Mounting Bracket
Houston, you can have that other bracket I bought if you want it.
11-14-2012, 01:51 PM
#175
There's not much room between the A/C blower and the firewall, plus there is carpet, carpet pad, and the engine wiring harness to deal with. It was a bit nerve-racking, but I think it's the best place to drill the firewall. Just make sure you use a quality grommet and not something which will fall out. Here is the one I used: StreetWires FB4 4-gauge firewall bushing at Crutchfield.com