
DIY: MazdaSpeed StrutBar install (and IPT cover)
 05-30-2004, 06:49 PM
#1

MazdaSpeed StrutBar install and IPT cover
I had originally taken pictures as I was doing the job but someone deleted my memory stick so keep that in mind.
Step 1
Jack your car up onto Y supports, if you don't your going to have much tougher time!
Step 2
Using a 12mm Key an extender and a ratchet unbolt the 2 smaller black bolts of the Stock Bar. Repeat on the other side and Stock Bar will lift off.

Step 3
Using a 14mm Key an extender and a ratchet unbolt the 3 green larger nuts holding down the Stock Bracket. Repeat on other side, save the 6 green nuts. Lift the Bracket off.

Step 4
Using a 17mm key and a ratchet loosen the Mazdaspeed bars blots to make it easier to position.
Step 5
Tighten the left and right brackets of the Mazdaspeed bar using a 14mm key an extender a ratchet and the green nuts.
Step 1
Jack your car up onto Y supports, if you don't your going to have much tougher time!
Step 2
Using a 12mm Key an extender and a ratchet unbolt the 2 smaller black bolts of the Stock Bar. Repeat on the other side and Stock Bar will lift off.
Step 3
Using a 14mm Key an extender and a ratchet unbolt the 3 green larger nuts holding down the Stock Bracket. Repeat on other side, save the 6 green nuts. Lift the Bracket off.
Step 4
Using a 17mm key and a ratchet loosen the Mazdaspeed bars blots to make it easier to position.
Step 5
Tighten the left and right brackets of the Mazdaspeed bar using a 14mm key an extender a ratchet and the green nuts.
 05-30-2004, 06:49 PM
#2
Step 6
Retighten the loosened MazdaSpeed Bolts.
Step 7
Brace the Master Cylinder using an Allen wrench and a 1/2in wrench.

Bar Installed!


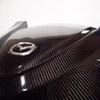
IPT Cover and Bar (HOLY SMOKES BATMAN)
I can't wait for Parker at IPT to Carbon Fiber the rest of the engine bay.
I told him that when he makes the AirBox out of CF to make the hinges a little higher because with the Mazdaspeed bar the right side of the cover doesn't quite touch down.
See here

Also when the cover rubs on the CF laminate on the Mazdaspeed Bar it scratches away the laminate on the bar so I put 2 pieces of black electrical tape over the place where the cover comes in contact with the bar.
See here (focus fix soon)

Retighten the loosened MazdaSpeed Bolts.
Step 7
Brace the Master Cylinder using an Allen wrench and a 1/2in wrench.
Bar Installed!
IPT Cover and Bar (HOLY SMOKES BATMAN)
I can't wait for Parker at IPT to Carbon Fiber the rest of the engine bay.
I told him that when he makes the AirBox out of CF to make the hinges a little higher because with the Mazdaspeed bar the right side of the cover doesn't quite touch down.
See here
Also when the cover rubs on the CF laminate on the Mazdaspeed Bar it scratches away the laminate on the bar so I put 2 pieces of black electrical tape over the place where the cover comes in contact with the bar.
See here (focus fix soon)
05-30-2004, 07:09 PM
#3
New Member

nice job polak.
The problem is my front strut is going to be a 4 pt one. There is no way I can fit the cover in securely right? Is there a way around this problem?
The problem is my front strut is going to be a 4 pt one. There is no way I can fit the cover in securely right? Is there a way around this problem?
05-30-2004, 07:58 PM
#4

That is that bar by AutoEXE but by design I disagree with what they have done with it however the cover fits over it.
There is also this one by CP racing

However it�s my opinion that that bar is the worst of all. (But for 200 bucks well...)
The MazdaSpeed 4 point brace is the best out off all of them as is the case with the 2 point bar.
When going for rigidity the worst thing you can do is put bends in a tube which is what CP did.
And as far as AutoEXE it looks like they were trying to design that bar around the cover which just defeats the purpose of a bar for rigidity.

 05-31-2004, 12:21 PM
#6
Registered User

Join Date: Feb 2004
Location: Fremont, California
Posts: 470
Likes: 0
Received 0 Likes
on
0 Posts
I don't think the 4pt MS or the Autoexec strut tower braces will fit LHD 8s. Look at the pics above and see that the windshield washer fluid and master brake cylinder are reversed on the LHD 8 engine bay (the one w/ the CP strut tower brace). I have yet to hear of any LHD 8s w/ these braces on. The day someone proves me wrong on the MS 4pt brace is the day I will order it.
05-31-2004, 07:47 PM
#9
Originally posted by JasonHamilton
A bit off topic, but can anyone explain to me the purpose of the engine cover? It seems to retain heat.
A bit off topic, but can anyone explain to me the purpose of the engine cover? It seems to retain heat.
05-31-2004, 07:49 PM
#10
Originally posted by neit_jnf
I'd like to know what does bracing the master cylinder accomplish? Won't this transfer part of the strut bar stress to it therefore increasing it's wear?
I'd like to know what does bracing the master cylinder accomplish? Won't this transfer part of the strut bar stress to it therefore increasing it's wear?
06-01-2004, 05:28 AM
#11
Registered User
Join Date: Oct 2003
Location: Spotsylvania, VA
Posts: 277
Likes: 0
Received 0 Likes
on
0 Posts
Does the cover completely close? It could be just the angle, it looks like the front of the cover isn't pushed down all the way. Or maybe just for the shot.
Looks great, good job.
Looks great, good job.
06-01-2004, 01:45 PM
#12
Forum Vendor
Join Date: Jan 2004
Location: iptmotorsports.com
Posts: 109
Likes: 0
Received 0 Likes
on
0 Posts
Originally posted by mmmdowning
Does the cover completely close? It could be just the angle, it looks like the front of the cover isn't pushed down all the way. Or maybe just for the shot.
Looks great, good job.
Does the cover completely close? It could be just the angle, it looks like the front of the cover isn't pushed down all the way. Or maybe just for the shot.
Looks great, good job.
It is just the pic it goes down just like stock
parker
www.iptms.com

 06-02-2004, 12:49 AM
#15
Yes very much so, I live in a development with lots of speed humps. When I went over the first hump I really felt a difference then when I took my first turn it was ecstasy. However, after the first hour you get used to it and you can�t remember what the stock bar feels like.
06-02-2004, 06:11 PM
#17
New Member
I think I will still have the cover on with cutting a few parts and tie them down to the strut... will let you know when i get my strut and installed them
12-10-2004, 01:48 AM
#18
Registered User

Join Date: Sep 2002
Location: LA, USA
Posts: 104
Likes: 0
Received 0 Likes
on
0 Posts
Step 1
Jack your car up onto Y supports, if you don't your going to have much tougher time!
Why we have to jack up the car when we install the front strut bar? It is necessarily to jack up the car when install the Front and black strut?
Jack your car up onto Y supports, if you don't your going to have much tougher time!
Why we have to jack up the car when we install the front strut bar? It is necessarily to jack up the car when install the Front and black strut?
12-10-2004, 06:58 AM
#19
Human Being

Join Date: Aug 2003
Location: plains
Posts: 554
Likes: 0
Received 0 Likes
on
0 Posts
Originally Posted by Brian_RX
Step 1
Jack your car up onto Y supports, if you don't your going to have much tougher time!
Why we have to jack up the car when we install the front strut bar? It is necessarily to jack up the car when install the Front and black strut?
Jack your car up onto Y supports, if you don't your going to have much tougher time!
Why we have to jack up the car when we install the front strut bar? It is necessarily to jack up the car when install the Front and black strut?
12-13-2004, 05:21 PM
#20
Rangers Lead The Way!

I didn't have to jack or lift the car up or anything to put my MS front tower bar on. Just loosen up all the bolts on the MS strut bar, place it over the mounting bolts on the struts. Then tighten everything up.
 07-01-2005, 05:59 PM
#25
Registered

Join Date: Feb 2004
Posts: 1,553
Likes: 0
Received 0 Likes
on
0 Posts
i just recieved my MS strut bar today and on it, it says
"!caution do not perform the work with the vehicle lifted or jacked up. the nuts securing the bases are tigtened with the suspension upper mounts. if the front strut bar bases are removed while the tires are off the ground, the suspension could fall"
another question... is the side with the master cylinder suppose to be flexible? with the head being able to pivot?