
DIY: Moisture In Your Tail Lights? Quick Easy Fix!
 01-02-2010, 11:18 AM
#51
really holes? i just took mine off and let it air out and when it was dry i made a better foam gasket tape! and no condensation since then...
buy here:
http://www.iaqsource.com/product.php...product=112227
buy here:
http://www.iaqsource.com/product.php...product=112227
 01-03-2010, 02:12 AM
#53
Swimming in my tail light

Join Date: Jan 2009
Location: Newnan, GA
Posts: 32
Likes: 0
Received 0 Likes
on
0 Posts
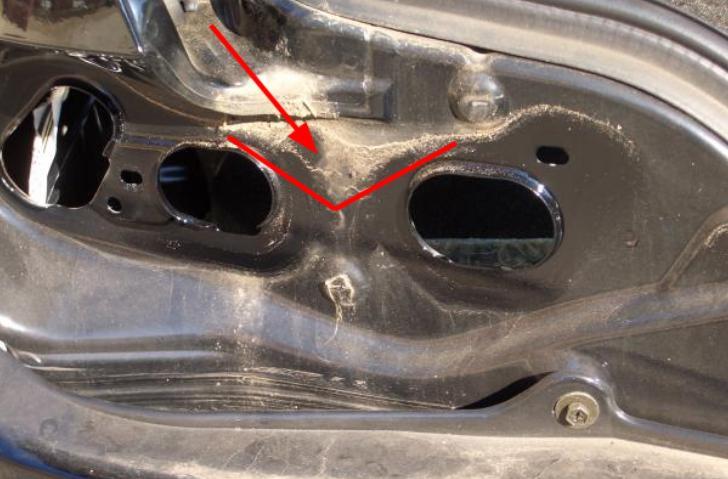
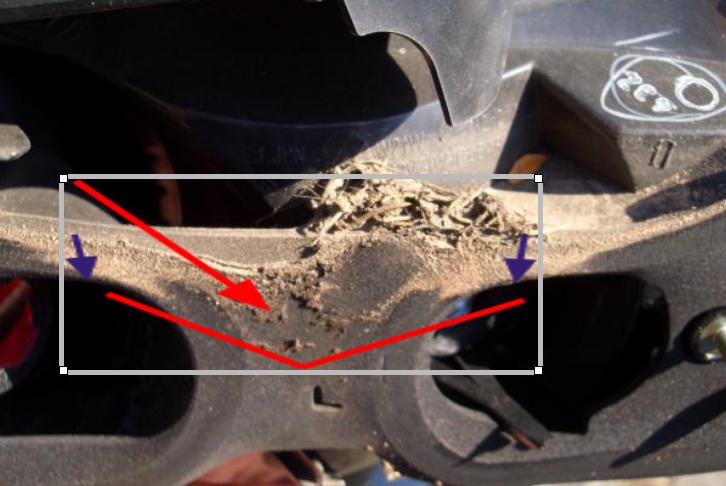
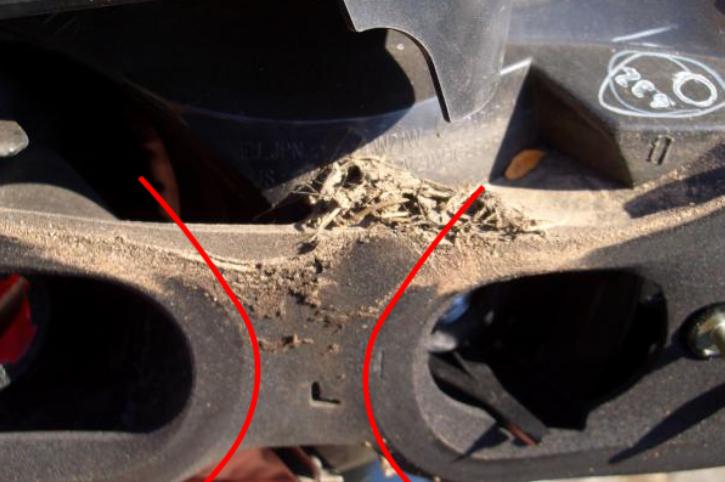
water and dirt runs directly from the truck lid drainage channel into the gasket seam

Water and dirt collect into a pocket at the gasket seam and erodes away the seal, see where the seal is compromised at the blue arrows

Speculation that removing the excess gasket seam would fix the problem

Water and dirt collect into a pocket at the gasket seam and erodes away the seal, see where the seal is compromised at the blue arrows
Speculation that removing the excess gasket seam would fix the problem
 01-04-2010, 09:08 PM
#55
Registered

Join Date: Oct 2004
Location: Philly
Posts: 332
Likes: 0
Received 0 Likes
on
0 Posts
Some pics for you
water and dirt runs directly from the truck lid drainage channel into the gasket seam
Water and dirt collect into a pocket at the gasket seam and erodes away the seal, see where the seal is compromised at the blue arrows
Speculation that removing the excess gasket seam would fix the problem
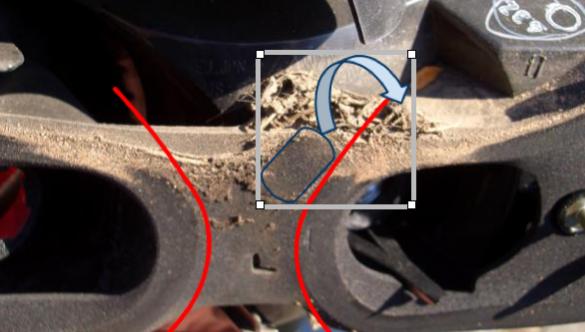
See blue oval and arrow, used my index finger to push away excessive dirt/debris for photo. That clump was in the seam pocket.
water and dirt runs directly from the truck lid drainage channel into the gasket seam
https://www.rx8club.com/attachment.ph...1&d=1261680690
Water and dirt collect into a pocket at the gasket seam and erodes away the seal, see where the seal is compromised at the blue arrows
https://www.rx8club.com/attachment.ph...1&d=1261680690
Speculation that removing the excess gasket seam would fix the problem
https://www.rx8club.com/attachment.ph...1&d=1261680690
https://www.rx8club.com/attachment.ph...1&d=1261680690
Water and dirt collect into a pocket at the gasket seam and erodes away the seal, see where the seal is compromised at the blue arrows
https://www.rx8club.com/attachment.ph...1&d=1261680690
Speculation that removing the excess gasket seam would fix the problem
https://www.rx8club.com/attachment.ph...1&d=1261680690
Water and dirt collect into a pocket at the gasket seam and erodes away the seal, see where the seal is compromised at the blue arrows
Speculation that removing the excess gasket seam would fix the problem
See blue oval and arrow, used my index finger to push away excessive dirt/debris for photo. That clump was in the seam pocket.
01-04-2010, 09:11 PM
#56
Registered
Join Date: Oct 2004
Location: Philly
Posts: 332
Likes: 0
Received 0 Likes
on
0 Posts
really holes? i just took mine off and let it air out and when it was dry i made a better foam gasket tape! and no condensation since then...
buy here:
http://www.iaqsource.com/product.php...product=112227
buy here:
http://www.iaqsource.com/product.php...product=112227
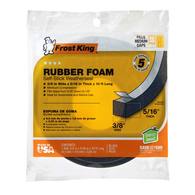
It's Frost King black foam tape they sell at Lowes or HD, it's been 3+ years now since I put it on, no water at all, none. Just wrap around rim edge on the taillight where the gasket would seat, make sure to clean the tailllight and seat area with rubbing alcohol first. Also, make sure the seam faces down (water can not run uphill) where the tape meets up together, and butt it/bunch it up there to create a tighter seal. I used 3/4" X X 5/16" X 10'

I didn't post it because I wasn't sure that it would work and I lost the photos on a shdc card somewhere in my house. 3+ years is pretty good evidence it works.
Last edited by Slick8; 01-04-2010 at 09:21 PM.
01-09-2010, 06:49 AM
#58
Registered User

Join Date: Aug 2008
Posts: 55
Likes: 0
Received 0 Likes
on
0 Posts
i used this method, worked perfectly.drilled 2 holes in the lowest resting area of the taillight.fog was gone and hasnt come back.there may be other ways of doing this, but this method is quick, it works, and its free.

 01-12-2010, 06:05 PM
#61

BTW, i bought the redesigned gasket and installed it...better, but i still have water getting in.
01-16-2010, 04:20 PM
#62

Dangit! I did this today and when finished both tail covers had a crack at the top where the black thing stops. I have no idea how I did that (I was very careful)- but they must be quite fragile.
Oh- and the nuts on both my mine came off by hand- no wrench needed. They were that loose.
Oh- and the nuts on both my mine came off by hand- no wrench needed. They were that loose.
Last edited by BReal-10EC; 01-16-2010 at 04:27 PM.
01-18-2010, 11:19 AM
#63
newbtacular newbness
iTrader: (1)

Join Date: Jun 2009
Location: Seattle, WA
Posts: 133
Likes: 0
Received 0 Likes
on
0 Posts
I just replaced my tail light gaskets with the "new and improved" ones from Mazda. I took out the housings and spent a good hour drying them out, which was a pain in the ***. The new gaskets are indeed thicker and more LUXURIOUS. BUT! I drove to work this morning and there is already condensation inside the tail lights after just a short 10min drive. Let me be clear, though, this is condensation not rain water seeping in. I'm sure it'll rain later today so we'll see if that seeps in.
What gives?!
Should I add silicone sealant to the gaskets? Or bin the ******* $45 dollar a piece gaskets I just bought and try a roll of rubber weather stripping from Home Depot and try that instead?
*shakes fist at Mazda*
What gives?!
Should I add silicone sealant to the gaskets? Or bin the ******* $45 dollar a piece gaskets I just bought and try a roll of rubber weather stripping from Home Depot and try that instead?
*shakes fist at Mazda*
Last edited by Butters; 01-18-2010 at 11:29 AM.
01-18-2010, 05:26 PM
#64
Registered User

Join Date: May 2009
Posts: 6
Likes: 0
Received 0 Likes
on
0 Posts
Both of mine were nearly brimming with water after a spirited wash and rain storm. I searched the boards and felt wary of drilling my lenses. I've done it on beater cars before, but this one won't be tampered with in such a way. I removed both tail light assemblies and carefully peeled the old gaskets off in one piece. After removing the bulbs and having two void housings, I tried to figure out the fastest way to dry them out. I tried vacuum lines, hair dryers, regulated compressed air, but nothing worked as good as-- the oven.
After removing most of the larger deposits of water, I laid a cookie sheet in the oven with a few towels to serve as padding for the lights. After the oven reached it's lowest setting, 170F, I placed them on the towels, clear side down (light-holes facing up). I checked the lights every thirty minutes or so, wary that the plastic would become weak or the foam insulating around the LED strips would start to fail. It never happened, and I'm proud to say it was a case of set it and forget it. About an hour and a half passed and they were dry as a bone. I refreshed the old gaskets with some clear silicone adhesive and reinstalled the lights. I replaced the old nuts with new nylon lock nuts, preventing a vibratory backing as the previous nuts encountered.
I've been water/condensation free for just under a year now!
Aside from some dime lock nuts I happened to have lying around, this was free. I get the concept of drilling the holes is faster and easier, but my method allowed me to clean the trunk and enjoy a few Heinekens while waiting for my lenses to bake
Last edited by ksanders8706; 01-18-2010 at 05:31 PM.
01-22-2010, 02:20 PM
#66
newbtacular newbness
iTrader: (1)
Join Date: Jun 2009
Location: Seattle, WA
Posts: 133
Likes: 0
Received 0 Likes
on
0 Posts
Well, I have replaced the $90 in OEM gaskets with $5 weather stripping from Home Depot and it seems to have solved the water seepage problem. The condensation problem is still around, though. I'm waiting to see if heavy rain will still seep in, wouldn't ya know that the day after I install the weather stripping it has ceased to rain in Seattle for three days straight. What the ****?
Does anyone still get condensation in the tail lights even after your weather stripping/drilling/silicone sealant+weather stripping/silicone sealant+new gaskets?
Does anyone still get condensation in the tail lights even after your weather stripping/drilling/silicone sealant+weather stripping/silicone sealant+new gaskets?
 01-25-2010, 09:13 AM
#70

Exactly. After drying get the upgraded Mazda gaskets or some silicone sealant. Drilling holes is just silly.
Why drill holes in the tail lights? It took me 5 minutes(no lie) to remove the tail light. Then the easiest way to remove the water is to get a couple sheets of paper towel, twist them together and push it into the light hole. Slosh around the water and let it get soaked up by the paper towel. Then, blow dry for 5 minutes on low to dry the gasket and remove any moisture left behind in the tail light. Clean around the gasket and put clear silicone around the entire gasket for good measure. Let it sit for 10 - 15 minutes(enough to scab over) and reinstall.
It took me about 30-40 minutes total or so to do both tail lights. If you live near boston, I'll fix them for you for a 6 pack
It took me about 30-40 minutes total or so to do both tail lights. If you live near boston, I'll fix them for you for a 6 pack
 .
.

 01-27-2010, 05:56 PM
#74

Its crazy to see people still like beating a dead horse in this thread.
And its sad to see people who have no real contribution to this forum post here just to attack others.
That alone shows me a person's "character type".
This is why I stayed out of this thread... the immaturity is incredible.