DIY: Radar Detector hard wired installation
 03-21-2006, 10:47 AM
#126
the stig is my hero

Join Date: Feb 2006
Location: NC
Posts: 701
Likes: 0
Received 0 Likes
on
0 Posts
Nevermind. I took a trip to my local best buy and bought a universal hardwire kit for $13. It basically had a slim, straight cable and universal ends for it to fit in any detector. The other end of the cable was fuse connectors. I just bought an add-a-fuse from Auto-Zone for like $6, and then hooked it up to the aux power fuse. Now my detector turns on with the car, and looks very stock ;-) Thanks guys for your great guidance on this thread! I'll post a pic at some point here, as I'm pretty impressed with how it looks.
 04-03-2006, 04:52 PM
#127
Registered User

Join Date: Dec 2005
Location: Bellevue, WA
Posts: 120
Likes: 0
Received 0 Likes
on
0 Posts
Originally Posted by Speed Racer
Yep, that's my handiwork! :D
The V1 is still mounted up at the top of the windshield where it gets its best performance. I opted for the remote display because I hate announcing the presence of a radar detector (or in this case locator) with all of its flashing lights. It also places the mute/function button within a finger's reach when your hand is on the shifter.
The V1 is still mounted up at the top of the windshield where it gets its best performance. I opted for the remote display because I hate announcing the presence of a radar detector (or in this case locator) with all of its flashing lights. It also places the mute/function button within a finger's reach when your hand is on the shifter.
Your install looks great!
Thanks!!
04-04-2006, 10:35 PM
#128
Registered

Join Date: Mar 2006
Posts: 43
Likes: 0
Received 0 Likes
on
0 Posts
I'm looking to do the fusebox hardwire for a V1 and type Add-A-Circuit into google to try to find the fuse part and came up with http://www.amazon.com/gp/product/B00...lance&n=172282
Is this the correct part?
Thanks.
Is this the correct part?
Thanks.
04-25-2006, 06:40 PM
#129
Registered User

Join Date: Nov 2005
Location: Colorado Springs, CO
Posts: 31
Likes: 0
Received 0 Likes
on
0 Posts
Great DIY instructions. I installed my V1 today and these instructions made it completely painless. I did as others suggested and hid the power unit with the red cord in the headliner to the left of the dome lights/glasses holder.
 12-31-2006, 06:00 PM
#131
Moof

Join Date: Nov 2006
Posts: 51
Likes: 0
Received 0 Likes
on
0 Posts
add me to the crew that has done the V1 hardwiring.  i used one of the two middle wires on the small, 4-plug wire going to the dome lights, i believe. i also used the tip from post #15 and tucked the V1's adapter box up against the roof, above and next to the metal frame that the dome light assembly screws into. the only thing showing is the cable.
the two middle wires were both at 12V with the ignition off, which although not ideal isn't a big deal, as i really should take the detector off and lock it in the glovebox when parked.
i used the amazon.com $5 multimeter/voltmeter, btw, and it worked like a charm. it's perfect for small, non-demanding projects like this.
http://www.amazon.com/Ziotek-Mini-Mu...&s=electronics
i used one of the two middle wires on the small, 4-plug wire going to the dome lights, i believe. i also used the tip from post #15 and tucked the V1's adapter box up against the roof, above and next to the metal frame that the dome light assembly screws into. the only thing showing is the cable.the two middle wires were both at 12V with the ignition off, which although not ideal isn't a big deal, as i really should take the detector off and lock it in the glovebox when parked.
i used the amazon.com $5 multimeter/voltmeter, btw, and it worked like a charm. it's perfect for small, non-demanding projects like this.
http://www.amazon.com/Ziotek-Mini-Mu...&s=electronics
 01-06-2007, 06:15 PM
#133
Moof
Join Date: Nov 2006
Posts: 51
Likes: 0
Received 0 Likes
on
0 Posts
Originally Posted by Tanaka826
can you hardwire without the sunroof?
01-07-2007, 02:01 PM
#135
Gearhead Geek

Join Date: Jul 2003
Location: TN
Posts: 521
Likes: 0
Received 0 Likes
on
0 Posts
Originally Posted by shikataganai
i believe that the wire i used goes to the dome light. just bust out the voltmeter and see if wires in the roof are at 12V...
But mine is a GT, so what do I know
 ?
?Dennis
04-21-2007, 12:17 PM
#136
1 + 9K = :)
Join Date: Mar 2007
Location: Churzee
Posts: 46
Likes: 0
Received 0 Likes
on
0 Posts
Good DIY, thanks.
FWIW, there's plenty of room above the metal assembly behind the lamp/sunglass unit to store both the V1 "power block" and any excess power cable.
Also, my V1's suction cups seem to be adhering to the "dot matrix" on the windshield without difficulty.
Thanks again!
FWIW, there's plenty of room above the metal assembly behind the lamp/sunglass unit to store both the V1 "power block" and any excess power cable.
Also, my V1's suction cups seem to be adhering to the "dot matrix" on the windshield without difficulty.
Thanks again!
04-21-2007, 01:10 PM
#137
Gearhead Geek
Join Date: Jul 2003
Location: TN
Posts: 521
Likes: 0
Received 0 Likes
on
0 Posts
Originally Posted by Plaz
Also, my V1's suction cups seem to be adhering to the "dot matrix" on the windshield without difficulty.
Dennis
04-21-2007, 01:38 PM
#138
1 + 9K = :)
Join Date: Mar 2007
Location: Churzee
Posts: 46
Likes: 0
Received 0 Likes
on
0 Posts
Originally Posted by dwynne
Mine does as well - and even if one cup comes loose it just drops down a fraction of an inch and sits on top of the mirror - so it does not come off the glass. Pretty stealth install with the remote display mounted on top of the steering column and becomes 100% stealty if I leave the sun glass holder open. About once of twice a year, usually during season changes, the V1 suction cups come loose and I have clean them and work with them to get a good stick back on the glass - but I have the same problem with an Escort 8500 and its mount is not nearly as nice (nor is the detector).
Dennis
Dennis
I've found that the hotter the ambient air temp, the more durable the suction seal will be. I'll often crank the windshield defroster at max temp for a few minutes to really heat things up before affixing the suction cups. That way, as the windshield/air/cups cool off, the air inside the seal also cools off and shrinks -- tightening the seal as it does so.
Yay, physics!
 04-21-2007, 01:49 PM
#139
Gearhead Geek
Join Date: Jul 2003
Location: TN
Posts: 521
Likes: 0
Received 0 Likes
on
0 Posts
I thought about trying to stick some of that "super duty" Velcro to the glass and the other side to the V1 mount (suction cups removed) and try that. If the Velcro can stay stuck to the glass, then I know the V1 is light enough to hang on to the Velcro.
I also toyed with the idea of putting some silicone sealant or some other liquid adhesive on the cups and just glue them to the glass. When I sell the car, the next owner would get a free pair of V1 suction cups
Dennis
I also toyed with the idea of putting some silicone sealant or some other liquid adhesive on the cups and just glue them to the glass. When I sell the car, the next owner would get a free pair of V1 suction cups
Dennis
 11-04-2007, 07:36 PM
#141
Registered User

Join Date: Aug 2007
Posts: 20
Likes: 0
Received 0 Likes
on
0 Posts
2005 base
I do not have a wire that runs in the head liner that is only on when the car is on.... Any suggestions? Would i have to wire one all the way from the fuse box?? any help?
01-14-2008, 08:47 PM
#143
Registered User

Join Date: Mar 2006
Posts: 39
Likes: 0
Received 0 Likes
on
0 Posts
Hard 8,
I tried this installation and couldn't get the fuse panel cover back on correctly. It seems the fuse tap bulges out a bit and doesn't allow for complete closure. Did you have this problem as well?
I tried this installation and couldn't get the fuse panel cover back on correctly. It seems the fuse tap bulges out a bit and doesn't allow for complete closure. Did you have this problem as well?
05-21-2008, 09:08 PM
#144
Master Shr3dd3r

Join Date: May 2008
Location: Colleyville, TX
Posts: 217
Likes: 0
Received 0 Likes
on
0 Posts
Hard 8, great pictures on the install although this being my first time to do this kind of wiring, I was very intrigued to figure it out even if I had no clue what I was doing. Since I dont have a powered rear view either I had to go the fuse box method...
I can add a little bit in depth for anyone who is COMPLETELY clueless with wiring as I am. Just like everyone said I went out and bought the add-a-circuit from Autozone. It wasn't the one that you guys posted but it still worked.. it came in this small yellow packaging. I think it was like 7 bucks. I cut the end of the red wire on the direct power adapter (comes with the V1) so a little bit of silver wiring was exposed and stuck it in the blue connector of the add-a-circuit. I got some pliers and clamped the blue connector with a little bit of force so the red wiring wouldn't slide out.
If you notice on hard 8's last picture he has both the fuse panel out and another panel out. There is a little screw next to the upper panel that's connected to the dash right next to your gauges. I wasn't sure what to connect the end of the black wiring to (that's connected to the V1 power adapter) so I got a washer and stuck the end of the black wire between the screw and washer to power it. I connected the add-a-circuit to one of my spare fuse inserts and yes it worked!!
I rolled up the excess wiring from the V1 power unit into a circular bundle like a hose and just used a zip tie to keep the wires from going everywhere and stuffed those and the actual power unit into the upper panel. It takes a little bit of effort but you can fit them in there if the power unit is turned just right. I then ran my flat power cord up the weather panel and into the insert between the side airbags and the pillar. You can get it to fit in between the little niche if you work with it a bit. Then from there you can fit the rest of the cable in the opening of your roof.. definitely much easier if you have two people. I held the power cord in place in the roof while my sister tightened the cord near the passenger side and pulled it out to plug into the radar which is above my rear view mirror.
Sorry for the long entry, but I tried to detail the explanation as much as possible for anybody else attempting to do this with no knowledge of wiring or messing with the fuse box or anything! Definitely use Hard 8's pictures.. they explain A LOT!! I will try to take some pictures as the mount above the rear view mirror looks VERY concealed even from the outside and the power cord that slips in between the side airbag and pillar slit is hardly noticeable!!!
07-10-2008, 11:00 AM
#145
Registered User

Join Date: Apr 2008
Posts: 187
Likes: 0
Received 0 Likes
on
0 Posts
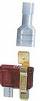
What about this tap?
I have the Escort X50, and was wondering if anyone has use this piece for hardwiring into to fuse box. The hardwire kit from escort has the "male" spade style lug, so I would also need a female/female spade lug coupler.
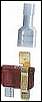
Any reason why this would not work? Does it mater which side/blade of the fuse itself that I attach this tap to?
BTW into which plug are we piggy backing this? I'd like to tap the radio fuse so that the detector only gets powered on when the car/accesories are? I imagine the fuse box map is in the owners manual??
04-09-2009, 10:45 AM
#146
D.K. wannabe

Join Date: Sep 2008
Location: New Jersey
Posts: 250
Likes: 0
Received 0 Likes
on
0 Posts
Thanks for the alternative. It was really hard trying to bring the Homelink wiring through the hole. So I tried you're method on my 2009 Rx8 and it worked. Just note: There is only one black wire on the 2009 models and that's the one I've plugged mine into. Didn't buy a voltmeter or anything. Really easy to do!
I did something like what you did, but just put the double RJ11 jack thingy up inside the headliner. So all that came out was a thin flat telephone wire I constructed about 6" long (in silver of course). Makes a nearly invisible install.
The other, and I think maybe easier part, is I didn't take apart, and use the mirror wiring. I instead used a large black wire coming out of the (larger) connector on the side going to the overhead assembly (***see the bunch of colored wires RIGHT IN FRONT in ATTACK's 3rd pic above w/big arrow pointing at it***) There are two black wires in there. To make sure you've got the right wire you can just use a voltmeter there to check what's live (red voltmeter lead to choosen connector wire, black to car chassis) while turning the key off/on.
Didn't have to strip anything, just clamp the V1 inline connector on it. Then plug and play! Works great. Sorry no pics of that, it's all back together.
06-02-2009, 12:18 AM
#148
I zoom therefore I am.

yes.. the cigarette lighter is a power source.. so splicing it will work fine. Run the wires behind the dash, zip tie as you go, then up one of the A pillars. it will take all of 10 minutes to do.
06-02-2009, 12:26 AM
#149
Registered User
iTrader: (2)

Join Date: May 2009
Location: NJ
Posts: 98
Likes: 0
Received 0 Likes
on
0 Posts
Success ran the power source to the radio fuse with a fuse inbetween the radio fuse and radar detector for extra security against blowing anything vital. Also hooked up a nicely mounted on off switch.. here some pics
switch:

radar:

switch:
radar:
06-02-2009, 12:29 AM
#150
I zoom therefore I am.
um.. you realize that having the radar detector mounted there and pointing downward will ensure you'll be able to wave to the cop before the detector even goes off, right?