DIY: Remove/Replace Rear Combination Light(Tail Light)


 01-30-2008, 04:02 PM
#27
Registered User

Join Date: Nov 2007
Posts: 116
Likes: 0
Received 0 Likes
on
0 Posts
Well I just got in a set of tail lights from an 08 I just ordered, only thing is that they didnt come with lightbulbs, will that make them not work and just fog up like the others, also now the lights are filled with packing peanuts and I cant get them all out. 
03-28-2008, 05:25 PM
#30
GoSpoddyGo!!!
hi
not been back in a while but the leds not coming on was due to a loose wire, supposedly...
DOH!!!! just be careful if you get the reversing sensors fitted and check the tail lights work correctly, before you leave the dealership.
not been back in a while but the leds not coming on was due to a loose wire, supposedly...
DOH!!!! just be careful if you get the reversing sensors fitted and check the tail lights work correctly, before you leave the dealership.

 07-08-2008, 06:28 PM
#33
CrossFit Eternal

Join Date: Jun 2008
Location: Charlotte NC
Posts: 100
Likes: 0
Received 0 Likes
on
0 Posts
Good DIY! I knocked it out this afternoon.
I did try putting vaseline on the old gasket to see if I can save it. I'm hoping the gasket will soak up the Vaseline and thicken up a good bit. An old trick I used on my old camaro when the T-tops used to leak.
I did try putting vaseline on the old gasket to see if I can save it. I'm hoping the gasket will soak up the Vaseline and thicken up a good bit. An old trick I used on my old camaro when the T-tops used to leak.
07-08-2008, 07:08 PM
#34
Man, We Ain't Found Sh*t!

did this mod with the new gaskets back in december and haven't seen a single drop or bit of condensation in my taillights since.. very useful DIY.. by the way my car stays outside and i live in washington where it rains all the damn time..


 03-08-2009, 12:09 AM
#38

This has been a very useful and helpful DIY. I have (had) this problem too.
The solution about cleaning the gasket was a good solution for me.
I've attached extra photos to take a look at the gasket. In my case I voted for lining the perimeter of the gasket with a foam tape. This will hopefully extend the surface contact and ensure there are no spaces around the seal for water to penetrate.
This might give others some ideas on how to fix this.
 05-12-2009, 08:44 AM
#40
Melbourne, Oztralia

Join Date: Nov 2006
Location: Melbourne, Australia
Posts: 100
Likes: 0
Received 0 Likes
on
0 Posts
Thank you so much nycgps for posting this.
I got fed up with my fish bowl. The water filled up 1/4 of the light!
The gasket was gross with dirt between it and the car. I dried the tail lights on both sides, replaced the gasket on the fish bowl side, but unfortunately, despite all best efforts... well.. the after shots tells the story.
I got fed up with my fish bowl. The water filled up 1/4 of the light!
The gasket was gross with dirt between it and the car. I dried the tail lights on both sides, replaced the gasket on the fish bowl side, but unfortunately, despite all best efforts... well.. the after shots tells the story.
06-14-2009, 06:54 AM
#41
Spazda RX-8

Join Date: Apr 2009
Location: Whitby, Ontario, Canada
Posts: 246
Likes: 0
Received 0 Likes
on
0 Posts
Just put on a new gasket on my right side. I swished some vinegar around to ensure no water spots will be left. Then I found a great way to blow air in to dry it out.
Here is what you do!
-You start a mattress on fire!
-Wait for the fire department to arrive.
-After the clean up is done, the clean up crew is sent from the insurance company.
-They place some large fans throughout the house to help dry and move the moisture around so no mould will for.
Place your taillight in front of one of these fans
Voila!
by the way ... this actually happened to me yesterday ... still made time to work on the 8!!


 02-06-2010, 05:47 PM
#44
Registered User

Join Date: Sep 2008
Posts: 21
Likes: 0
Received 0 Likes
on
0 Posts
great instructions and good write up, made it so easy to remove, btw the bolt is 10mm for anyone that wants to start the project.
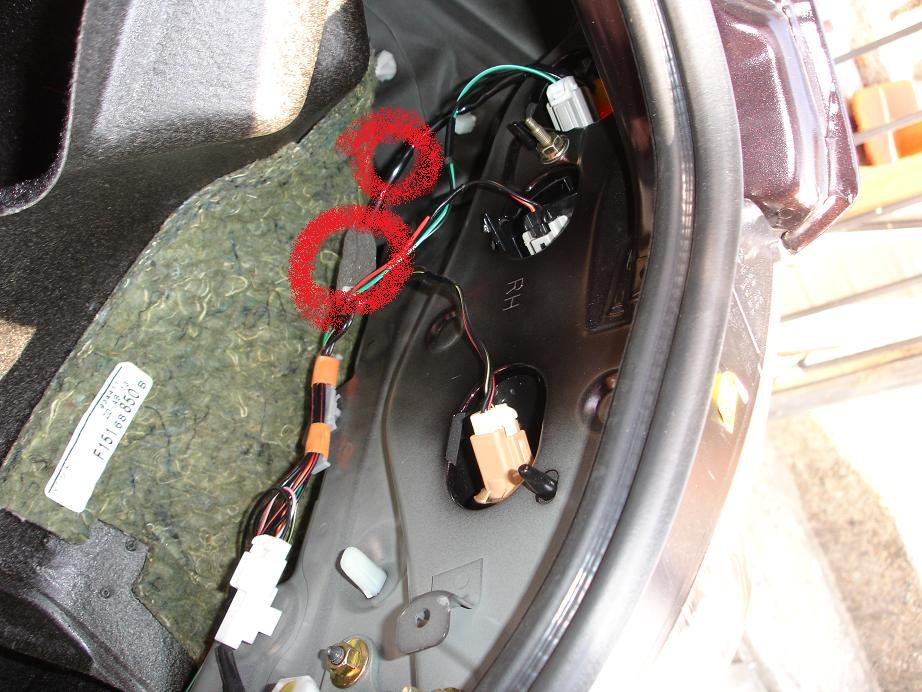
side note, don't let water accumulate too long or it will begin to disolve the chrome reflector housing.
also I reccommend u seal the gasket to the light housing physically because cleaning the gunk build up doesn't stop the water from going into the light again. water getting into the light is not a problem, bigger problem is the water will also find its way around the seal and into the inside lining of your trunk, feel around the lining behind the light and under the light to see if it is damp.
I have no idea why the water problem doens't happen to the driver side light because both lights look identical.
04-24-2010, 08:11 PM
#45
I got nothing good to say

Join Date: Jan 2004
Location: Tysons Corner, VA
Posts: 450
Likes: 0
Received 0 Likes
on
0 Posts
Great write up, and like was said before this is very easy to do. Looks like the replacement gasket is a two piece deal now and costs a whopping $54  at http://www.finishlineperformance.com...cat=302&page=1. I just reused the old gasket for now and sealed it with some Permatex black RTV on both sides. Hopefully that'll do the trick.
I heated the tail light in the oven at 170 F for almost two hours to get the water out completely. Nothin' says lovin' like tail light in the oven!

(not sure why the it's a hyperlink and image is not inserting - see attachment below)
I don't know why people drill holes when this simple procedure is almost as easy should fix the problem completely.
at http://www.finishlineperformance.com...cat=302&page=1. I just reused the old gasket for now and sealed it with some Permatex black RTV on both sides. Hopefully that'll do the trick.I heated the tail light in the oven at 170 F for almost two hours to get the water out completely. Nothin' says lovin' like tail light in the oven!
(not sure why the it's a hyperlink and image is not inserting - see attachment below)
I don't know why people drill holes when this simple procedure is almost as easy should fix the problem completely.
04-24-2010, 08:19 PM
#46
I got nothing good to say
Join Date: Jan 2004
Location: Tysons Corner, VA
Posts: 450
Likes: 0
Received 0 Likes
on
0 Posts
Oh, and to add; as an engineer I'm appalled at this ridiculous design. What genius looked at the design and didn't figure out it would be a problem?!  How much money has Mazda had to spend replacing tail lights/gaskets because of this?
How much money has Mazda had to spend replacing tail lights/gaskets because of this?
10-02-2010, 05:47 PM
#47
Registered

Join Date: Sep 2008
Location: Fort Meade, MD
Posts: 257
Likes: 0
Received 0 Likes
on
0 Posts
Thank you guys!!!
just cleaned out my right taillight - damn Tropical storm >.<
I used my blow dryer(has a setting to blow only cold air), and my Dyson vacuum hose in one hole, was dried out in about 2hours. I also rolled up a papertowel and stuck it through one of the holes to get a bulk of the water out.<< Helped alot.
11-02-2010, 07:47 PM
#48
Registered User

Join Date: Nov 2010
Posts: 29
Likes: 0
Received 0 Likes
on
0 Posts
*EDIT
I guess it doesn't =o wish me luck doing this at night! ULTRA LONG DRY WAIT!!
Last edited by DONX8; 11-02-2010 at 08:24 PM.
11-02-2010, 08:34 PM
#49
Registered User

Join Date: Apr 2010
Posts: 44
Likes: 0
Received 0 Likes
on
0 Posts
should i even attempt to try to clean the gaskets if someone drilled a hole in the tail lights. i guess the previous owner thought it would be a good idea to just make a hole on the bottom of the tail light. so when i wash my car, the inside of the tail light is soaked
11-03-2010, 02:08 AM
#50
Registered User
Join Date: Nov 2010
Posts: 29
Likes: 0
Received 0 Likes
on
0 Posts
should i even attempt to try to clean the gaskets if someone drilled a hole in the tail lights. i guess the previous owner thought it would be a good idea to just make a hole on the bottom of the tail light. so when i wash my car, the inside of the tail light is soaked