DIY: Remove SSV (beta/teaser video)
 03-31-2011, 04:27 AM
#126
ohio gozaimas!
So I think I have an issue related to the SSV...as documented here
https://www.rx8club.com/series-i-trouble-shooting-95/i-win-loudest-ticking-noise-%5Bvideo%5D-213088/
I also recently have really poor acceleration and poor gas mileage - less than 200 miles per tank.
I have replaced all the suspension on my car (sways, shocks, springs), replaced the cat-back exhaust, but this seems a bit too daunting for me. Ugh. And I don't like my dealership.
Does anyone know of any good mechanics in the San Jose area? :/
Is there a sure-fire way to test the SSV while it's still on the car?
 03-31-2011, 04:43 AM
#127

Even through the video shows the LIM out of the car (which was simply for ease of demonstration), these can be performed with it in the engine bay too.
03-31-2011, 10:22 AM
#128
ohio gozaimas!
Somebody didn't read the 1st post thoroughly, or they might have found a link to a "DIY for troubleshooting the intake valves"
Even through the video shows the LIM out of the car (which was simply for ease of demonstration), these can be performed with it in the engine bay too.
Even through the video shows the LIM out of the car (which was simply for ease of demonstration), these can be performed with it in the engine bay too.
 04-06-2011, 12:35 PM
#130
Registered User

So I'm assuming the failure to start now that I'm trying this procedure is gunk getting into the engine. It sounds similar to when the engine is flooded, would the standard deflood work or is there a better way to attempt to get the car started when all done with cleaning the ssv?
BTW, thanks for the help and explaining everything. Great help, but I also hate you because I watched that video and my SSV did not come out anything near that easily lol. I think I spent 2 hours at least just on the valve
BTW, thanks for the help and explaining everything. Great help, but I also hate you because I watched that video and my SSV did not come out anything near that easily lol. I think I spent 2 hours at least just on the valve
04-06-2011, 04:52 PM
#131
So I'm assuming the failure to start now that I'm trying this procedure is gunk getting into the engine. It sounds similar to when the engine is flooded, would the standard deflood work or is there a better way to attempt to get the car started when all done with cleaning the ssv?
But yes... you can treat it like a deflood and it will eventually start.

In that video, Steve's (Vyndictive) SSV was actually stuck in there very good.
He tried for awhile and I eventually took over and still had trouble.
Since we could pull the valve out ~1/2", I sprayed carb cleaner where I could and moved the valve in and out to worked the cleaner in.
I removed my SSV before his (mine wasn't sticking... just practicing) and it came out with no problems.
So your's being stuck in there that bad is a good indication that it needed to be pulled/cleaned and other "half-***" methods wouldn't have been sufficient.
04-06-2011, 04:56 PM
#132
Registered User
Ya got it going eventually. Had to clean the plugs up quite a bit and fight with it a bit more than normal. But now its up and running and the CEL is gone so guess cleaning the SSV did the trick. Thank god too because I troubleshot everything but the solenoid. I really didn't want to rip the intake apart to get to that lol
04-14-2011, 09:54 PM
#133

Jon - could you take a listen to my engine noise on my link - been trying to figure this out for a year. Would SSV sticking cause this possible situation!
https://www.rx8club.com/series-i-trouble-shooting-95/misfiring-fuel-starvation-video-sound-attached-204603/
https://www.rx8club.com/series-i-trouble-shooting-95/misfiring-fuel-starvation-video-sound-attached-204603/
04-15-2011, 07:55 AM
#134

Jon - could you take a listen to my engine noise on my link - been trying to figure this out for a year. Would SSV sticking cause this possible situation!
https://www.rx8club.com/showthread.php?t=204603
https://www.rx8club.com/showthread.php?t=204603
Jon, I'm interested in you thoughts here.
04-15-2011, 09:54 PM
#135
I've never heard a bad actuator or solenoid make a noise that loud where it could be heard like that in the car.
So I doubt its that... but I've given you the resources to test them all, in the 1st post of this thread, if you wish to verify.
I'll comment in your thread so we don't go off topic in this one...
04-16-2011, 09:11 PM
#136
Registered User

Join Date: Oct 2010
Posts: 20
Likes: 0
Received 0 Likes
on
0 Posts
So I have three days on trying to fix this and the fuel line and I started today and I already running into troubles..ok first off when I was watching your video I see that you have a different battery than I do I was struggling on removing the battery but I figured it out then there was the battery box, I can't seem to take that box out even though I remove the bolt on the bottom. What I found out is mine has a ledge by the PCM area where one of the coolant hose is blocking it and I can't get past it. I need help please and for the fuel line, I'll just ask somewhere else
04-17-2011, 04:16 AM
#137

What about the fuel line.......
Then why did you ask here?
Sorry dude.... but if the battery box was too much for you to figure out (even though the video does show it), then maybe its best that you find someone to help you out.
Does the valve actually need to be removed? If not, its best that you leave it alone.
05-24-2011, 09:55 AM
#138
Registered
Ok so I'm l completed now bit unfortunately my car won't start now. It just keeps cranking and doesn't try to start. Tried the flood and nothing. So I'm wondering if I had some sensor unplugged that didn't get plugged back in. I was very careful about it but I did have some friends with me part of the time and I'm worried they unplugged something without telling me. Is there a sensor that would cause this that might get unplugged during this process? If so where would it be located at?
05-24-2011, 11:14 AM
#139
Silver6:
1st verify all the PCM connections are fully inserted.
2nd if you removed the air pump, ensure everything is plugged in (there is a sensor to one side and a resistor at the bottom).
3rd did you read the 1st post where I mentioned laying a shop towel inside the housing so crud doesn't fall into the engine?
This will causing difficulty starting.
05-24-2011, 12:32 PM
#140
Registered
I did check the pcm and that what was causing it not to start. But now its acting like its flooded but I can get it started but it won't let me give it gas for some reason and just dies. Should I try the push start method?
 05-24-2011, 05:06 PM
#142
Registered
Wow that was the first time I ever had to deflood a car. Thats a pita. Im so glad I bought the car with the upgraded starter already so thats the only time I had to deal with it. Tho I'm sure my starter is on its way out after today. Any ways thanks for all your help Jon. It's finally up and running after I've been working on it when I've had the time over several days. If it weren't for this thread I would have prob had to pay the $600 dollars to pay the stealership to do it. Ant I think they were just planning on taking the UIM of and spraying carb cleaner in it.
 07-15-2011, 11:00 PM
#144
Registered

Join Date: Mar 2010
Location: Nova Scotia, Canada
Posts: 71
Likes: 0
Received 0 Likes
on
0 Posts
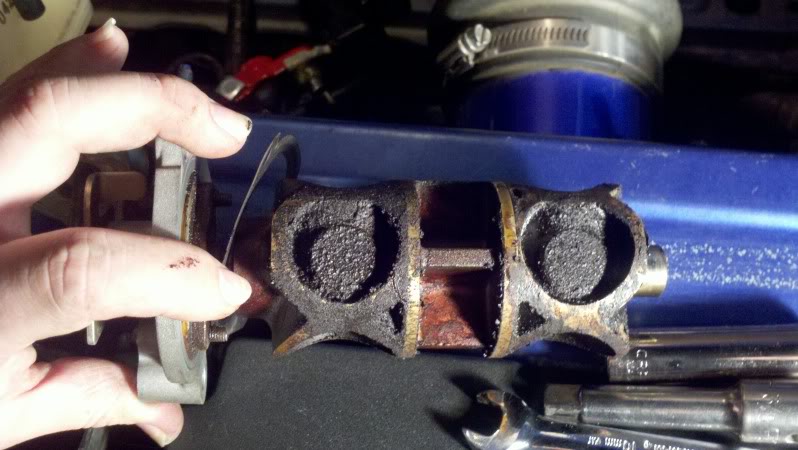
I had been getting engine hesitation around 4300RPM for a while and finally a stuck SSV CEL came on (cleared it by driving the **** out of my car like someone suggested)... but I figured I should investigate a bit more.
So yesterday I took out my SSV, and yeah, it was pretty gunky.
But I noticed a small hole in the SSV actuator. Now the hole is clean, perfectly round, only a couple mm across, and looks like it is supposed to be there... but when I look up pictures of the part online I don't see the hole.
So I'm confused.
I've got a 2004 GT model. I'm not the first owner, but I don't think that the SSV was replaced before. Should that hole be there or not?
07-17-2011, 12:35 PM
#145
75shot55fueljets=GOBABYGO

Join Date: Dec 2007
Location: Sebastopol, CA
Posts: 142
Likes: 0
Received 0 Likes
on
0 Posts
Just did mine yesterday, i just decided to do it for 70k miles treatment and since ive always done the oil changes thought i'd take a look. wasnt too gunky but still carbon build up for sure moves much smoother, less hesitation for sure and feels nice high rpms cant wait to start sprayin  and 1st startup after cleaning defently took 3sec longer to crank and turnover, but still only 1 key turn :-) babys gots loads of live in her.
for anyone wanting to do this i'd say worst part is the god damn airpump bolts (2 of them) securing the whole assembly to the frame. good 45 mins to re fasten them (baseball mitts for hands). other than that its fairly easy just take your time.
Battery box was pretty funny i almost didn't do this due to i couldn't figure out how to get the clip on top part off. push inward on the sides and outward on the top and bottom. you'll get it eventually.
hard pipe really easy to get to with long arms through the flappy rubber guard. (same as changing plugs)
good luck
10mm auto ratcheting wrench came in handy
10mm socket wrench
2 3" extension (for hard pipe)
1 1" extension (for left bolt on the hard pipe)
10mm Long socket drive (3/8th and 1/4th size)
12mm long socket drive (lower thermometer bolt)(3/8th)
12mm short socket drive (3/8th)
Vice Grips
Pliers
needle nose pliers
3/8 socket wrench
1/4 socket wrench
short P2 screw driver (radiator plug drain)
2cans decarb (mine was pretty clean so i only used 1 can, i can defiantly see someone using 2-3)
enjoy.
and 1st startup after cleaning defently took 3sec longer to crank and turnover, but still only 1 key turn :-) babys gots loads of live in her. for anyone wanting to do this i'd say worst part is the god damn airpump bolts (2 of them) securing the whole assembly to the frame. good 45 mins to re fasten them (baseball mitts for hands). other than that its fairly easy just take your time.
Battery box was pretty funny i almost didn't do this due to i couldn't figure out how to get the clip on top part off. push inward on the sides and outward on the top and bottom. you'll get it eventually.
hard pipe really easy to get to with long arms through the flappy rubber guard. (same as changing plugs)
good luck
10mm auto ratcheting wrench came in handy
10mm socket wrench
2 3" extension (for hard pipe)
1 1" extension (for left bolt on the hard pipe)
10mm Long socket drive (3/8th and 1/4th size)
12mm long socket drive (lower thermometer bolt)(3/8th)
12mm short socket drive (3/8th)
Vice Grips
Pliers
needle nose pliers
3/8 socket wrench
1/4 socket wrench
short P2 screw driver (radiator plug drain)
2cans decarb (mine was pretty clean so i only used 1 can, i can defiantly see someone using 2-3)
enjoy.
07-20-2011, 08:12 PM
#146
OK so i performed the DIY. it was very time consuming, but not to hard at all..
Long story short the car ran better than ever. But just 2days ago I got a check engine light twice (car running LEAN). Found out it was a vacuum leak. I FOUND the vacuum leak. One of the 2 bolts that popped out or broke off. the bottom one. I cant tell if it broke off or fell out completely...
Help: i need to find the bolt size, pattern, length of the bottom bolt that holds the SSV?
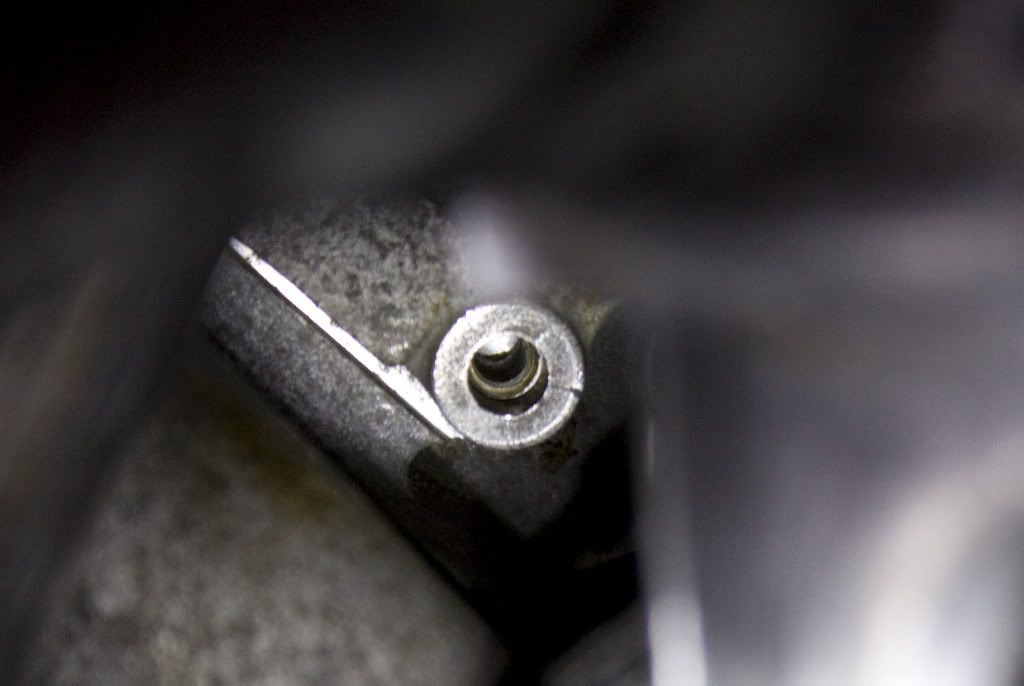
Last edited by NYC Drift King; 07-20-2011 at 08:20 PM.
07-22-2011, 12:35 AM
#147
Registered
I hate to tell you this now... but if you took off the bolts on top off the air pump off first (the ones holding the air pump to the bracket) then the bracket came off very easy. Just a long extension straight down to the bracket bolt. Sorry I couldn't have saved you time before hand but hopefully it saves time if you have to remove the pump again later

 09-28-2011, 11:19 PM
#149
Lift FTW!

Join Date: Jul 2010
Location: Ontario, CA
Posts: 49
Likes: 0
Received 0 Likes
on
0 Posts
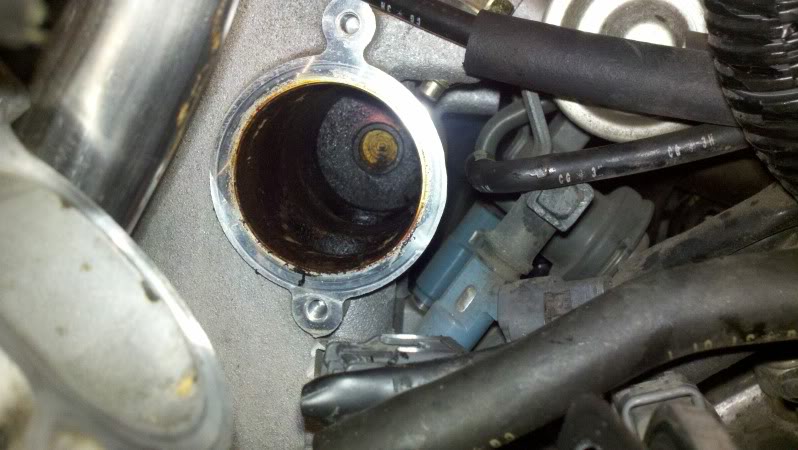
I had a pending P2070 and it brought me to this thread. Did this last night and the car drives much better. It idles better and doesn't hesitate.
Awesome write up! Very detailed and helped a lot. Took 5 hours for me. Ran into a few problems (gummed up coolant hoses). Only thing that I got stuck on was that there were 3 nuts holding the thermostat housing. the 3rd one was a bitch to find lol
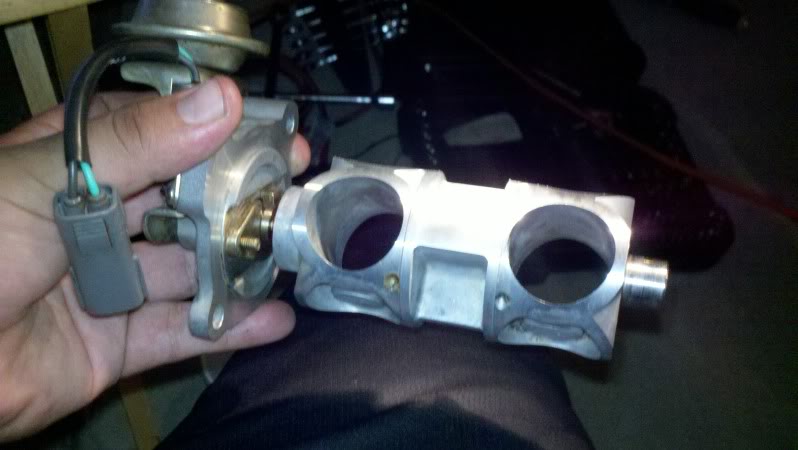
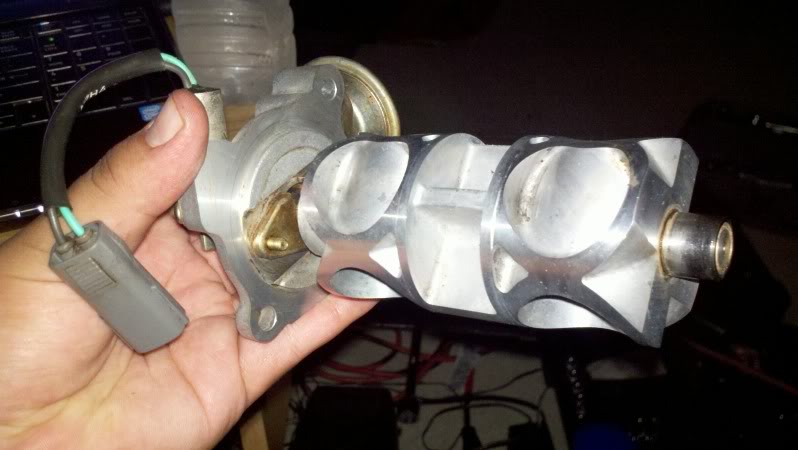
Here are pics of my SSV.

Awesome write up! Very detailed and helped a lot. Took 5 hours for me. Ran into a few problems (gummed up coolant hoses). Only thing that I got stuck on was that there were 3 nuts holding the thermostat housing. the 3rd one was a bitch to find lol
Here are pics of my SSV.
09-28-2011, 11:29 PM
#150
Lift FTW!
Join Date: Jul 2010
Location: Ontario, CA
Posts: 49
Likes: 0
Received 0 Likes
on
0 Posts
