DIY: RP (AFE) Short Shifter install.


 07-15-2006, 08:57 PM
#178
FourOneMuthaFcuknFive
Join Date: Sep 2003
Posts: 512
Likes: 0
Received 0 Likes
on
0 Posts
hey thanks for the diy. I juss installed mines and loving it.. Like everone else i thought the clip/tab part was the hardest..but after awhile i got mad and couldnt wait any longer and pulled the tab towards me and up..whoa the whole panel came off without breaking the clip hahaha,lucky me i guess...
07-15-2006, 09:01 PM
#179

haha... i spent 20 minutes trying to get out that tap only to come back and continue reading to find that i was pushing it the wrong way. and so i went about pushing it the other way and it came off quick.
the tap pisses everyone off. except those that just grabbed it by the shift boot and pulled. easy for them...
the tap pisses everyone off. except those that just grabbed it by the shift boot and pulled. easy for them...
01-05-2007, 06:09 PM
#180
Registered

Join Date: Jun 2003
Location: Phoenix, AZ
Posts: 84
Likes: 0
Received 0 Likes
on
0 Posts
Originally Posted by Hymee
Richard makes a nice shifter as well 
Nice to hear you don't have any noise issues.
Cheers,
Hymee
Nice to hear you don't have any noise issues.
Cheers,
Hymee
I was wondering, on the stock shifter the plastic on the bottom bushing goes a bit below the metal ball on the end of the shifter. On the short shifter, the bottom of the plastic is even with the metal ball, and does not cover it. Could the metal on the bottom of the shifter be touching the metal on the shifting rod in certain gears or at certain times? That could transmit a whining type of noise.
03-26-2007, 02:09 AM
#181
Rotary Powered Decepticon

Thanks for the this DIY. Had a bitch of a time trying to get that right hand clip off. I ended up doing the brute force method of pulling up on the boot. But still the right hand clip would come undone ... in the end I broke it. The rest of the install was easy from there. I did find a surprise guest in the upper boot ... there was a spider! (dead of course). I can now see what you guys were talking about with regards to the "bolt action" vs the soft cushy OEM. I'm getting a little more noise than before but I have my stereo on most of the time anyways, so it doesn't matter.
Thanks again to Gomez for the DIY and thanks to Richard Paul for this great product.
Thanks again to Gomez for the DIY and thanks to Richard Paul for this great product.
 08-10-2007, 02:32 AM
#183
anti-bandwagon

Join Date: Mar 2006
Location: Diamond Bar, CA
Posts: 160
Likes: 0
Received 0 Likes
on
0 Posts
great write-up! no problems with install... not even the tab, i just yanked up. hardest part was fixed when i re-read the stuff about that metal thingie sticking out has to face the right side (it was for the reverse gear)
08-20-2007, 03:59 PM
#184
Registered User

I also broke the infamous tab during the RP shifter installation. I found the best way to repair the tab is to install a new A-Clip. There is an unused A-Clip post (YELLOW circle) near parking brake boot. I simply purchased a new A-clip (GREEN Arrows) and installed over the post. Everything is back as new.
Here are the steps:
1. buy the A-Clip ($0.71) from Mazda
2. use a flat head x-acto knife to carve out the groove on one side (make the post "I" shape)
3. heat up a flat-head screw driver and burn a slot for the clip to latch in
4. clip the A-clip over the post
Make sure you measure the slot position carefully for a tight fit.
-RX8Z88M
Last edited by RX8Z88M; 08-20-2007 at 04:20 PM.
09-04-2007, 07:56 AM
#185
Registered User

Join Date: Feb 2006
Posts: 37
Likes: 0
Received 0 Likes
on
0 Posts
I just wanted to say good job Gomez and the rest of the crew for putting up such a great DIY. I installed the short shifter yesterday, and wow. I had no idea a shifter could make that much of a difference in the overall satisfaction of the car, but I stand corrected.
Excellent job all and thanks. I didn't quite break the tab, but I did bend it a bit. I don't seem to have any problems shifting between 5th, 6th, reverse, nor do I hear any whining.
Excellent job all and thanks. I didn't quite break the tab, but I did bend it a bit. I don't seem to have any problems shifting between 5th, 6th, reverse, nor do I hear any whining.

 09-29-2007, 04:02 PM
#188
Surf Hard, Drive Hard

Join Date: Feb 2007
Location: Indialantic, Florida
Posts: 7,840
Likes: 0
Received 11 Likes
on
9 Posts
Gomez.......good DIY. I have one suggestion that worked really well for me, it's a small portion of the install, but will save some aggravation.
Here's what you said:
Now you need to undo the four nuts indicated by the orange arrows. Two of the four nuts have wiring harness clips over the threads. These are a pain to get off. I used a small flat bladed screwdriver to separate the clip from the thread....others have had success using a straightened paperclip bent into a "U" shape.
In this step, if you look down straight into those wiring clips(right down beside the bolts), you will notice two little tabs on each side that are inside the overall plastic wiring clips(these grab the threads on the bolts). Using just a small set of needle nose pliers, you can insert right down beside the bolt and the spread the two tabs that grab the threads(and with fingers on the other hand lifting up), they come of really easy.
Dave
Interestingly enough, I was in there doing the AFE shifter and replacing my parking brake with a totally new one. Jeez, that was fun...........remove passenger seat(actually you can just loosen it, but I took it out for more room), then you take out the ENTIRE center console from the ash tray to the trunk pass through! The instructions I had were in Japanese and were of no real use except for some drawings. I winged it with those and the brake took about 2 hours as I went really slow and was methodical about that. Shifter was only about 35 minutes!
Last edited by Mazurfer; 09-29-2007 at 04:44 PM.
09-29-2007, 06:42 PM
#190
Surf Hard, Drive Hard
Join Date: Feb 2007
Location: Indialantic, Florida
Posts: 7,840
Likes: 0
Received 11 Likes
on
9 Posts
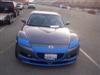
Okay, you asked........and I don't want to hijack the thread so here are a few shots with the short shifter installed along with the leather parking brake. I'm not the best at photos so I took a bunch and you'll have to sort them out. 
Some were taken with a flash and some were not.
Some were taken with a flash and some were not.
09-29-2007, 06:52 PM
#191
Surf Hard, Drive Hard
Join Date: Feb 2007
Location: Indialantic, Florida
Posts: 7,840
Likes: 0
Received 11 Likes
on
9 Posts
Couple more.
Cleaning day is tomorrow as I kinda made a mess having a good portion of the interior dis-assembled for that brake.
Last one is my current engine bay for the hell of it!")
Cleaning day is tomorrow as I kinda made a mess having a good portion of the interior dis-assembled for that brake.
Last one is my current engine bay for the hell of it!
Last edited by Mazurfer; 09-29-2007 at 07:16 PM.
09-29-2007, 07:31 PM
#192
w8nkel

Join Date: Sep 2006
Location: Dallas
Posts: 2,317
Likes: 0
Received 0 Likes
on
0 Posts
^oh, I thought you were the one who bought the momo park brake. In any case, nice work. It looks really good! and nice ss too! haha
Edit: why the hell do you have a steering wheel cover?!?!?!?!?!
Edit: why the hell do you have a steering wheel cover?!?!?!?!?!

 10-02-2007, 06:45 PM
#200
Surf Hard, Drive Hard
Join Date: Feb 2007
Location: Indialantic, Florida
Posts: 7,840
Likes: 0
Received 11 Likes
on
9 Posts
You mean the sort of green fuzzy in this picture on this thread?
https://www.rx8club.com/showthread.p...46790#poststop
This is the supposed sound deadening wadding that comes with the car normally.
People were finding in some cases that taking this out actually reduced the noise when the SS was installed, but I believe that has been corrected in other ways. Mine is still in there and to tell you the truth.......I don't have any cabin noise from the transmission or gearbox. Maybe RP will chime in if he sees this or LittleJohn or Gomez.