DIY: Side-marker "Clear Corner Lights" Installation

 05-01-2007, 07:31 PM
#251
2005 Black RX-8 GT 6M

Join Date: Jul 2006
Location: San Jose Area
Posts: 6,350
Likes: 0
Received 0 Likes
on
0 Posts
After doing this....here are my additional recommendations.
1. Removing the side marker should be described with more detail. There is a little plastic nub/peg on the top of the rear tab and that needs to be pushed down out of a hole in the body to get the side marker to come out from the car. Take a look at a loose side marker and you can see it.
2. Get yourself some skinny pliers so you can pull that reflector out easier. Use the pliers to bend the corners and sides inward the best you can. Unless you bend them, you are not going to get it out of the hole. Bend first and then work the reflector out with a screwdriver. And patience--its a big pain.
3. Get yourself a can of compressed air to blow out any reflective particles that may come off the reflector when you work it out. Using the pliers, I left quite a bit of dust that I had to blow out.
My result: a driver's side marker with no scratches and a passenger side marker with a couple very very tiny marks that are unnoticeable.
I didn't think it would make that much a difference, but I love the clear markers now that they are on and the internal reflector is gone. I did plug the light in with the reflector to see what it looked like. It was a bit funny looking.
I put a regular amber bulb in there so I could be closer to the law than with stealth bulbs here in California.
 05-07-2007, 04:57 PM
#252
WWFSMD?
Join Date: Jul 2003
Location: Massachusetts, USA
Posts: 597
Likes: 0
Received 0 Likes
on
0 Posts
Thanks for the instructions; the install took only 10 min.
{snip}
Autolumination has stealth bulbs (bulb 194, Silver Vision, Amber) for $3 each and shipping is cheap.
{snip}
Autolumination has stealth bulbs (bulb 194, Silver Vision, Amber) for $3 each and shipping is cheap.
 05-10-2007, 01:44 AM
#254
2005 Black RX-8 GT 6M
Join Date: Jul 2006
Location: San Jose Area
Posts: 6,350
Likes: 0
Received 0 Likes
on
0 Posts
They remind me of some of the side Euro turn signals some cars are coming with on the side mirrors/side panels that have the hint of the orange bulbs behind the clear lenses.
06-02-2007, 12:20 PM
#255
9K RPM's = ♥♥
iTrader: (1)
Join Date: Apr 2007
Location: Oviedo, FL
Posts: 220
Likes: 0
Received 0 Likes
on
0 Posts
Easy installation  Took about 10 Minutes w/ just a small phillips, however I didn't bother with the reflector. Too much of a pain for me. Looks good either way...
Took about 10 Minutes w/ just a small phillips, however I didn't bother with the reflector. Too much of a pain for me. Looks good either way...
07-03-2007, 07:44 PM
#257
Registered User

Join Date: Oct 2006
Location: Louisiana
Posts: 88
Likes: 0
Received 0 Likes
on
0 Posts
I received mine today, and installed them. I used the stock bulb, and not the amber bulb that came with the clear corner. I have to post pics later, but has anyone done this? I wonder how it will look at night, and is this set up legal? Would there be any difference if I used the bulb that came with the corner?
And thanks for the DIY posts.
And thanks for the DIY posts.
07-03-2007, 07:53 PM
#258
Surf Hard, Drive Hard

Join Date: Feb 2007
Location: Indialantic, Florida
Posts: 7,840
Likes: 0
Received 11 Likes
on
9 Posts
I received mine today, and installed them. I used the stock bulb, and not the amber bulb that came with the clear corner. I have to post pics later, but has anyone done this? I wonder how it will look at night, and is this set up legal? Would there be any difference if I used the bulb that came with the corner?
And thanks for the DIY posts.
And thanks for the DIY posts.
Yes...............if you use the ones that came with the clear corners, you will see a difference..........................then your light will be amber! Sorry, I couldn't resist!
")
BTW, did you pull out the reflector? I'm not saying you should..as it can be a bitch until you have done one, I'm just curious. I think mine look better without the reflector but again.............I'm not using bulbs.
Last edited by Mazurfer; 07-03-2007 at 07:57 PM.
07-04-2007, 06:22 AM
#259
Registered User
Join Date: Oct 2006
Location: Louisiana
Posts: 88
Likes: 0
Received 0 Likes
on
0 Posts
Lol. My light would be amber. I can't resist being a smart *** either sometimes.
I did not pull out the reflector so I could see what it is like with it in. Plus it looked a little hard to do. I am not a handy person. It took me a good 45 minutes to do the install. I had much trouble taking out the OEM corners as it was. I just got home, and it is still a little dark. I am not sure if I like it. I do like the way it looks sitting in the drive way, just not the bulbs.
Is removing the bulb is as simple as indicated on the first page of this thread? You just remove the actual bulb, meaning the glass/plastic round tip?
07-04-2007, 07:49 AM
#260
Surf Hard, Drive Hard
Join Date: Feb 2007
Location: Indialantic, Florida
Posts: 7,840
Likes: 0
Received 11 Likes
on
9 Posts
Lol. My light would be amber. I can't resist being a smart *** either sometimes.
I did not pull out the reflector so I could see what it is like with it in. Plus it looked a little hard to do. I am not a handy person. It took me a good 45 minutes to do the install. I had much trouble taking out the OEM corners as it was. I just got home, and it is still a little dark. I am not sure if I like it. I do like the way it looks sitting in the drive way, just not the bulbs.
Is removing the bulb is as simple as indicated on the first page of this thread? You just remove the actual bulb, meaning the glass/plastic round tip?
I did not pull out the reflector so I could see what it is like with it in. Plus it looked a little hard to do. I am not a handy person. It took me a good 45 minutes to do the install. I had much trouble taking out the OEM corners as it was. I just got home, and it is still a little dark. I am not sure if I like it. I do like the way it looks sitting in the drive way, just not the bulbs.
Is removing the bulb is as simple as indicated on the first page of this thread? You just remove the actual bulb, meaning the glass/plastic round tip?
Last edited by Mazurfer; 07-04-2007 at 07:53 AM.
07-04-2007, 06:12 PM
#261
Registered User
Join Date: Oct 2006
Location: Louisiana
Posts: 88
Likes: 0
Received 0 Likes
on
0 Posts
I attached a picture of me removing the OEM corner. Did I do it correctly, or was I suppose to remove the bulb also?
I also posted before and after pics. I know its dirty, but when it rains everyday, what can you do?
I also posted before and after pics. I know its dirty, but when it rains everyday, what can you do?
07-05-2007, 11:30 AM
#262
Registered
Join Date: Oct 2004
Location: New York, Northern NYC Burbs
Posts: 601
Likes: 0
Received 0 Likes
on
0 Posts
If I am removing the front nose to install the Hymee oil cooler protectors, will I be able to install the clear corners without removing the panel inside the wheel well?
07-05-2007, 01:36 PM
#263
Surf Hard, Drive Hard
Join Date: Feb 2007
Location: Indialantic, Florida
Posts: 7,840
Likes: 0
Received 11 Likes
on
9 Posts
Dave
07-05-2007, 01:39 PM
#264
Surf Hard, Drive Hard
Join Date: Feb 2007
Location: Indialantic, Florida
Posts: 7,840
Likes: 0
Received 11 Likes
on
9 Posts
Don't have to remove the panel, just have to take out about three of the push pins. Just enough to reach in and get that that little plastic clip(so to speak) and the screw that holds them in. If you are gonna remove the bumper, you should have little fear in doing the corners!
07-05-2007, 01:41 PM
#265
I zoom therefore I am.

 07-05-2007, 04:40 PM
#267
Registered User
Join Date: Oct 2006
Location: Louisiana
Posts: 88
Likes: 0
Received 0 Likes
on
0 Posts
I left the stock bulbs connected to the car. I removed the bulbs that came with the clear corners. The bulbs that were connected to the car look more white than yellow or orange. I had some body work done on my car, and I am not sure if they hooked those lights back up stock. There is tape, but then again, maybe that is stock.
07-09-2007, 11:09 AM
#268
HIDs back in business!

Join Date: Jun 2007
Location: Probably @ work
Posts: 358
Likes: 0
Received 0 Likes
on
0 Posts
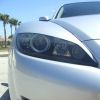
Popped in the clear corners. Ordered them from Ebay- $40 shipped. Got Stealth bulbs for $30. I removed the reflector as advised and do prefer the look with it out. The removal process left some slight scratches inside the lens but they are unnoticeable from more than a few inches away. Definitely worth it, but I don't see how these can be removed without leaving at least a few scratches. It just seems impossible.
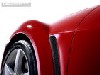
Stealth bulbs looks great and the clear looks sooooo much better on the red than the clashing amber. I'm also in the minority, but I think the flares lenses look better and more aggressive than then US spec.
Stealth bulbs looks great and the clear looks sooooo much better on the red than the clashing amber. I'm also in the minority, but I think the flares lenses look better and more aggressive than then US spec.
07-10-2007, 06:35 AM
#269

just installed mine, a lot easier than i expected with the explanation, i was just real carefulk when removing the reflector. all i did was got a small phillips screwdriver to loosen it and then get a larger one to completely break it free then ease it out if the corner. I love this look for just 80 dollars.
Thanks for the tutorial
Thanks for the tutorial
12-06-2007, 07:18 PM
#270

Doing this now.
First: Genuine Mazda clear corners direct from Japan can be had for $52 shipped off Ebay.
Second: That little plastic REAR TAB or what have ya... is the worst part. Push it forward of the car and start to slightly push downward towards the ground. Between those two movements, it should come free every time without breaking
And lastly.... to anyone thinking about just installing them and leaving the reflector....DONT. It DOES look like crap. I have no friggin idea why they would put that bull$%^& in the lens. Got one side done and decided to see how it looked. TERRIBLE. Turned them right off and started removing the reflector in the other one. lol Used a huge screw driver. Reflector popped free in under 30 seconds. Regular needle nose had it out in under 30 seconds. Yes. 1 minute reflector removal. lol
Last edited by firebirdude; 12-06-2007 at 07:48 PM.
01-07-2008, 03:02 PM
#271
Yippie ki yay

Join Date: May 2007
Location: NKY
Posts: 63
Likes: 0
Received 0 Likes
on
0 Posts
Would it be too much to ask for night pics with and w/o the reflector in the housing? This isnt necessarily directed towards the OP just anyone. I just wanna know if worth potentialy damaging the side marker.
01-07-2008, 03:15 PM
#272
I zoom therefore I am.
Here's a link to a thread I posted awhile back. Shows pictures of the clear corners in the day and night. Reflectors were removed.
https://www.rx8club.com/rx-8-multimedia-photo-gallery-6/my-baby-114983/
https://www.rx8club.com/rx-8-multimedia-photo-gallery-6/my-baby-114983/
01-07-2008, 03:29 PM
#273
Hubble has been saved!
Thread Starter

Join Date: Aug 2003
Location: Richmond, VA
Posts: 1,221
Likes: 0
Received 0 Likes
on
0 Posts
However, if you are really not sure, I would suggest you install the side-markers with the reflectors in place. If you like it, leave it. If not, pop the side markers out, remove the reflectors and re-install. Removing and re-installing the side markers are pretty quick, particularly if you have already done it once.
01-07-2008, 04:52 PM
#274
9k Redline
Join Date: Jul 2007
Location: Irvine, CA
Posts: 183
Likes: 0
Received 0 Likes
on
0 Posts
Well I can say from experience that dealing with these markers can be a bitch. i broke through one of mine the first time i tried to remove a reflector and had to order a new pair. (sucks pretty bad). Havent had them installed but i am gonna run a white 6 LED bulb in mine to match my parking lights. does anyone know if thats legal in NC? their gonna be smoked which will make it a bit darker light but still noticeable. i really think cops have better things to do...
01-07-2008, 07:53 PM
#275
However, if you are really not sure, I would suggest you install the side-markers with the reflectors in place. If you like it, leave it. If not, pop the side markers out, remove the reflectors and re-install. Removing and re-installing the side markers are pretty quick, particularly if you have already done it once.