DIY: Trunk Keyhole Camera Installed
 05-26-2005, 12:45 AM
#1
503wtq Boosted Bimmer
Thread Starter
iTrader: (2)

Join Date: Oct 2004
Location: Los Angeles, California
Posts: 3,038
Likes: 0
Received 0 Likes
on
0 Posts
DIY: Trunk Keyhole Camera Installed
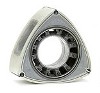
Even though most people said our key hole was too small for a camera, I thought I'd try it anyway. So, I bought the $50 ebay special and gave it a shot.
Last edited by Rotary Rasp; 05-26-2005 at 02:29 AM.
 05-26-2005, 12:48 AM
#2
503wtq Boosted Bimmer
Thread Starter
iTrader: (2)
Join Date: Oct 2004
Location: Los Angeles, California
Posts: 3,038
Likes: 0
Received 0 Likes
on
0 Posts
I had to do a lot of grinding to make the camera fit. I did not have to do any cutting on the car.
I had to make a bracket to hold the camera in the key hole and keep it nice and tight.
I had to make a bracket to hold the camera in the key hole and keep it nice and tight.
05-26-2005, 12:53 AM
#5
503wtq Boosted Bimmer
Thread Starter
iTrader: (2)
Join Date: Oct 2004
Location: Los Angeles, California
Posts: 3,038
Likes: 0
Received 0 Likes
on
0 Posts
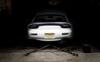
Here are some pictures of the image at night. The day time picture is 1000 times better, but I forgot to take pictures of it. I will tomorrow  .
.
.
 05-26-2005, 01:01 AM
#8
503wtq Boosted Bimmer
Thread Starter
iTrader: (2)
Join Date: Oct 2004
Location: Los Angeles, California
Posts: 3,038
Likes: 0
Received 0 Likes
on
0 Posts
The camera comes on and switches the display when the car is put into reverse, then goes back to my computer after the car is taken out of reverse.
 05-26-2005, 01:32 AM
#10
503wtq Boosted Bimmer
Thread Starter
iTrader: (2)
Join Date: Oct 2004
Location: Los Angeles, California
Posts: 3,038
Likes: 0
Received 0 Likes
on
0 Posts
Originally Posted by Lock & Load
Nice touch is it infrared ??
cheers
michael
cheers
michael
no room for IR.
Brighter reverse bulbs will have to do.
 05-26-2005, 02:25 AM
#12

shoot beat me to this DIY RR :P can you change the title to 'backup keyhole camera installed'?
mine has a different mounting position...yours is sweet mine requires no fabrication or cuting of camera or car or anything for that matter
I'll still post it after I get from out of the country
mine has a different mounting position...yours is sweet
mine requires no fabrication or cuting of camera or car or anything for that matterI'll still post it after I get from out of the country
05-26-2005, 02:36 AM
#13
503wtq Boosted Bimmer
Thread Starter
iTrader: (2)
Join Date: Oct 2004
Location: Los Angeles, California
Posts: 3,038
Likes: 0
Received 0 Likes
on
0 Posts
Originally Posted by truemagellen
shoot beat me to this DIY RR :P can you change the title to 'backup keyhole camera installed'?
mine has a different mounting position...yours is sweet mine requires no fabrication or cuting of camera or car or anything for that matter
I'll still post it after I get from out of the country
mine has a different mounting position...yours is sweet
mine requires no fabrication or cuting of camera or car or anything for that matterI'll still post it after I get from out of the country
05-26-2005, 05:53 AM
#15
Bubblicious? DEF.
Join Date: Mar 2004
Posts: 4,062
Likes: 0
Received 0 Likes
on
0 Posts
[QUOTE]
The camera comes on and switches the display when the car is put into reverse, then goes back to my computer after the car is taken out of reverse.
THAT IS NUTS. do you think it will work with the NAV?
The camera comes on and switches the display when the car is put into reverse, then goes back to my computer after the car is taken out of reverse.
THAT IS NUTS. do you think it will work with the NAV?
05-26-2005, 08:27 AM
#16
[QUOTE=LiL BenNy]
I know for a fact it does :D
I promise I'll finish the DIY Backup Cam for NAV :D
The camera comes on and switches the display when the car is put into reverse, then goes back to my computer after the car is taken out of reverse.
THAT IS NUTS. do you think it will work with the NAV?
THAT IS NUTS. do you think it will work with the NAV?
I promise I'll finish the DIY Backup Cam for NAV :D
05-26-2005, 09:52 AM
#20
Originally Posted by foxman
Nice project, looks really cool. I always wondered about car cam on the NAV. Sounds like a great project. Where is flyboyindy, he needs this too! :D
he decided to install it in the middle of the rear rotary accent, I chose right license plate post
05-26-2005, 09:56 AM
#21
503wtq Boosted Bimmer
Thread Starter
iTrader: (2)
Join Date: Oct 2004
Location: Los Angeles, California
Posts: 3,038
Likes: 0
Received 0 Likes
on
0 Posts
The one thing I like about this mounting place, it cannot be seen. Even if you're looking for it, you pass right over it because you think its the trunk key. I took some day pictures this morning, they look real good. I'll post them later.
khtm- The bracket is pretty simple to make. The only problem is for nav people you'd need to either buy the AVElectronics kit ($500) or replace the screen with this Xenarc and install a RBG to VGA converter (about $400 for both). The second choice would be the better way to do it because you'd have a better screen and the option of rca/vga input. But, for that reason alone, I doubt very many people will want to fork over the money for a back up cam. I already had the screen for my computer, so it was only another 50 bucks for the camera.
khtm- The bracket is pretty simple to make. The only problem is for nav people you'd need to either buy the AVElectronics kit ($500) or replace the screen with this Xenarc and install a RBG to VGA converter (about $400 for both). The second choice would be the better way to do it because you'd have a better screen and the option of rca/vga input. But, for that reason alone, I doubt very many people will want to fork over the money for a back up cam. I already had the screen for my computer, so it was only another 50 bucks for the camera.
Last edited by Rotary Rasp; 05-26-2005 at 10:03 AM.
05-26-2005, 10:05 AM
#22
Torque is Good

Join Date: May 2004
Location: Indianapolis, IN
Posts: 694
Likes: 0
Received 0 Likes
on
0 Posts
Originally Posted by truemagellen
flyboy already installed his a couple months ago :D
he decided to install it in the middle of the rear rotary accent, I chose right license plate post
he decided to install it in the middle of the rear rotary accent, I chose right license plate post
05-26-2005, 10:12 AM
#23
Originally Posted by foxman
You know what, I forgot about that...a good project would be in car video, recorded to the X-BOX, that could be played back on the NAV, that would keep him busy for a while.
flyboy is kind of giving up on his xbox...but I'll stop that since I cured our powersupply issue (I'm inverter free :D :D :D)
05-26-2005, 10:25 AM
#24
I like rusty spoons

Join Date: Jul 2004
Location: Calgary, Alberta
Posts: 1,959
Likes: 0
Received 0 Likes
on
0 Posts
Originally Posted by Rotary Rasp
khtm- The bracket is pretty simple to make. The only problem is for nav people you'd need to either buy the AVElectronics kit ($500) or replace the screen with this Xenarc and install a RBG to VGA converter (about $400 for both). The second choice would be the better way to do it because you'd have a better screen and the option of rca/vga input. But, for that reason alone, I doubt very many people will want to fork over the money for a back up cam. I already had the screen for my computer, so it was only another 50 bucks for the camera.