
DIY: You CAN lower the power seat!


 03-09-2012, 12:45 PM
#52

Hah, i just got my helmet for my first autox next month, went to sit in the car and was like "uhhhhhh" I dont know how you guys do it but im only 5'10" and my head almost hits the sunroof when sitting close to 80 degrees. So ill be doing this mod so i dont have to recline the seat to an obscene amount when driving.
03-10-2012, 07:20 AM
#53

I am 6' and I did this mod, bought a thinner helmet, bought thinner shoes, wear thinner pants, and I still have to drive with my head a little bit tilted lol.
At least I got used to it now...I naturally tilt my head when I am in autox position.
Yes extending the steering column will solve all the problem...I can't believe Mazda doesn't offer that on the rx8.
At least I got used to it now...I naturally tilt my head when I am in autox position.
Yes extending the steering column will solve all the problem...I can't believe Mazda doesn't offer that on the rx8.
03-10-2012, 07:38 AM
#54

Great idea I am about 5"10 and I struggle with the seat position as I meed to have the seat further back then is comfortable. I will try this soon, the other option is removing the padding :-(.
Lowering the seat will also help lower the center of gravity in the car (by lowering the driver) which will help with cornering forces making the car faster...... A tiny tiny bit, but the driver being more comfy will improve lap time more..
Lowering the seat will also help lower the center of gravity in the car (by lowering the driver) which will help with cornering forces making the car faster...... A tiny tiny bit, but the driver being more comfy will improve lap time more..
03-10-2012, 10:33 AM
#55
my problem is that my center of mass is already pretty low, and the size of my center of mass is what makes me higher in the seat.
Shaving the foam is next. From what I can tell, the foam I have is one piece. but, it can be thinned. There are just several things that I need to accomplish first. Anyone else what to take a shot at it and post pictures?
Shaving the foam is next. From what I can tell, the foam I have is one piece. but, it can be thinned. There are just several things that I need to accomplish first. Anyone else what to take a shot at it and post pictures?
 03-15-2012, 12:00 AM
#57
do you think you could provide alittle more detail in the guide when not removing the seat? Im alittle confused.
Are there any other supplemental pictures?
rx8club server decided to take a **** as i was in homedepot getting the needed supplies so i had to go home and go back out 2 hours later, i didnt know how many of each to get.
I got
(12) 5/16 washers
(4) M8-1.25 30mm bolts
(4) M8-1.25 nuts
on my way back to the car i moved the seat forward, raised the butt cushion and looked..... and had no idea where to even begin. Im going to attempt again tomorrow at around 12 so any response before then would be greatly appreciated.

 05-02-2012, 12:43 PM
#63
i now can put my fist above my head and have it fit between my head and the liner!!
I went for a little joyride around the block to see how my helmet fit and it was 80% tolerable. Im sure if i try now, it will be perfect!
thanks Green!
05-04-2012, 09:15 PM
#65
Registered

Join Date: Jul 2005
Posts: 51
Likes: 0
Received 0 Likes
on
0 Posts
Worked a treat for me.
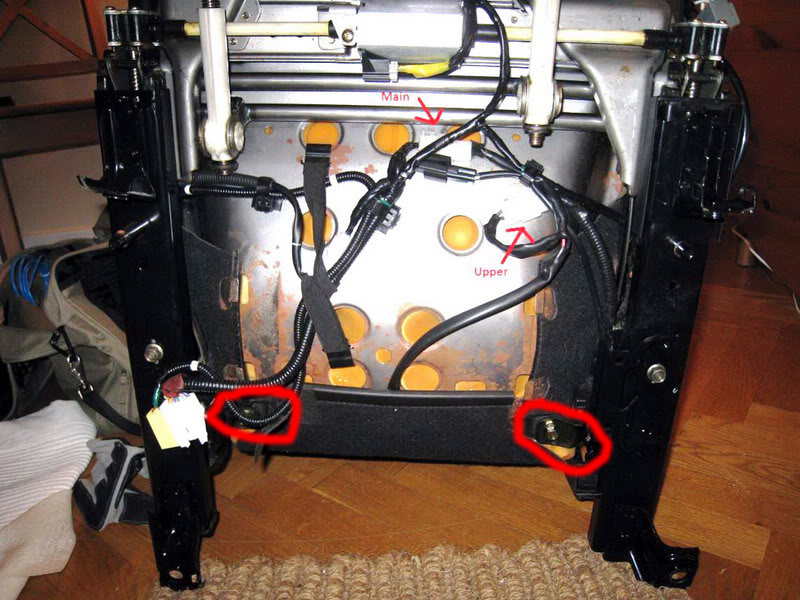
The pics are very good and I could not do better. Just stick your head in under the front seat with a printed out pic and it will all make sense.
I think I used 12 washers for spacers and a couple of large mudguard washers on each side to spread the load.
I love the new seating position. My head still hits the roof with my helmet on, but at least I can get comfortable.
Thanks heaps Mr Green
Matt
05-05-2012, 12:05 AM
#66
Worked a treat for me.
The pics are very good and I could not do better. Just stick your head in under the front seat with a printed out pic and it will all make sense.
I think I used 12 washers for spacers and a couple of large mudguard washers on each side to spread the load.
I love the new seating position. My head still hits the roof with my helmet on, but at least I can get comfortable.
Thanks heaps Mr Green
Matt
05-05-2012, 12:11 AM
#67
feel under youre seat for that bracket, or try to stick your hand in between the foam and the pan.
It took me a while to figure out where everything was, and the foam DID NOT want to budge, i was tugging reaaally hard to get the foam to move so i could access the bracket. I wound up using a bottle and wedging it between the foam and the pan to keep it from going back to its original position.
Dont expect it to be a walk in the park, seperating the foam so you can work in there.
Unplugging the battery and taking out the seat might have to be what you need to do.
05-05-2012, 11:08 PM
#69
 05-06-2012, 03:37 AM
#73
i saw them(the brackets?)
already like this(already like what? thats what the bracket looks like when oem)
what?
this makes no sense, im going to find my friends manual seat next weekend and play with it to see if its there.
the bracket doesnt interact with the seat differently in auto or manual, i dont have any reason to believe they are different.
05-09-2012, 11:38 PM
#75

I just did this inside of 20 minutes. Took 5 minutes to locate the two bolts, a minute to unscrew them, about 10 minutes to get the brackets to the top of the frame and a couple more to thread the bolts back in from the top down.
This gained me about a 1/2 inch clearance which is all I needed to get my helmet to clear the roof liner.
This gained me about a 1/2 inch clearance which is all I needed to get my helmet to clear the roof liner.