
Weekend Plans...
 02-02-2007 | 04:14 PM
#1

Thread Starter
1.21 Jiggawatts
Joined: May 2006
Posts: 1,330
Likes: 0
From: Lima, OH
Weekend Plans...
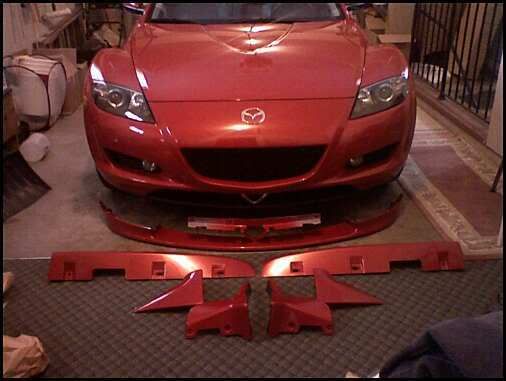
looks like i've got my weekend tied up.
any guess how long all this is gonna take to install?
I find it hard to believe that it was actaully LESS to get the appearance pkg afterwards than to get it as an option.

 02-02-2007 | 04:32 PM
#3

One ball, corner pocket
Joined: Apr 2004
Posts: 2,053
Likes: 1
From: Fontucky, right next to Patriotville
There are indicators on the back of the front bumper...so remove the bumper and lay it down...you'll see "x" in the plastic...just line a drill up and you'll be fine. The sides and rear sill take you a little longer, just make sure you use the templates and you'll be fine. Should take you about 4-6 hours for everything is my guess.


 02-02-2007 | 07:58 PM
#7
Thread Starter
1.21 Jiggawatts
Joined: May 2006
Posts: 1,330
Likes: 0
From: Lima, OH
ok...step one is now complete. Logged right around 3 hours on the front bumper. I will admit that i didn't have 1/2 the supplies when i started so some time was taken on retrieving those from the basement. I also took my time, as i'd rather do it right and be precise than rush for no reason.
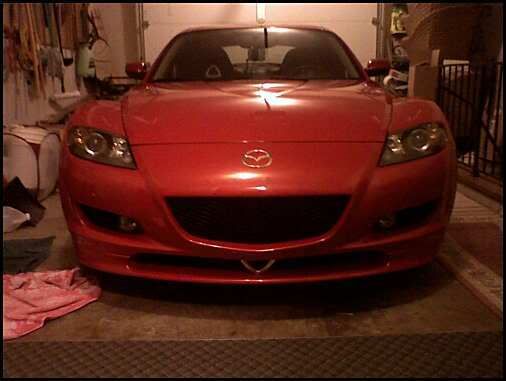
Intial concern when I put it back together was the gap between the bumper and the hood...i thought it looked bigger, however, i think a lot of that is in my head. Compared to the previous picture, i LOVE the look of the dam!
Has anyone else who's performed this had any trouble unsnapping the side signals?! OMG. Almost as bad as the A/C controls when doing anything with the audio deck. I swear, i spent a good 20-30 minutes on those ALONE.
Didn't take any DIY instructions/pictures along the way, because the current DIY on the front bumper is almost perfect. ONE error i found though...there are TEN screws on the underside of the bumper, NOT 8. It took me a good while to realize that this was the main reason that i couldn't get it to budge intially. That was a frusterating realization.
I was rather surprised how relatively simple the bumper went back on. After some of the pains encounted taking it off, it just slide RIGHT back on, easy as pie. Easiest front bumper i've EVER worked with!
As for the actaul install, it was pretty smooth and straight forward. I was under the impression that this air dam slid over the existing one...not so. The stock air dam (if you dare call it that) is a narrow peice that comes off easily. When I first saw where the drill x's were, I couldn't comprehend WHY you would drill through actual bumper PAINT that was showing. Obviously i didn't grasp the concept that the new air dam actually covers a part of the far right and left remaining front bumper. More than i thought it would anyway.
Also worthy of mentioning...rotary accent. Another good 15-20 minutes were spent on peelin that sucker off the old dam. Ha...and to think that I questioned if it were on there solid enough. Not to mention taking the time to reapply the extra double-side adhesive that I LUCKILY had saved from the intial install. If you currenty have the rotary accent on, plan on arm wrestling that sucker off. It WILL take you a few minutes.
TIP - before you take the bumper off, line the inner sides of the HEADLIGHTS with some kinda thick tape, probably electric tape would do nicely. Pushing the bumper back on dug the semi-sharp corners of the bumper into my drivers side headlight, creating a nice permanent scar on the headlight casing.
More to come as i inch along...
Last edited by Stavesacre21; 02-02-2007 at 08:00 PM.
 02-03-2007 | 01:00 AM
#10
Thread Starter
1.21 Jiggawatts
Joined: May 2006
Posts: 1,330
Likes: 0
From: Lima, OH
yea, the fogs were somewhat of a pain too, but I found that i was able to pull the bumper out a good amount before I had to unplug um. By that time, I could reach behind pretty easily and fit my hands in there.
The hardest part about ANY harness is finding out how it releases. Ugh...some squeeze from the side, some from top...bottom....latch...lever...twist. Man I can't stand all the variety. I found the fog harnesses to release very easliy.
The hardest part about ANY harness is finding out how it releases. Ugh...some squeeze from the side, some from top...bottom....latch...lever...twist. Man I can't stand all the variety. I found the fog harnesses to release very easliy.
 02-04-2007 | 12:36 AM
#13
Thread Starter
1.21 Jiggawatts
Joined: May 2006
Posts: 1,330
Likes: 0
From: Lima, OH
I'll be attacking the rear flares (and bumper removal) tomorrow and then the side flares on Monday.
On a depressing note, i just realized that the front mad flaps had a REALLY shotty clearcoat job, and it looks like there was either water or condensation on the paint between the paint and clearcoat jobs. It looks horrendous.
Rosenthal Mazda has been notified about it and the new ones should be here late next week. Kind of a bummer cause i was gonna hit those up tomorrow as well.
I've only had my car about 8 months and already i've had THREE run-ins with Mazda's cheap paint quality. I'm honestly not all that surprised anymore
02-04-2007 | 08:05 PM
#14
Thread Starter
1.21 Jiggawatts
Joined: May 2006
Posts: 1,330
Likes: 0
From: Lima, OH
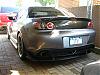
The saga continues...
Moving along, i've logged exactly 3 hours (again). Once again, this was really taking my time and trying to be a perfectionist. However, the first hour or so was probably trying to understand how the sides of the rear bumper wrapped around and attached (via clips) to the side. No collateral damage this time around.
I was a little baffled as to HOW MUCH WORK went into installing such SMALL parts. This almost parralled the air dam in time, most likely because of all the precautions i took.
Also, the slit that goes in the side...kind of a pain in the butt. I thought i'd use my dremel for it...simple right? Not quite...no matter what angle you turn the bumper (front OR back) you can't find a good angle to dremel in.
I ended up using the dremel to create a faint baseline, then drilled numerous small holes on the lines and and used the drill bit almost as a router. Worked out good enough for the cause.
Intially getting the bumper back on was kind of a pain in the butt, but once you got one side going you were in good shape. Just as with the front, it all popped back into place nicely. The mud guards on the backside created some caution for alignment when snapping the bumper back in place.
I did set myself back a little by removing the WRONG set of screws in the wheel well intially. The one you are supposed to be after is tucked under the mudguard which you have to pull out. I removed the one in the far back corner of the well. LoL. Not a bad setback though.
Minor note - the cargo net is SO friggin retarded. I can't even try to begin to explain how STUPIDLY this thing was designed. Anyone who has installed it knows the frusterations abroad.
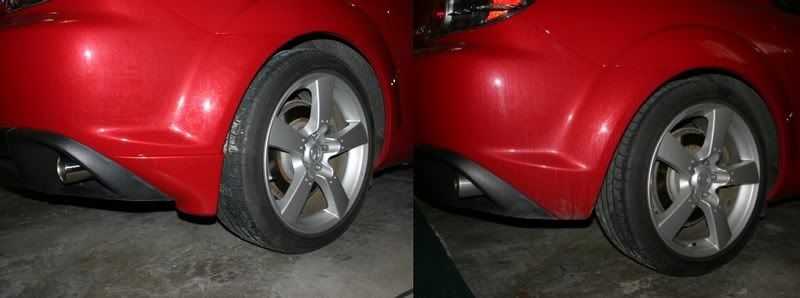
All in all, i'm just glad to have it done now. Looks completely flush and smooth. maybe just a hair cleaner too! (and yes, i washed up before installing...just not before pics 
Next...the infamous side aero flares. who-rah. Any tips would be good to hear!
Moving along, i've logged exactly 3 hours (again). Once again, this was really taking my time and trying to be a perfectionist. However, the first hour or so was probably trying to understand how the sides of the rear bumper wrapped around and attached (via clips) to the side. No collateral damage this time around.
I was a little baffled as to HOW MUCH WORK went into installing such SMALL parts. This almost parralled the air dam in time, most likely because of all the precautions i took.
Also, the slit that goes in the side...kind of a pain in the butt. I thought i'd use my dremel for it...simple right? Not quite...no matter what angle you turn the bumper (front OR back) you can't find a good angle to dremel in.
I ended up using the dremel to create a faint baseline, then drilled numerous small holes on the lines and and used the drill bit almost as a router. Worked out good enough for the cause.
Intially getting the bumper back on was kind of a pain in the butt, but once you got one side going you were in good shape. Just as with the front, it all popped back into place nicely. The mud guards on the backside created some caution for alignment when snapping the bumper back in place.
I did set myself back a little by removing the WRONG set of screws in the wheel well intially. The one you are supposed to be after is tucked under the mudguard which you have to pull out. I removed the one in the far back corner of the well. LoL. Not a bad setback though.
Minor note - the cargo net is SO friggin retarded. I can't even try to begin to explain how STUPIDLY this thing was designed. Anyone who has installed it knows the frusterations abroad.
All in all, i'm just glad to have it done now. Looks completely flush and smooth.
maybe just a hair cleaner too! (and yes, i washed up before installing...just not before pics Next...the infamous side aero flares. who-rah. Any tips would be good to hear!
Last edited by Stavesacre21; 02-04-2007 at 08:13 PM.
 02-05-2007 | 07:32 PM
#16
Thread Starter
1.21 Jiggawatts
Joined: May 2006
Posts: 1,330
Likes: 0
From: Lima, OH
you wouldn't believe how complicated 2 of the 4 pieces of installation are to use. Apparently i'm not the only one, according to some of the other posts i found.
I've never seen anything designed so horribly...and that doesn't go just for cars.
I've never seen anything designed so horribly...and that doesn't go just for cars.
02-06-2007 | 07:06 PM
#17
Thread Starter
1.21 Jiggawatts
Joined: May 2006
Posts: 1,330
Likes: 0
From: Lima, OH
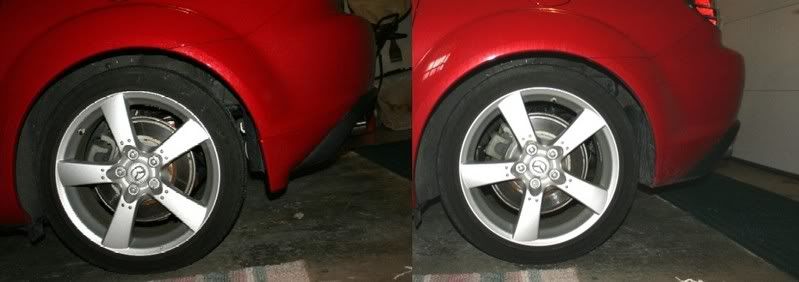
Another 5 hours logged in, and I'm done with the side flares. By far, the most involved and teedious of all the stuff i've done thus far.
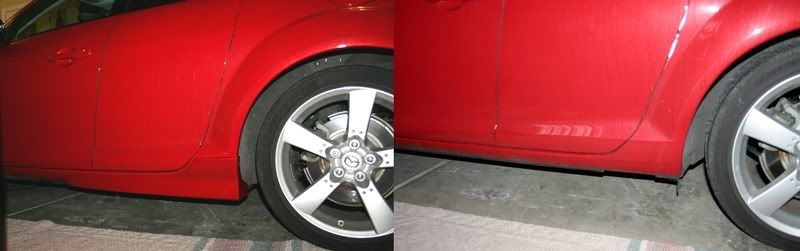
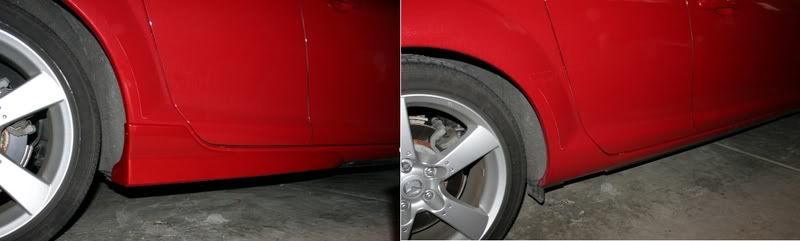
Oddly enough, the largest frusteration that arose was figuring out how to get the clips of the stone guard to release. The first one i released was almost completely mauled by the time i got it out. The illustration did NOT do a very good job of pointing out that you come in from teh SIDE with the screwdriver...NOT front-to-back like they claimed. That was a pain.
First one took me 3 hours, second one took 2. As funny as it may sound, my first one actually turned out flawless, and my other one didn't quite pan out as smooth. I too am now victim to the "front gap" on one of the side flares.
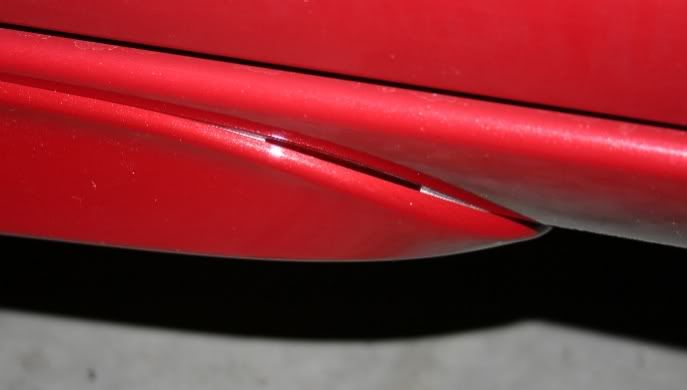
I still haven't the slightest how it occured or which step i slightly botched up...but somewhere I was slightly off. No such problem on the other side. Anyone have a good remedy to close that gap up? I was half temped to just line the inside part of it with super glue and brace it over night, but thought i'd check here for some ideas first.
I'm not too concerned about the whole glue-on-paint deal, because those holes you had to bore out were as big as your friggin finger...so i'd have bigger problems then glue residue if I ever wanted to take them off
SOOOO
for the stock aero package, I spent 11 hours of labor. However, i'm not done yet, and still have to install the front mud guards, which should be a laugh compared to these other items. Also, I don't believe they are part of the stock aero package, so i don't know if anyone considers that the end of the labor total for stock.
All thoughts, comments and suggestions are always appriciated.
Oddly enough, the largest frusteration that arose was figuring out how to get the clips of the stone guard to release. The first one i released was almost completely mauled by the time i got it out. The illustration did NOT do a very good job of pointing out that you come in from teh SIDE with the screwdriver...NOT front-to-back like they claimed. That was a pain.
First one took me 3 hours, second one took 2. As funny as it may sound, my first one actually turned out flawless, and my other one didn't quite pan out as smooth. I too am now victim to the "front gap" on one of the side flares.
I still haven't the slightest how it occured or which step i slightly botched up...but somewhere I was slightly off. No such problem on the other side. Anyone have a good remedy to close that gap up? I was half temped to just line the inside part of it with super glue and brace it over night, but thought i'd check here for some ideas first.
I'm not too concerned about the whole glue-on-paint deal, because those holes you had to bore out were as big as your friggin finger...so i'd have bigger problems then glue residue if I ever wanted to take them off
SOOOO
for the stock aero package, I spent 11 hours of labor. However, i'm not done yet, and still have to install the front mud guards, which should be a laugh compared to these other items. Also, I don't believe they are part of the stock aero package, so i don't know if anyone considers that the end of the labor total for stock.
All thoughts, comments and suggestions are always appriciated.
02-07-2007 | 04:38 PM
#18
Thread Starter
1.21 Jiggawatts
Joined: May 2006
Posts: 1,330
Likes: 0
From: Lima, OH
Alright, last step has FINALLY been completed! The last step was ironically by FAR the shortest of all of um. The front splash guards took a while 45 minutes to installed both.
No pics at the moment, as i'm going to wait to get a few pics of it all outside once it gets a little nicer (for a before/after type shot).
If anyone is thinking about doing this, I know can say that I completed ALL of the work myself, and logged JUST under 12 hours. However, if you have experience working with the body of this car, you can probably cut off a decent amount of that. I took my royal time with every step and didn't rush in anyway...not to mention it was in a garage about 50 degrees the whole time.
As long as you consider yoruself somewhat mechanically inclined, i would definetely say go for it if you'd like!
02-28-2007 | 07:13 AM
#20

Registered User
Joined: Sep 2006
Posts: 60
Likes: 0
From: Cairo, Georgia
Looks good, worth the hard work. I am planning on putting the front air dam on mine this weekend. Did you have any problem sticking the air dam to the bumper before you fasten it up? If you get it in the wrong spot can be hard to realign.
02-28-2007 | 09:08 AM
#21

It's just a flesh wound!
Joined: Mar 2006
Posts: 82
Likes: 0
From: Jackson, Mississippi
Way to go!
Well,
I can say that you have motivated me to pull out the parts I have purchased over the months (used) from various forum members and try this soon. Looks like you bought your parts new, and that they came complete with all mounting hardware and instructions.
The biggest reason (besides weather) that I've delayed doing the work on mine is that I don't have all the mounting hardware, templates, or instructions. I know the instructions can in most cases, be had online. The templates are a complete other story. I can't get those, and in many cases, can't get the mounting hardware.
I've been told by some very patient forum members that the aero package can be applied without the clips (just with 2 sided tape). I have 2 rolls of 3M that stare at me every morning on my bathroom sink, just waiting to be used. I'm just not ready to pull the trigger on all of it yet. Still chicken? Probably.
Is there any way you might be able to send me your templates to borrow/copy so I can have a better idea how these are supposed to line up? I'd be happy to pay you to do so and I can return them when I'm done with them.
Once again, great job. I think I'll be like you, and go really slow. I have no experience with this sort of thing. But I need to do it myself, and save the $ (as evidenced by the fact that I am using used parts in the first place!)
Michael
 02-28-2007 | 01:48 PM
#23
One ball, corner pocket
Joined: Apr 2004
Posts: 2,053
Likes: 1
From: Fontucky, right next to Patriotville
Originally Posted by Swingblade
Looks good, worth the hard work. I am planning on putting the front air dam on mine this weekend. Did you have any problem sticking the air dam to the bumper before you fasten it up? If you get it in the wrong spot can be hard to realign.
 02-28-2007 | 04:28 PM
#25
Registered User
Joined: Sep 2006
Posts: 60
Likes: 0
From: Cairo, Georgia
Thanks Kwescott. I could just envision that sticky tape going to one location then when you tighten it up with the nuts it needing to be in another. Will probably see it when I get it a taken apart. Thanks for the reassurance.