DIY: "Alternative" phone mount project
#1
DIY: "Alternative" phone mount project
**There are missing pictures of the install and parts due to the fact that I really didn’t think it would work!**
If you’re like me, you are not very happy with the availability of a good phone mount for the RX-8. Sure there are windshield mounts, vent mounts…even cigarette mounts and mounts for cup holders. I wanted something where it was more “stock” looking as a location, so I decided to try the Arkon SM225-S SmartPhone Mount - Universal 15 Inch Steel Gooseneck kit from www.gpscheap.com ($19.95). I chose this kit because it fits my new T-mobile G2 MyTouch perfectly. You can choose a separate mount depending on your phone.
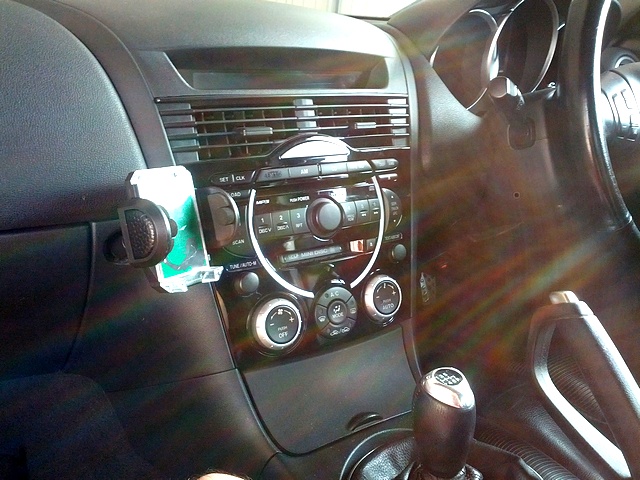
Although it mounted fine on the passenger seat, it looked like *** and still shook when you drove, so I nixed it pretty quickly. However, I noticed that a small plug in the dash next to the glove box may be an option. I test fitted the gooseneck and needed a bolt to mount the gooseneck pretty low under the dash to get it to work and found it.
After more testing, it was evident that I needed some parts:
1 – 6mm-1.0 x 16mm Hex Bolt (this needs to be longer than the original due to a washer and the gooseneck mount)
1 - Home Depot Grommet Kit (only one and it’s in the electric section)
1 -6mm washer
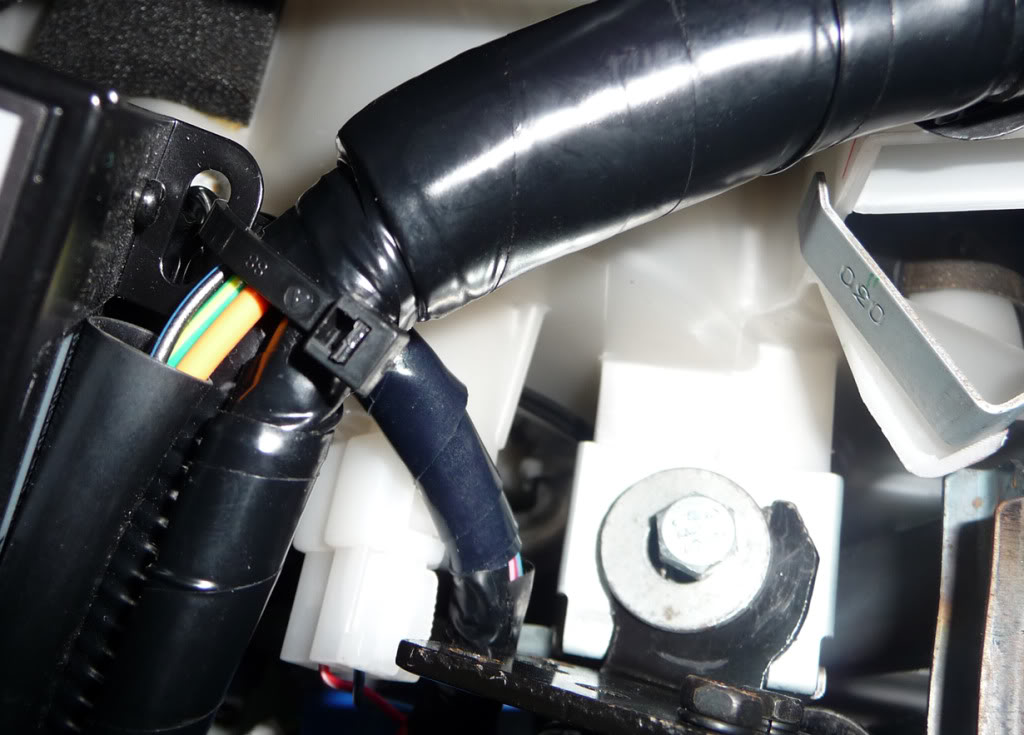
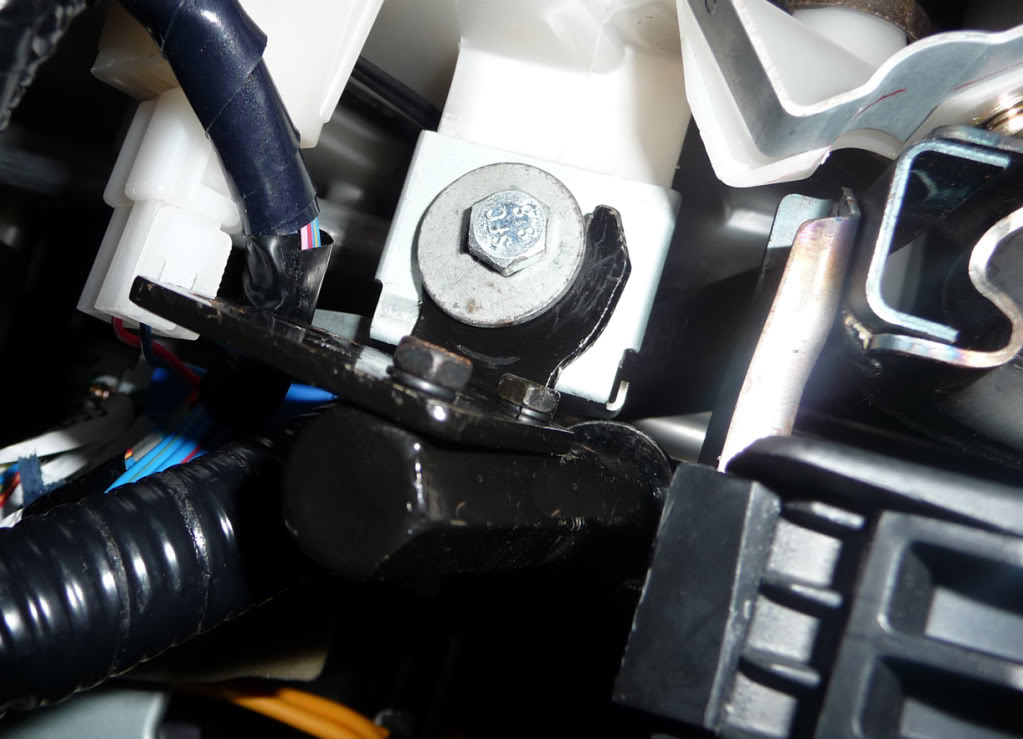
When installing the gooseneck under the dash, there is only one obvious bolt closest to the final mount location and seems to fasten a white plastic cover. When installing the gooseneck, the adapter that is used to attach to the seat’s bolt on the floor must be flipped over so the gooseneck can mount properly through the dash.
**This takes the longest time because you literally have to massage the gooseneck’s shape to perfectly exit the mount hole (and face the driver) at the same time.**
The good news is when you do get it through; it is fairly flexible and can be manipulated into twisting a bit before the grommet is installed. Now when you put the grommet on when the gooseneck is through the mount hole, the back of the grommet will have to be trimmed about an inch with a razor to pop into position so it looks flush. Also, the gooseneck will have to be through by at least 2 inches for the twist lock to fit the phone mount mechanism.
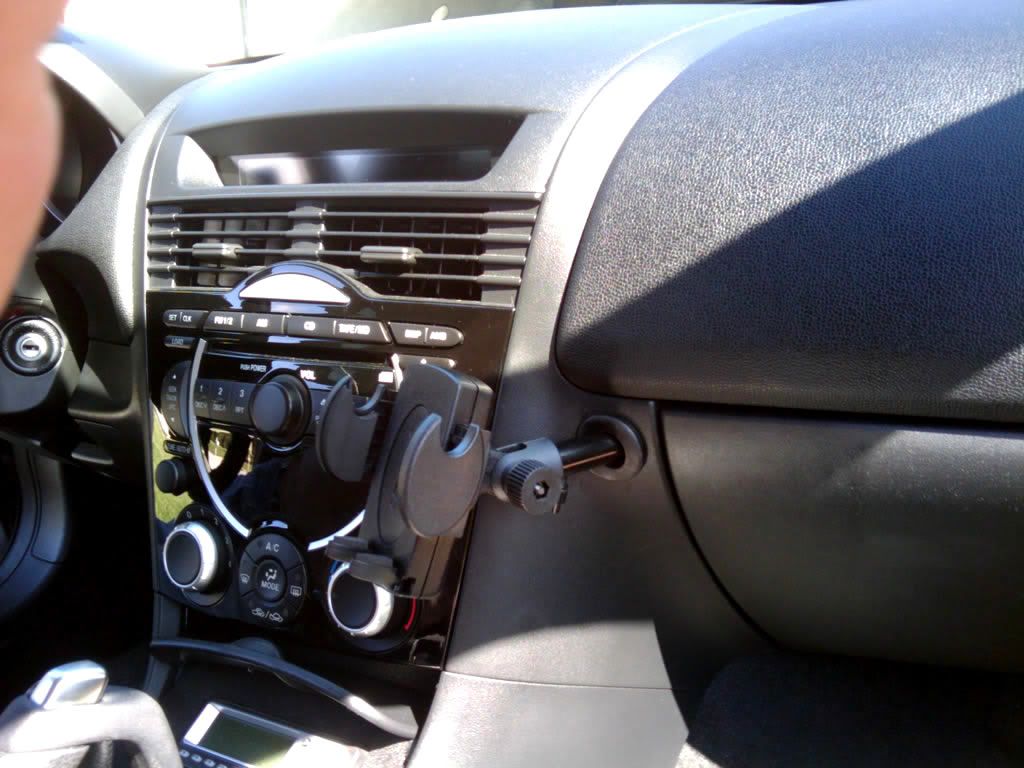
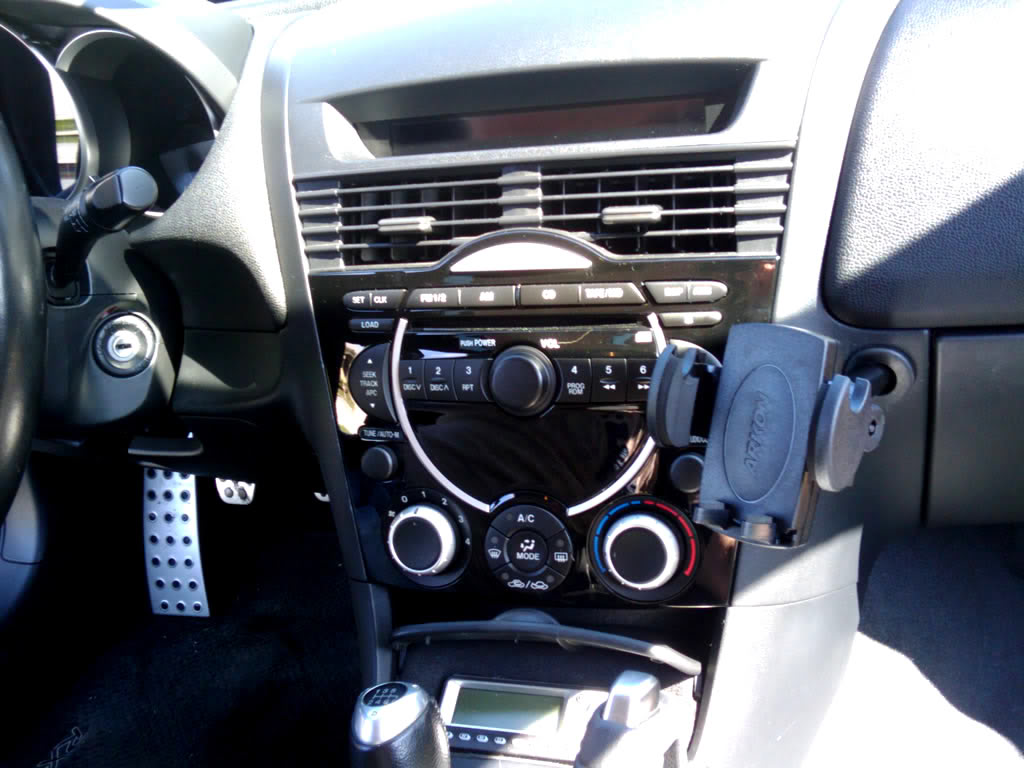
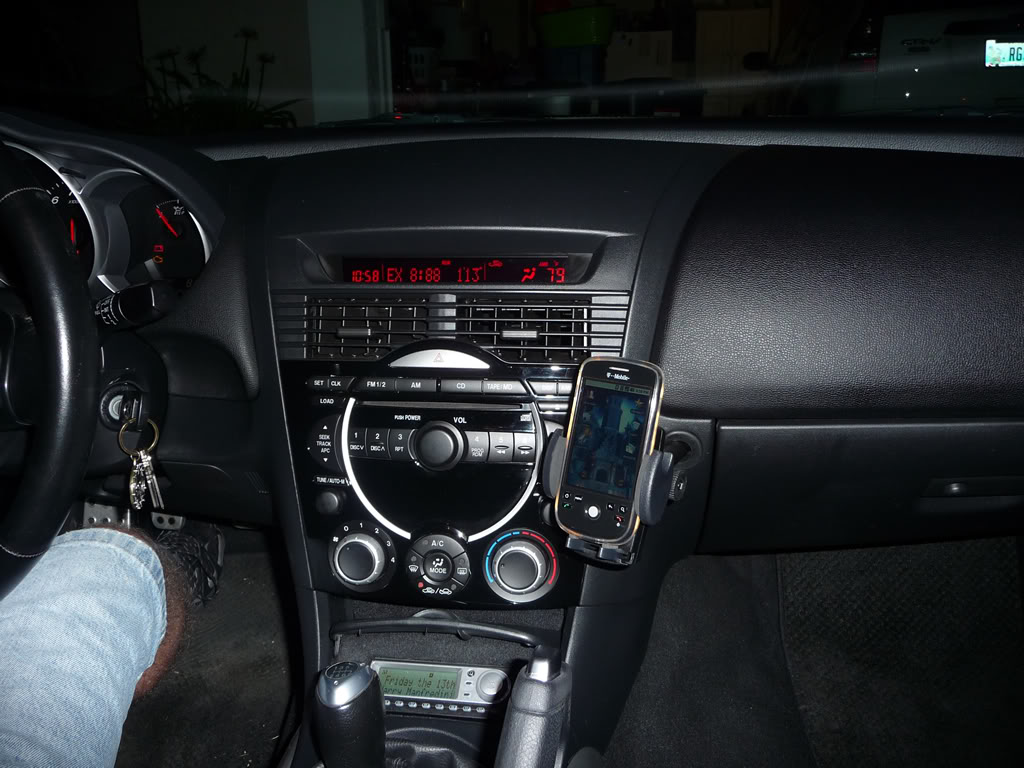
Here are the final results that I’m very happy with. Very sturdy and looks kind of like it was designed for it too.

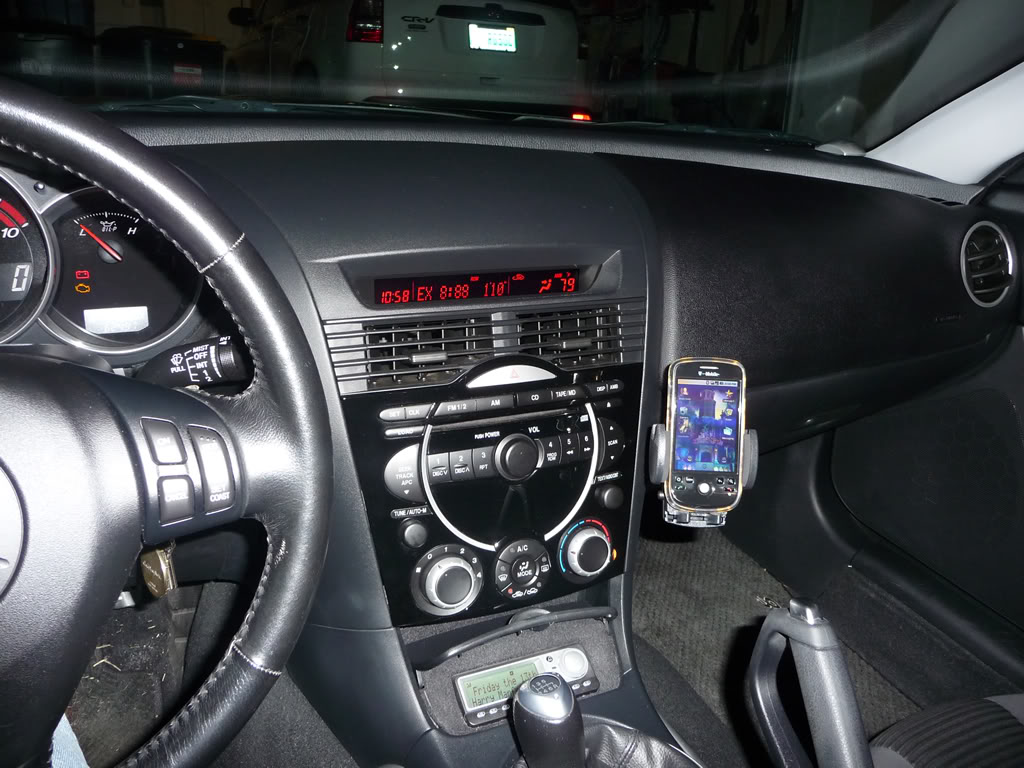
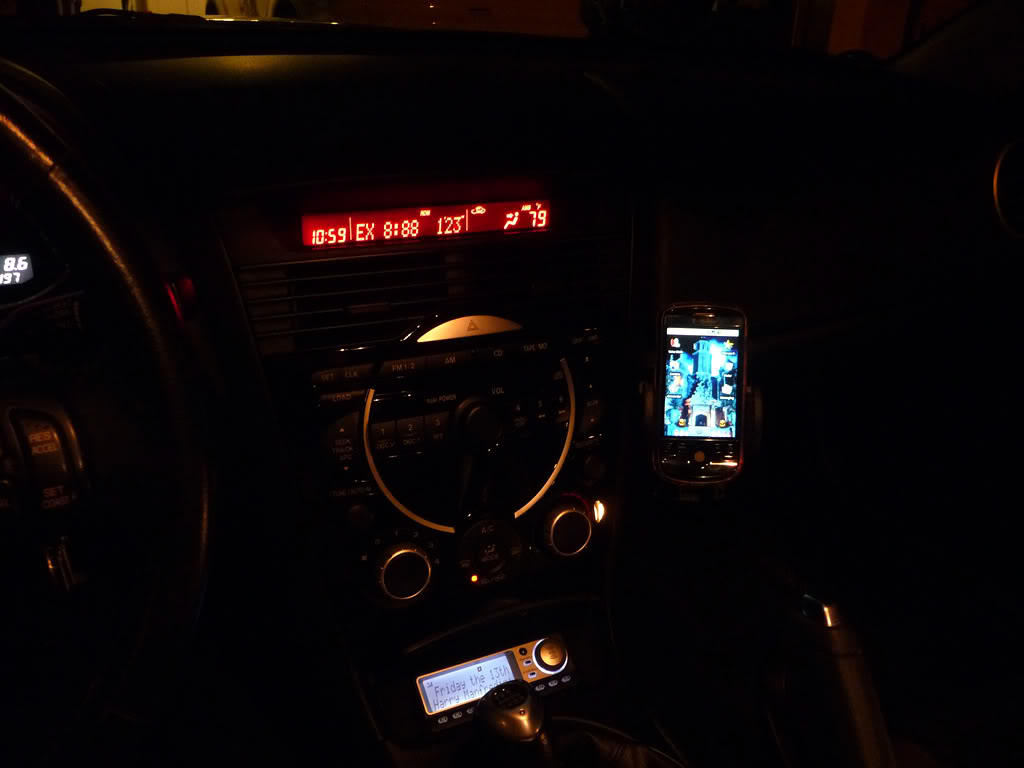
PS: Although I have a Jabra Bluetooth Speakerphone with FM modulation, the radio quality sucks because FM reception changes too much, so this way I can easily add a CD Lineout hack and phone charge cabling without looking like spaghetti hanging off of a windshield.
If you’re like me, you are not very happy with the availability of a good phone mount for the RX-8. Sure there are windshield mounts, vent mounts…even cigarette mounts and mounts for cup holders. I wanted something where it was more “stock” looking as a location, so I decided to try the Arkon SM225-S SmartPhone Mount - Universal 15 Inch Steel Gooseneck kit from www.gpscheap.com ($19.95). I chose this kit because it fits my new T-mobile G2 MyTouch perfectly. You can choose a separate mount depending on your phone.
Although it mounted fine on the passenger seat, it looked like *** and still shook when you drove, so I nixed it pretty quickly. However, I noticed that a small plug in the dash next to the glove box may be an option. I test fitted the gooseneck and needed a bolt to mount the gooseneck pretty low under the dash to get it to work and found it.
After more testing, it was evident that I needed some parts:
1 – 6mm-1.0 x 16mm Hex Bolt (this needs to be longer than the original due to a washer and the gooseneck mount)
1 - Home Depot Grommet Kit (only one and it’s in the electric section)
1 -6mm washer
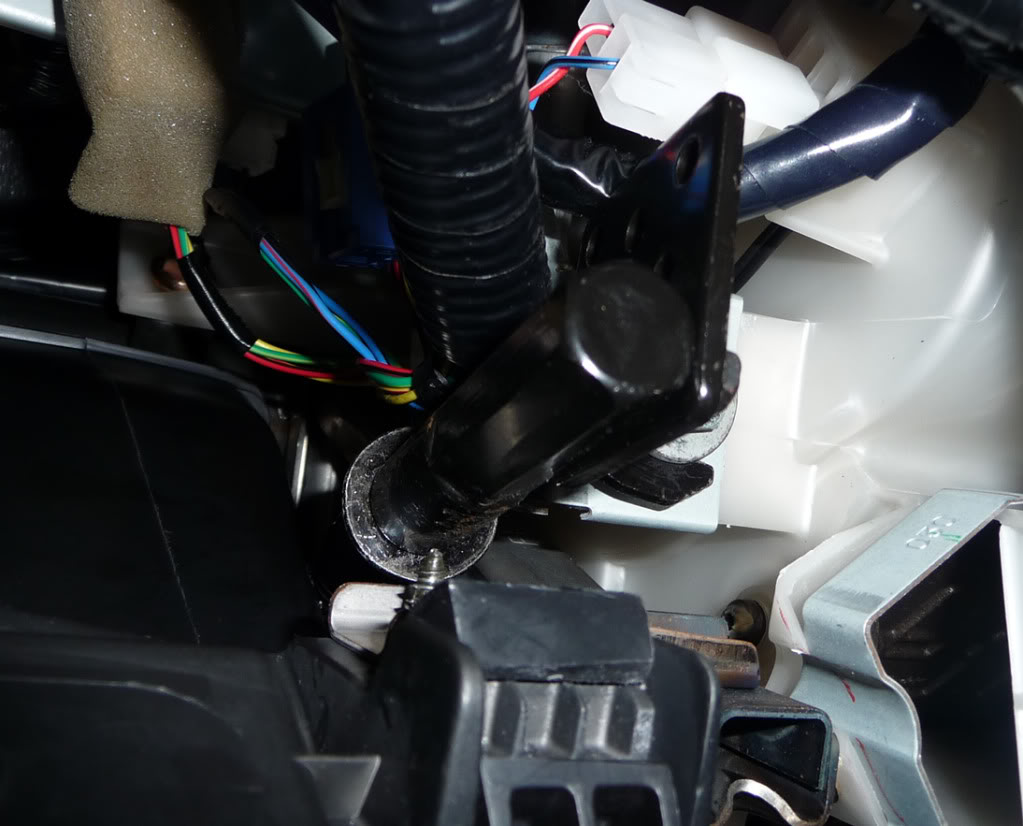
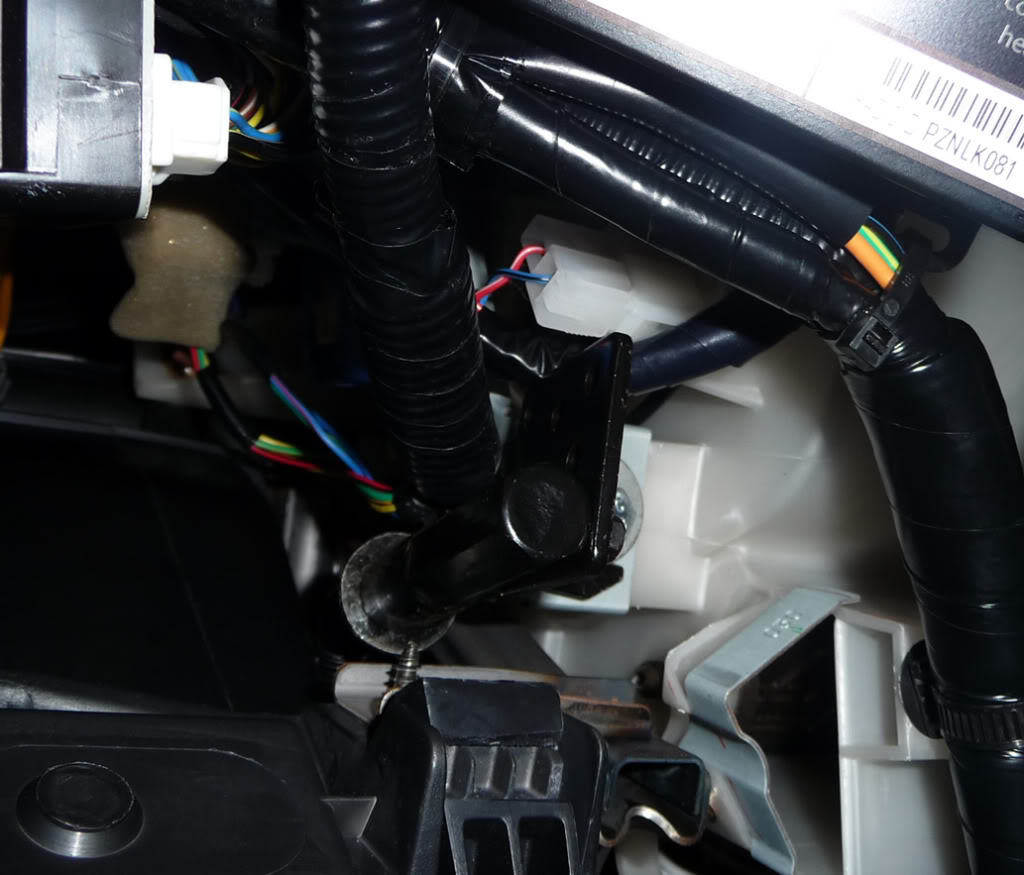
When installing the gooseneck under the dash, there is only one obvious bolt closest to the final mount location and seems to fasten a white plastic cover. When installing the gooseneck, the adapter that is used to attach to the seat’s bolt on the floor must be flipped over so the gooseneck can mount properly through the dash.
**This takes the longest time because you literally have to massage the gooseneck’s shape to perfectly exit the mount hole (and face the driver) at the same time.**
The good news is when you do get it through; it is fairly flexible and can be manipulated into twisting a bit before the grommet is installed. Now when you put the grommet on when the gooseneck is through the mount hole, the back of the grommet will have to be trimmed about an inch with a razor to pop into position so it looks flush. Also, the gooseneck will have to be through by at least 2 inches for the twist lock to fit the phone mount mechanism.
Here are the final results that I’m very happy with. Very sturdy and looks kind of like it was designed for it too.


PS: Although I have a Jabra Bluetooth Speakerphone with FM modulation, the radio quality sucks because FM reception changes too much, so this way I can easily add a CD Lineout hack and phone charge cabling without looking like spaghetti hanging off of a windshield.
Last edited by NoPistonZ; 11-02-2009 at 12:25 AM.
#3
The gooseneck mount is originally designed to be mounted on the seat bolt on the floor for passenger side or driver side. It is flexible steel that can be moulded to your exacting specs. There are parts for that in the package, but I only used the flange that is attached to it in the picture above. The other side of the goosneck has a removable mount and the loom can be slid off of it, which I did do.
Because it's 15" long, I could find a bolt lower under the dash to mount it and "play" with placement and see where it ended up out of the mount hole in the dash. The hardest part of the whole install is manipulating the shape of the gooseneck to not only face the driver but to fit where the bolt attaches under the dash. This was obviously not intended as a mount under the dash, but the design is so "flexible" you can custom mount it anywhere if you have the patience. Ultimately, I chose this location because it bugged me that there was a cover over a hole in the dash that could not only be used to mount a phone, but have it nice and sturdy and wouldn't vibrate while driving (thanks to the rubber grommet)
Another reason I chose this was that it can be completely reversed like it never was there and the gooseneck mount kit can be used again elsewhere.
Last edited by NoPistonZ; 11-10-2009 at 09:03 AM.
#4
Here are some shots under the dash to help anyone interested in where I attached the gooseneck base. I did have to reverse the bracket on the gooseneck to have it fit down here though. 


#5
Thread Revival!
Sorry, but I've been waiting for almost a year to do this, and I finally got it done yesterday!
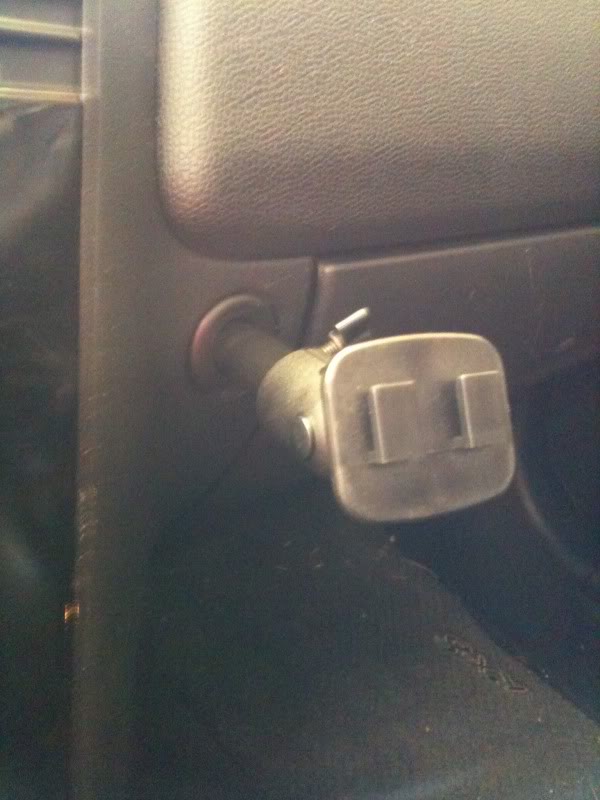
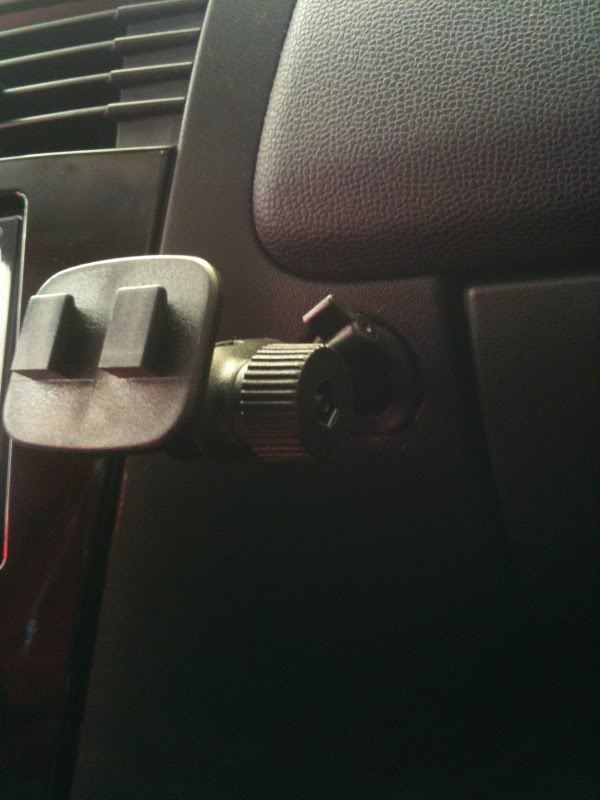
FYI: The scraping in this pic (white spots) is from my DVD install, not this.
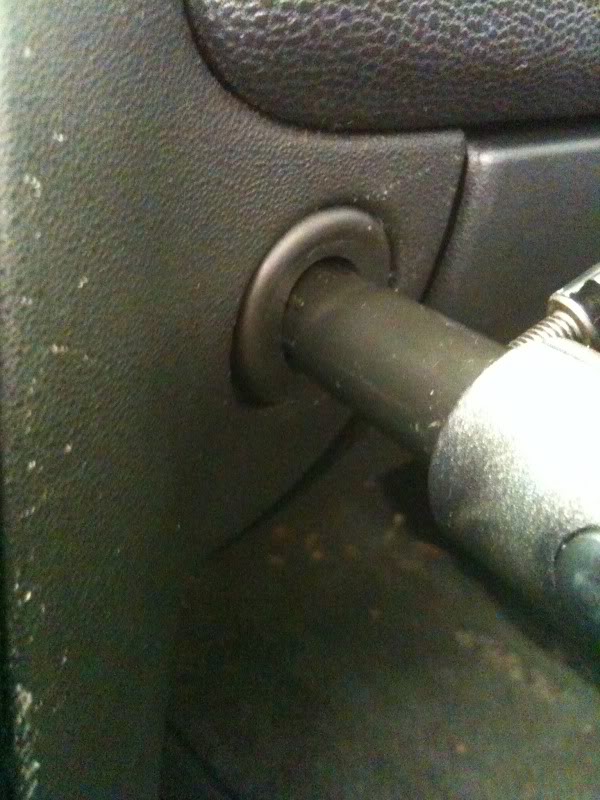
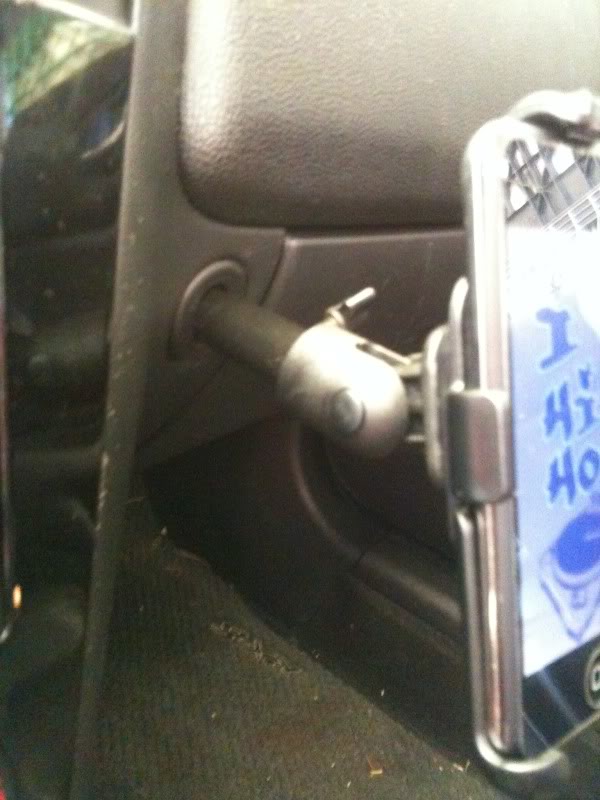
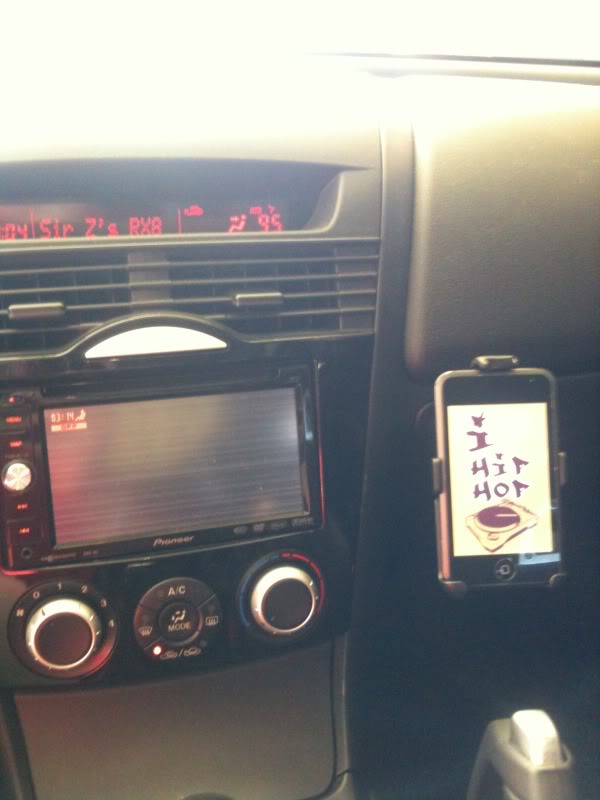
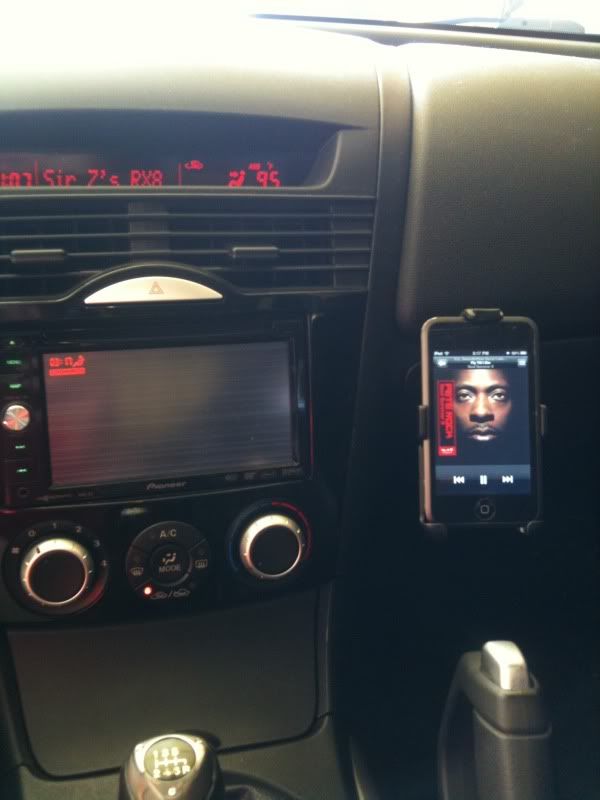
Took me about 30 minutes start to finish, and the whole project came in at just under $20 ($15 for the kit, ~$5 at Home Depot for the extras). Best idea EVER! Thanks for sharing your find. This thing ROCKS!
Sorry, but I've been waiting for almost a year to do this, and I finally got it done yesterday!


FYI: The scraping in this pic (white spots) is from my DVD install, not this.


Took me about 30 minutes start to finish, and the whole project came in at just under $20 ($15 for the kit, ~$5 at Home Depot for the extras). Best idea EVER! Thanks for sharing your find. This thing ROCKS!
#6
Glad to see it worked out! I use it every day...The hardest part was getting it to angle at the driver...that took me an extra 20+ minutes because you have to constantly massage it to fit before mounting.
I recommend this mount over all others, frankly because I still haven't found another that uses that accessory punch out yet
I recommend this mount over all others, frankly because I still haven't found another that uses that accessory punch out yet

#7
Nice alternative NoPistonZ!
If a person finds they would like a slightly lower mount this one has worked well for me.


http://www.proclipusa.com/?sectionpa...ageid=1&dtype=
If a person finds they would like a slightly lower mount this one has worked well for me.


http://www.proclipusa.com/?sectionpa...ageid=1&dtype=
Last edited by BoosTED; 11-12-2010 at 05:13 AM.
#8
I remember looking into this kit over a year ago, but when I called them at the time, they didn't have the 2nd mount that fit my phone. I needed a universal that would change widths if I changed my phone in the future...and I did. My new MyTouch 4G is wider and it fits perfectly.
#9
Glad to see it worked out! I use it every day...The hardest part was getting it to angle at the driver...that took me an extra 20+ minutes because you have to constantly massage it to fit before mounting.
I recommend this mount over all others, frankly because I still haven't found another that uses that accessory punch out yet
I recommend this mount over all others, frankly because I still haven't found another that uses that accessory punch out yet

 That meant I had to take the glove compartment off and work the mount back twards the driver's side a little more, but that only took 2-3 minutes.
Nice alternative NoPistonZ!
If a person finds they would like a slightly lower mount this one has worked well for me.


http://www.proclipusa.com/?sectionpa...ageid=1&dtype=
If a person finds they would like a slightly lower mount this one has worked well for me.


http://www.proclipusa.com/?sectionpa...ageid=1&dtype=
 Looks awesome though!
I remember looking into this kit over a year ago, but when I called them at the time, they didn't have the 2nd mount that fit my phone. I needed a universal that would change widths if I changed my phone in the future...and I did. My new MyTouch 4G is wider and it fits perfectly.
#12
#13
Just did this. I have an iPhone 3GS, but I got the universal mount anyhow.
Kudos to nopistonz. Your spatial reasoning is superior to my own, I never would've figured this out. Also, I'm a big guy, and I felt like I was going to break my collar bone crawling under there repeatedly.
Worth it in the end, this is a great upgrade. Looks almost oem.
Thanks!
Kudos to nopistonz. Your spatial reasoning is superior to my own, I never would've figured this out. Also, I'm a big guy, and I felt like I was going to break my collar bone crawling under there repeatedly.
Worth it in the end, this is a great upgrade. Looks almost oem.
Thanks!
#14
oltmann....glad that I could help!  Still use it every day...
FYI...these phones are getting bigger, case in point my friend's Droid X almost eats up the whole width of the biggest opening on this Arkon adapter, which is 2 and 5/8 inches wide. They may make some new adapters for the Arkon that can have the phones sit widescreen too, but I'm not sure.
 Still use it every day...
FYI...these phones are getting bigger, case in point my friend's Droid X almost eats up the whole width of the biggest opening on this Arkon adapter, which is 2 and 5/8 inches wide. They may make some new adapters for the Arkon that can have the phones sit widescreen too, but I'm not sure.
#15
UPDATE: I got an Verizon iPhone 4 tonight, so I need to upgrade my holder as well since I bought the iPhone 3Gs holder originally. Anybody found out which mount adaptor works with the iPhone 4?
#16
BUMP! I found it!
http://www.amazon.com/gp/product/B003Z4L68S
Arkon IPM515 Windshield/Dashboard Mount with Slim-Grip Phone Holder--Compatible with iPhone 4
I bought this on Amazon for $11, got it within 2 days, and just swapped the phone holder piece out with my old 3Gs holder (I left all the hardware behind the dash in place). This is actually the universal holder, not specific to the iPhone 4. The bottom of it is spring loaded, so it expands to accomodate different size smartphones with and without cases. I've used it for a couple of days now and it's quick, easy, secure, and because the arms are padded, it doesn't scratch my phone up (I'm REALLY picky about keeping my phones nice).
My only concern with it is over time, the springs in the bottom might stretch and not hold the phone as snugly. But at $11 each, I can't really complain!
#17
Well, I was FINALLY able to get this little project out of the way!
I ended up with a pretty half-assed job. I have no imagination when it comes to making these things, but I don't think it turned out too badly
Sorry bout the quality of pics. Used my Blackberry


And here is my old mount. Keeping it for now, until I find another location for my AccessPORT...

If you have an imagination, and some patience, this is a very easy mod, and also handy
I ended up with a pretty half-assed job. I have no imagination when it comes to making these things, but I don't think it turned out too badly

Sorry bout the quality of pics. Used my Blackberry


And here is my old mount. Keeping it for now, until I find another location for my AccessPORT...

If you have an imagination, and some patience, this is a very easy mod, and also handy
#20
Thanks for this. This is a great idea, I was looking for somewhere else to mount my ugly windscreen mount.
I used a Griffin 'WindowSeat' In-car mount for an IPhone. It's good because uses a black plastic like the stereo.
Also you can adjust to any angle and it was easy to fit. I just wedged the suction part in with some hard foam blocks and it's solid, 10 min job.


I used a Griffin 'WindowSeat' In-car mount for an IPhone. It's good because uses a black plastic like the stereo.
Also you can adjust to any angle and it was easy to fit. I just wedged the suction part in with some hard foam blocks and it's solid, 10 min job.


#24
I agree. If you have the right sized grommet, the windshield kits may work. I used this one because it was thick enough to fill the gap. I have enough play to run a charge cable for power too and keep it failly stealth.
Last edited by NoPistonZ; 01-18-2012 at 08:03 AM.
#25
DIY: RX-8 Mobile Phone Cradle Mount


