
Painting Interior Plastic Pieces
 06-17-2009, 08:15 PM
#1

Painting Interior Plastic Pieces
So I decided to paint some stuff. Currently I have the seat rotor garnish, stereo garnish, air vent bezels, and the dash gauge bezels painted. I plan on painting the center console garnish, shift boot ring, HVAC control *****, rear pass through, and finally with the most pain (because of taping the red triangles) the hazard button. I stripped the stock aluminum paint off the plastic, cleaned the plastic, sanded it down with some fine grit paper, cleaned it again, primed it, then painted it using high quality acrylic model paint. Gun Metal with flakes, a shade lighter than black, a shade darker than my exterior color, Ti Gray.
What do you think so far? Sorry no pics installed yet, but they look good! Tomorrow when I clean my car and I have good lighting, I'll try to get some quick installed pics of what I have. Also, please excuse the quality of the photos... iPhone...
Pictures


What do you think so far? Sorry no pics installed yet, but they look good! Tomorrow when I clean my car and I have good lighting, I'll try to get some quick installed pics of what I have. Also, please excuse the quality of the photos... iPhone...
Pictures


 06-17-2009, 10:34 PM
#5
Alex: There def is a difference! The pictures are crummy. I'll try to get better shots tomorrow.
Easy: I will do my best to take better ones tomorrow with a camera. They will be installed though; I've had the pieces back in for two days now. The dash cluster bezels are very easy to remove, just slide a knife between the aluminum colored cluster bezels and the black housing. Be VERY careful because if you yank or tug too hard, you'll snap the plastic tabs off. It's just as easy as remove the air vent bezels. The radio surround pieces were a little trickier, but it's still very easy. The black piano plate that has "Power" on it pops right out. Get a knife and just pop it out. Also, the blank black piano plate below the volume dial also pops out easily. Pop them out and it will be apparent how to very easily remove the surround pieces. I still haven't figured out how to remove the control ***** or the hazard button. I think I will have to take off the whole radio face plate to figure that out. I know the ***** might be tricky because they have LEDs in them. I need to get more paint, either way.
9k: will do.
06-17-2009, 10:35 PM
#6
Alex: There def is a difference! The pictures are crummy. I'll try to get better shots tomorrow.
Easy: I will do my best to take better ones tomorrow with a camera. They will be installed though; I've had the pieces back in for two days now. The dash cluster bezels are very easy to remove, just slide a knife between the aluminum colored cluster bezels and the black housing. Be VERY careful because if you yank or tug too hard, you'll snap the plastic tabs off. It's just as easy as remove the air vent bezels. The radio surround pieces were a little trickier, but it's still very easy. The black piano plate that has "Power" on it pops right out. Get a knife and just pop it out. Also, the blank black piano plate below the volume dial also pops out easily. Pop them out and it will be apparent how to very easily remove the surround pieces. I still haven't figured out how to remove the control ***** or the hazard button. I think I will have to take off the whole radio face plate to figure that out. I know the ***** might be tricky because they have LEDs in them. I need to get more paint, either way.
9k: will do.
Easy: I will do my best to take better ones tomorrow with a camera. They will be installed though; I've had the pieces back in for two days now. The dash cluster bezels are very easy to remove, just slide a knife between the aluminum colored cluster bezels and the black housing. Be VERY careful because if you yank or tug too hard, you'll snap the plastic tabs off. It's just as easy as remove the air vent bezels. The radio surround pieces were a little trickier, but it's still very easy. The black piano plate that has "Power" on it pops right out. Get a knife and just pop it out. Also, the blank black piano plate below the volume dial also pops out easily. Pop them out and it will be apparent how to very easily remove the surround pieces. I still haven't figured out how to remove the control ***** or the hazard button. I think I will have to take off the whole radio face plate to figure that out. I know the ***** might be tricky because they have LEDs in them. I need to get more paint, either way.
9k: will do.
06-17-2009, 11:09 PM
#7
Registered User

Join Date: Feb 2003
Location: South Florida
Posts: 1,080
Likes: 0
Received 0 Likes
on
0 Posts
Are you going to clear coat it? I want to do the glossy black pieces on my door a silver satin to match the stock silver trim (and my exterior) and I was thinking something like Krylon Fusion but I can never find an appropriate color....however there'll be a much better variety in model paints...for some reason that never occurred to me.
jds
PS: Interesting use of the Budweiser...
jds
PS: Interesting use of the Budweiser...
06-17-2009, 11:34 PM
#8

 06-18-2009, 12:44 AM
#10
Alex: There def is a difference! The pictures are crummy. I'll try to get better shots tomorrow.
Easy: I will do my best to take better ones tomorrow with a camera. They will be installed though; I've had the pieces back in for two days now. The dash cluster bezels are very easy to remove, just slide a knife between the aluminum colored cluster bezels and the black housing. Be VERY careful because if you yank or tug too hard, you'll snap the plastic tabs off. It's just as easy as remove the air vent bezels. The radio surround pieces were a little trickier, but it's still very easy. The black piano plate that has "Power" on it pops right out. Get a knife and just pop it out. Also, the blank black piano plate below the volume dial also pops out easily. Pop them out and it will be apparent how to very easily remove the surround pieces. I still haven't figured out how to remove the control ***** or the hazard button. I think I will have to take off the whole radio face plate to figure that out. I know the ***** might be tricky because they have LEDs in them. I need to get more paint, either way.
9k: will do.
Easy: I will do my best to take better ones tomorrow with a camera. They will be installed though; I've had the pieces back in for two days now. The dash cluster bezels are very easy to remove, just slide a knife between the aluminum colored cluster bezels and the black housing. Be VERY careful because if you yank or tug too hard, you'll snap the plastic tabs off. It's just as easy as remove the air vent bezels. The radio surround pieces were a little trickier, but it's still very easy. The black piano plate that has "Power" on it pops right out. Get a knife and just pop it out. Also, the blank black piano plate below the volume dial also pops out easily. Pop them out and it will be apparent how to very easily remove the surround pieces. I still haven't figured out how to remove the control ***** or the hazard button. I think I will have to take off the whole radio face plate to figure that out. I know the ***** might be tricky because they have LEDs in them. I need to get more paint, either way.
9k: will do.
Ive painted all but the radio surround 2 pieces.
Are you talking about the fan speed **** and the temp control ? If you are they just pull right out. No problem.
06-18-2009, 06:48 AM
#11
Are you going to clear coat it? I want to do the glossy black pieces on my door a silver satin to match the stock silver trim (and my exterior) and I was thinking something like Krylon Fusion but I can never find an appropriate color....however there'll be a much better variety in model paints...for some reason that never occurred to me.
jds
PS: Interesting use of the Budweiser...
jds
PS: Interesting use of the Budweiser...
Thanks all... I'll get better pictures up later today.
Last edited by endowdly; 06-18-2009 at 06:51 AM.


 06-19-2009, 05:09 PM
#14
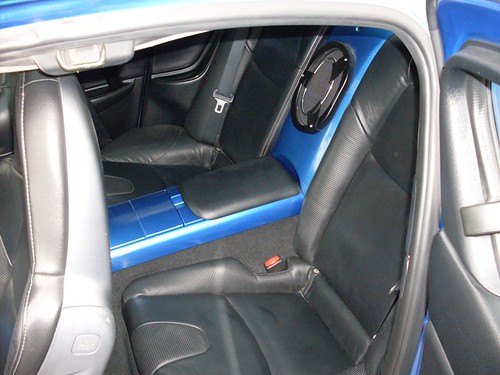
Oh wow. I was thinking about painting the door handle bezel and window switch plate, but I think I will go and buy the Mazdaspeed CF accents to match my hood and other pieces. Oh but yours came out really nice. Especially that back pass through. Is that a vinyl? Very nice. Also, good idea for the trim on the SATNAV controls! Mind if I steal it?
06-22-2009, 06:58 AM
#16
I've been pretty terrible about this, eh? Well the weather has been awful up here for the last couple of days, but the sun is finally out again. I'll be bringing my car to my uncle's shop to get the bumpers painted as well so when I go for that I will take some nice pictures, I hope. Also haven't painted anymore inside because I ran out of paint.
06-22-2009, 08:47 AM
#18
Momentum Keeps Me Going

Question endowdly: how do you strip the silver paint of the plastic bits (like the console sides) without harming the plastic underneath. Don't you need to use something that could just as easily soften the plastic? What did you use?
06-22-2009, 09:12 AM
#19
Rough sand paper! I used some nice film model sand paper, but any good old 160-250 grit paper should work. It'll come off pretty easily with minimal elbow grease. Once you get most of it off--it doesn't need to be completely clear... clean it off with soap and water. Regular dish detergent is fine. Then use fine grit paper 450-600 to rough up the plastic and scratch up any remaining silver paint. Prime. Paint. Gloss. Done!
06-22-2009, 09:15 AM
#20
^^ Oh in addition, the base color of the plastic in the car is a dark blueish black. The stock aluminum paint is a pretty thin with just a smidgen of a UV protection layer; it comes off very easily. Just so you know what you're looking for.
06-22-2009, 12:51 PM
#22
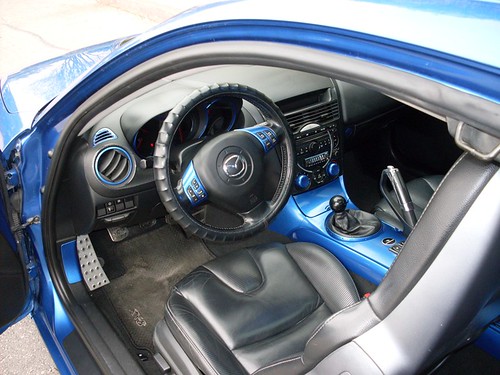
Some better pictures (but not the best)...
I was going to take some nice pictures with my dad's SLR camera, but his batteries were dead. These were the best I could do...
The seat garnish...
The stereo surrounds...
The dash and air vent bezels...
Still have to paint the windshield vents, dials, button, center console, heat warmer switch guides, satnav guides, and rear pass through!
I'll continue work when I get my car back. I just dropped it off this morning.

