Remote bass control.. finally installed
 06-04-2006, 10:12 PM
#1
Registered
Thread Starter
Remote bass control.. finally installed
I've had my JL 500/1 and 10w6v2 in my car for about 2 months now and the RBC-1 remote bass control just sitting waiting.. so I finally got around to doing the install.
It wasn't hard, a little tricky, but i think it came out really nice.
See below.
If you have questions, I can prolly do a full DIY.
Ajax
It wasn't hard, a little tricky, but i think it came out really nice.
See below.
If you have questions, I can prolly do a full DIY.
Ajax


 06-05-2006, 02:13 PM
#6
Administrator
iTrader: (7)

Ajax, that's awesome!
I'm thinking of running a very similar set up soon and I'd love a diy if you've got the time.
I'm thinking of running a very similar set up soon and I'd love a diy if you've got the time.
 06-05-2006, 02:43 PM
#7
Registered
Thread Starter
Originally Posted by LiL BenNy
hows the bass sound? i have a 500.1 with 2 10w6v2's... wonder what the difference is..
The RBC only overrides the boost setting on the 500/1 in the bass eq section of controls so it's not going to change anything else. It's just a potentiometer that's interfaced through a phone cable, lol. But well worth it.
06-05-2006, 02:59 PM
#8
Registered
Thread Starter
Originally Posted by Jedi54
Ajax, that's awesome!
I'm thinking of running a very similar set up soon and I'd love a diy if you've got the time.
I'm thinking of running a very similar set up soon and I'd love a diy if you've got the time.
Anyway, here's the basic steps. I might do some pictures.
1. Remove the rear driver side seat cushion and back. You'll need that space open to route the cable through to the drivers side wiring channel.
2. Remove the drivers side wiring channel cover. To do this, open both doors and just lift it up. You have to pull kind of hard to get it off. I reccommend working from the back seat to the front. It just pops out.
3. Route the cable from the amp through the open section behind the rear seat down along with the black cable that's coming that way. There is conveniently an extra wire retention clip right next to that black cable. Follow the cable into the wiring channel and then all the way up to where the channel ends.
4. Remove the plastic fuse box cover on the left side of the driver's footwell area.
5. If you know how to remove the plastic surround for the fuse box area, go ahead. I didn't bother since it proved to be a pain. I basically flossed the cable up underneath and pushed it up into the fuse box area so i could grab it, pulled it out and then ran it up into the area below the switches. Leaving it there for the moment.
Now.. the hard part.
6. Remove the plastic cover over the steering column.
7. Remove the 2 bolts holding the metal steering column cover in place.
This is the hardest step.
8. Reach up behind the switch panel from the right. You'll have to feel your way around until you find the switches. The one immediately to the left will have cables so you'll have a big plastic blank (it's not just a cover) that goes back about 2-3 inches. If you wiggle it, you should be able to see the blank move. There are 2 tabs holding it in, one on top, one on the bottom. I found it easiest to push the bottom tab with my index finger or thumb while pushing the back of the entire assembly forward with the other finger. The bottom of the blank should pop out. Do the exact same for the top part but dont let the bottom pop back in or you'll have to do it over. The entire blank should pop out.
9. The blank is actually 2 pieces. A fake wiring harness plug and the mount itself. You dont need the wiring harness plug since it's useless so either break or loosen the 4 clips holding it in place and remove it.
10. Get 2-3 drill bits. Drill a hole up to 3/8 of an inch in diameter in the center of the blank. I actually used a bit 1 smaller than 3/8, but I had to use 2 smaller bits to get it started. I started with a 1/8 and worked my way up.
11. Once you have a nice smooth hole, take the cap off of the RBC1 (it just pops off) and push the assembly into the blank from the back so that the cable is on the bottom of it and the brass **** comes through the hole (obviously). The fit is extremely tight so you'll have to push pretty hard. Once you have the RBC-1 all the way in, just put the cap on it with the dial turned all the way counterclockwise and the cap positioned so it points to 7pm (like in my picture).
You're then ready to reassemble.
12. With the car/engine off, push the DSC button and put the RBC'd blank back in. Having the DSC button pushed in makes it a lot easier to get that slightly widenned blank in there. It's actually quite easy to do.
13. Connect the phone cord wire to the RBC and zip tie to something sturdy. Reassemble everything. and test it out.
Piece of cake really. I can take pictures this weekend.
It'll just take me some time to get that damn blank back out, lol.
Ajax
 06-05-2006, 04:33 PM
#10
Registered

Join Date: Jan 2005
Location: San Diego, CA
Posts: 394
Likes: 0
Received 0 Likes
on
0 Posts
Ajax,
pretty damm nice!, it looks awesome. Thanks to you i already have my 4080 box, 10w6v2 sub and just waiting for the weekend to get it all installed. I'm sure that i'll be looking for a RBC in the near future, it looks like something very convinient.
pretty damm nice!, it looks awesome. Thanks to you i already have my 4080 box, 10w6v2 sub and just waiting for the weekend to get it all installed. I'm sure that i'll be looking for a RBC in the near future, it looks like something very convinient.
 06-05-2006, 04:54 PM
#13
Registered
Thread Starter
Originally Posted by sharkman
Ajax,
pretty damm nice!, it looks awesome. Thanks to you i already have my 4080 box, 10w6v2 sub and just waiting for the weekend to get it all installed. I'm sure that i'll be looking for a RBC in the near future, it looks like something very convinient.
pretty damm nice!, it looks awesome. Thanks to you i already have my 4080 box, 10w6v2 sub and just waiting for the weekend to get it all installed. I'm sure that i'll be looking for a RBC in the near future, it looks like something very convinient.
Glad you like yours and yes, it is quite nice up there.
06-05-2006, 06:23 PM
#14
resU deretsigeR

Join Date: Jan 2006
Location: Jacksonville, FL
Posts: 743
Likes: 0
Received 0 Likes
on
0 Posts
Originally Posted by Ajax
I have it in a 4080 box.
Nevermind. I found an old post.
Last edited by jstkilntim; 06-05-2006 at 06:30 PM.
06-05-2006, 08:22 PM
#15
Registered
Join Date: Jan 2005
Location: San Diego, CA
Posts: 394
Likes: 0
Received 0 Likes
on
0 Posts
Yes hahaha, you should ask for a comision indeed!. Very nice box by the way. So what bran of capacitator are you looking at/recomend for your setup since im practically cloning your setup? if you don't mind me asking?
06-05-2006, 08:44 PM
#16
Registered
Thread Starter
Originally Posted by sharkman
Yes hahaha, you should ask for a comision indeed!. Very nice box by the way. So what bran of capacitator are you looking at/recomend for your setup since im practically cloning your setup? if you don't mind me asking?
I'll let you know when i pick one but right now I'm still just looking around.
 06-05-2006, 10:06 PM
#18
Registered
Thread Starter
Originally Posted by \\Konig\\
what did the RBC look like before you put it in there?
I have one for my 250/1 jl amp but im not sure if its the same RBC. Did your RBC have a sort of metal piece the only covered the front and top of the RBC when you first got it?
I have one for my 250/1 jl amp but im not sure if its the same RBC. Did your RBC have a sort of metal piece the only covered the front and top of the RBC when you first got it?
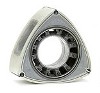
It was a little plastic box with a metal mounted potentiometer with a plastic ****.
Lemme find a pic.
06-05-2006, 10:06 PM
#19
Registered
Thread Starter
06-06-2006, 07:06 PM
#21
Registered

Join Date: May 2004
Location: Norrk�ping, Sweden
Posts: 140
Likes: 0
Received 0 Likes
on
0 Posts
Hey I just saw this thread. BTW i got the same set up 500/1 and 10w6v2 in a 4080 box. Btw. You don't really need to take apart anything to get the blank out. I just drilled into it while it was in the car, and used the hole to leverage it out. Oh and don't try to put it on the blank on the left. its too close to the door to comfortably change the volume. I made that mistake and had to switch it up with the other one.
08-06-2006, 10:02 PM
#23

Ajax,
Thanks for the good install instructions. I just did this tonight and I have to say it is the best location for the bass control. The only thing I did different was to sand down the sides of the plastic a little bit on the potentiometer and then used a little silicon lubricant to make it slide in easier (that came out wrong didn't it). Looks great and is easy to reach. Thanks again for the info.
Corvus13
08-06-2006, 10:45 PM
#24
the stig is my hero

Join Date: Feb 2006
Location: NC
Posts: 701
Likes: 0
Received 0 Likes
on
0 Posts
Great DIY! I ended up actually putting the control in that little blank circle that's between the head unit and the glove compartment. The control my amp came with had a big ugly chip that would have made it hard to put in the blank next to the dsc.
08-07-2006, 09:54 AM
#25
IstanbulNotConstantinople

I have the exact same setup.
I switched to a Optima Yellow Top, and have never had the lights dim since.
I even tried running the stereo with the engine off, and the lights on for about 10mins, and they never dimmed.
A bunch of us went to the drive-in to see F&F3, and I ran the stereo really loud, with the bass way up (we were sitting outside the cars watching the movie), and never had a problem either.
- Cesar -