Derex'8 Turbo Setup
 11-27-2008, 09:21 PM
#26
You may have created a vacuum leak with swapping the fuel injectors. If they aren't seated in lower intake manifold properly that can leak and suck in air.
Swapping injectors is easier the third time, LOL. Popping off the fuel rail is simple with hand tools tho- just use a 3/8" ratchet with a 10" extension and 10mm socket to pop off the rail.
The Esmeril kit routes the charge pipes through the cutout in the front bumper area to the intercooler, so if you plan on putting a CAI there you need to redo the charge piping, which may lead to some convoluted pipes.
 11-28-2008, 07:53 AM
#27
ReDuX
Thread Starter
iTrader: (4)
Join Date: Oct 2006
Location: Norfolk, VA
Posts: 918
Likes: 0
Received 0 Likes
on
0 Posts
^^^^^Yeah and I was extra cautious and took my time w/ the fuel injectors for this very exact reason..will give them a check agin tomorrow when I install the entire kit.
Still think it may have something to do w/that broken nipple on the purge solenoid valve as it also makes this sqeeling noise now..
Still think it may have something to do w/that broken nipple on the purge solenoid valve as it also makes this sqeeling noise now..
 not only do I smell it but can also see it white smoke, and fuel leaking.
 11-29-2008, 07:36 PM
#31
Agreed, diagnostics is usually the hardest part.
When putting the injectors in you probably lost one of the grommets. There is a rubber o-ring also that attaches on top of the injector and seats into the fuel rail, it can sometimes rip/tear so check that. Use some lightweight oil (like 2-stroke oil or Marvel Mystery) to lube the o-ring when re-installing.
Also make sure you have those rubber donuts that seat inbetween the injector and injector boss in the LIM. I found it easiest to put the rubber donut in the boss first instead of having it hang on the injector because they will fall off if you move the rail around a lot.
Seat all injectors in the rail and then drop the rail down, holding the rail with your thumb pressed against your palm and use your fingers to help guide the injectors into the boss'. Once they are seated pop in the two 10mm bolts. Also don't overtighten them or you can crack the injectors. Each injector should be able to spin freely once the rail is bolted in.
 11-30-2008, 06:11 PM
#33
ReDuX
Thread Starter
iTrader: (4)
Join Date: Oct 2006
Location: Norfolk, VA
Posts: 918
Likes: 0
Received 0 Likes
on
0 Posts
Agreed, diagnostics is usually the hardest part.
When putting the injectors in you probably lost one of the grommets. There is a rubber o-ring also that attaches on top of the injector and seats into the fuel rail, it can sometimes rip/tear so check that. Use some lightweight oil (like 2-stroke oil or Marvel Mystery) to lube the o-ring when re-installing.
Also make sure you have those rubber donuts that seat inbetween the injector and injector boss in the LIM. I found it easiest to put the rubber donut in the boss first instead of having it hang on the injector because they will fall off if you move the rail around a lot.
Seat all injectors in the rail and then drop the rail down, holding the rail with your thumb pressed against your palm and use your fingers to help guide the injectors into the boss'. Once they are seated pop in the two 10mm bolts. Also don't overtighten them or you can crack the injectors. Each injector should be able to spin freely once the rail is bolted in.
When putting the injectors in you probably lost one of the grommets. There is a rubber o-ring also that attaches on top of the injector and seats into the fuel rail, it can sometimes rip/tear so check that. Use some lightweight oil (like 2-stroke oil or Marvel Mystery) to lube the o-ring when re-installing.
Also make sure you have those rubber donuts that seat inbetween the injector and injector boss in the LIM. I found it easiest to put the rubber donut in the boss first instead of having it hang on the injector because they will fall off if you move the rail around a lot.
Seat all injectors in the rail and then drop the rail down, holding the rail with your thumb pressed against your palm and use your fingers to help guide the injectors into the boss'. Once they are seated pop in the two 10mm bolts. Also don't overtighten them or you can crack the injectors. Each injector should be able to spin freely once the rail is bolted in.
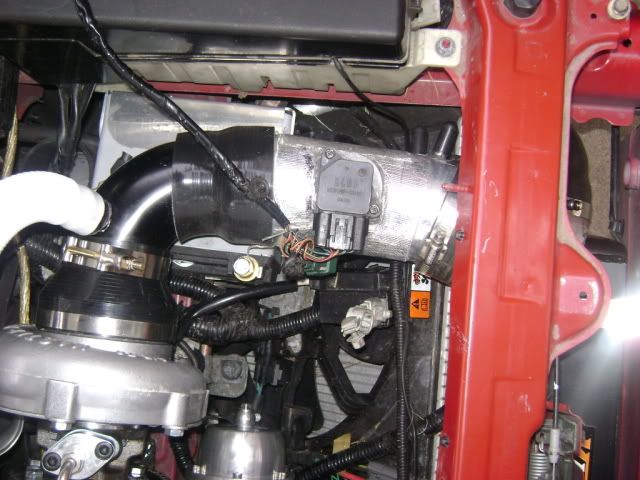
Yeah come to find out I lost 2 of those lower cushions on bottom of injectors and forgot to plug the hoses up to that vaccum bracket thingy with the 4 nipples

 ...BTW what is that piece called? it connects to the oil metering nozzles
Picked up some rubber grommets and gasket maker to seal injectors back in.
Other than that made major progress today and got the manifold, upipe, turbo, downpipe, and IC all installed today
 All thats left is the charge and MAF piping, relocate battery, greddy oil pan, and put intake system back together.
 Will have pictures of everything tomorrow. Right now I'm tired as hell

Last edited by Derex'8; 11-30-2008 at 06:17 PM.
11-30-2008, 11:29 PM
#34
Yeah come to find out I lost 2 of those lower cushions on bottom of injectors and forgot to plug the hoses up to that vaccum bracket thingy with the 4 nipples ...BTW what is that piece called? it connects to the oil metering nozzles
Picked up some rubber grommets and gasket maker to seal injectors back in.
Other than that made major progress today and got the manifold, upipe, turbo, downpipe, and IC all installed today All thats left is the charge and MAF piping, relocate battery, greddy oil pan, and put intake system back together.
Will have pictures of everything tomorrow. Right now I'm tired as hell
...BTW what is that piece called? it connects to the oil metering nozzlesPicked up some rubber grommets and gasket maker to seal injectors back in.
Other than that made major progress today and got the manifold, upipe, turbo, downpipe, and IC all installed today
All thats left is the charge and MAF piping, relocate battery, greddy oil pan, and put intake system back together. Will have pictures of everything tomorrow. Right now I'm tired as hell
I would advise against using gasket sealer on the fuel injectors- the rubber grommets and o-rings are plenty enough, and gasket sealer can gum up the injectors and disable them if it is ingested or can get sucked into the motor. Bad.
12-04-2008, 02:31 PM
#35
ReDuX
Thread Starter
iTrader: (4)
Join Date: Oct 2006
Location: Norfolk, VA
Posts: 918
Likes: 0
Received 0 Likes
on
0 Posts

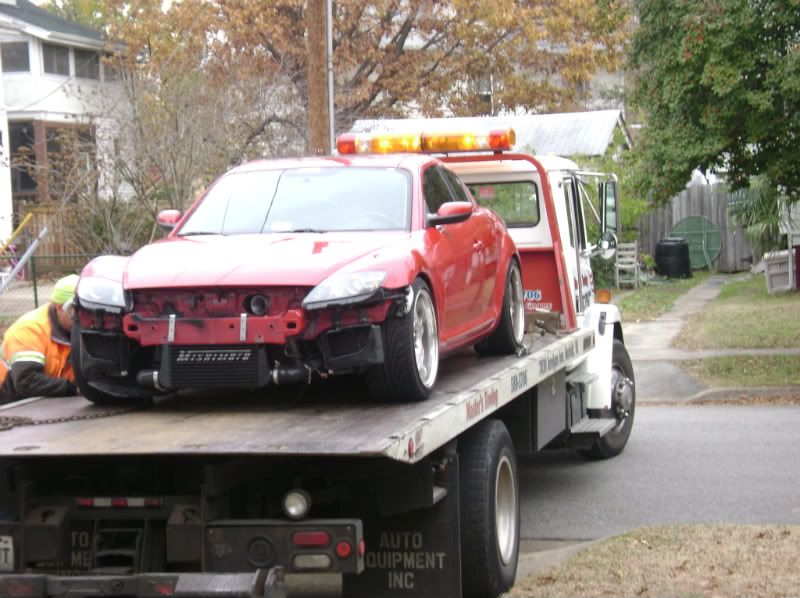
This happened tuesday after 4 days straight and one to many fitment issues. The car is in my buddys hands now getting some fabricating done to it. Issues I ran into were
the 2 piece downpipe and trying to get that bitch clamped
Intercooler piping
Wastegate
He'll be fixing that and doing some xtra things: Getting IC brackets welded to front bar. Modifying front bar to allow miore air flow to IC, relocating battery and creating bracket, ensuring my injectors are seated correctly allowing no leaks, and modifying my CAI.
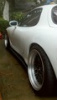
Couple of pics of setup before it left
Let me know if you forsee issues w/this intake setup, as I can address it now while it's still in the shop
Last edited by Derex'8; 12-16-2008 at 04:29 PM.
12-04-2008, 03:41 PM
#36
That MAF tube is probably gonna be a problem.
See if you can get an "elbow" to the turbo that doesn't step down and then back up.
Also, move the MAF itself 2 inches forward and put a screen before it.
Make sure the tube is 3.375" i.d. for as much of its length from the filter to the turbo as possible.
See if you can get an "elbow" to the turbo that doesn't step down and then back up.
Also, move the MAF itself 2 inches forward and put a screen before it.
Make sure the tube is 3.375" i.d. for as much of its length from the filter to the turbo as possible.
 12-04-2008, 05:00 PM
#38
ReDuX
Thread Starter
iTrader: (4)
Join Date: Oct 2006
Location: Norfolk, VA
Posts: 918
Likes: 0
Received 0 Likes
on
0 Posts
Yeah I'm a end up trashing the whole setup and get them to fab me up a complete two piece 3.5" od/3.375" ID pipe running from the turbo exiting out the engine bay w/90 degree turn out like mazsport.
This was just some **** I halfassed together as you can see not very pretty, I used the AEM pipe I had but and needed it turning in that direction or otherwise it would have clearance issues.
This was just some **** I halfassed together as you can see not very pretty, I used the AEM pipe I had but and needed it turning in that direction or otherwise it would have clearance issues.
12-04-2008, 07:14 PM
#40
I knew you would have issues with the charge piping. Esmeril routes their pipes through the bumper hole that most of use as a CAI hole.
You also may consider getting a new AST- your wastegate pipe is awfully close to the plastic and it will melt. I would look into a metal AST (Carbing makes a nice one) to avoid it melting.
You also may consider getting a new AST- your wastegate pipe is awfully close to the plastic and it will melt. I would look into a metal AST (Carbing makes a nice one) to avoid it melting.
12-04-2008, 10:31 PM
#41
ReDuX
Thread Starter
iTrader: (4)
Join Date: Oct 2006
Location: Norfolk, VA
Posts: 918
Likes: 0
Received 0 Likes
on
0 Posts
I knew you would have issues with the charge piping. Esmeril routes their pipes through the bumper hole that most of use as a CAI hole.
You also may consider getting a new AST- your wastegate pipe is awfully close to the plastic and it will melt. I would look into a metal AST (Carbing makes a nice one) to avoid it melting.
You also may consider getting a new AST- your wastegate pipe is awfully close to the plastic and it will melt. I would look into a metal AST (Carbing makes a nice one) to avoid it melting.
As far as the WG and overflow tank I'll be using thermotec 2000 F dhesive backed heat shielding on the tank....As well as heatshielding other vital areas..no worries
Last edited by Derex'8; 12-04-2008 at 10:39 PM.
12-05-2008, 04:38 AM
#43

One major issue I have with the front-mount turbo kits is that they make it impossible to use one of the most valuable mods we have for the Renesis; the Sohn OMP Adapter.
 12-06-2008, 05:39 PM
#46
ReDuX
Thread Starter
iTrader: (4)
Join Date: Oct 2006
Location: Norfolk, VA
Posts: 918
Likes: 0
Received 0 Likes
on
0 Posts
Well looks like eveything will be finished up Either Monday or Tuesday 
I got my Tial 46mm wastegate in the mail today...and can I add that is one nicely built wastegate...will be dropping that off w/them monday so they can finish up and tighten everything...
God knows I probably won't be getting any sleep between then and now.....The Anxiety!!!
I got my Tial 46mm wastegate in the mail today...and can I add that is one nicely built wastegate...will be dropping that off w/them monday so they can finish up and tighten everything...
God knows I probably won't be getting any sleep between then and now.....The Anxiety!!!
 12-11-2008, 11:00 AM
#49
ReDuX
Thread Starter
iTrader: (4)
Join Date: Oct 2006
Location: Norfolk, VA
Posts: 918
Likes: 0
Received 0 Likes
on
0 Posts
Well Just came back from the shop, saw my car and.......me> <MRD...... all I can say is damn, It has definately been worth the wait. They literally took my **** mess and made it official
  !
!
Car wil be done tomorrow!!!
Pics to follow
<MRD...... all I can say is damn, It has definately been worth the wait. They literally took my **** mess and made it official !Car wil be done tomorrow!!!
Pics to follow
Last edited by Derex'8; 12-11-2008 at 11:06 AM.
