Do you really need to re-scale your injectors when you upgrade them
 05-12-2009, 04:27 PM
#1

Do you really need to re-scale your injectors when you upgrade them
When I fitted my turbo I also fitted blue injectors off an AT 8 to upgrade my fueling . I also rescaled the injectors via my tuning software to bring them into line with the actual injector size .
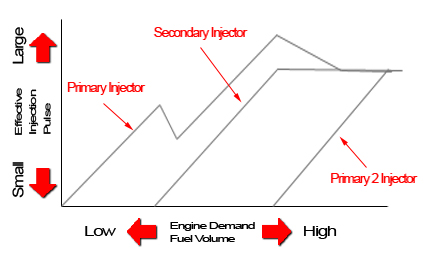
Stock................P1..290cc...............Sec.. 380cc...................P2..380cc.....Total 2100cc
After upgrade...P1..290cc...............Sec..380cc...... .............P2..480cc.....Total 2300cc
Total increase in capacity - 9%
So after rescaleing them I know that my target fueling is going to more closely resemble the actual AFRs I get . However the real point of putting in larger injectors is to reduce the load on all the injectors so that they are not running too close to maximum duty cycle .
When I thought about it I realised that fitting one bank of injectors of a different size and then scaling them is like you had not even fitted larger injectors as far as the other two banks are concerned .
That is because the pcm now knows my P2s are bigger so will in turn reduce the pulses to those injectors to match the fueling of the the stock injectors when they were in that position. So instead of getting 480cc I will only get 380cc at the point where the other injectors are at 100% duty cycle.
So what should you do ? I reverted back to 1/2 way between stock and fully scaled and noticed that i could reduce all my target lambda numbers over 4500rpm by 5% to get the same AFRs . Exactly as it should . (Edited)
This seems to work fine for the 480cc injectors as they are only 20% larger than stock . But how does one handle 780cc injectors to get the max benefit from them?
Last edited by Brettus; 06-08-2009 at 02:02 AM.
 05-12-2009, 06:53 PM
#2

Good question Brettus....I am having a hell of a time getting my car tuned for the reworked KGParts injectors...according to their flow sheet they gave me on the reworked injectors they are now 820cc. That is alot more than I expected.
However when it is scaled to that size I am running stupid lean. I saw 14's and up. Right now it is at 520cc but it's still not right. 10.5 then settles around 11.1 which isn't bad, but I get some lean spikes in the mid to high 12's. Also car seems sluggish. KGParts has not returned my call or email yet to find out if it actually does flow 820cc's which seems impossible.
I just might set my car on fire. FI is frustrating at times.


 I fell your pain
  05-13-2009, 05:57 AM
#4

When I fitted my turbo I also fitted blue injectors off an AT 8 to upgrade my fueling . I also rescaled the injectors via my tuning software to bring them into line with the actual injector size .
Stock................P1..290cc...............Sec.. 380cc...................P2..380cc.....Total 2100cc
After upgrade...P1..290cc...............Sec..380cc...... .............P2..480cc.....Total 2300cc
Total increase in capacity - 9%
So after rescaleing them I know that my target fueling is going to more closely resemble the actual AFRs I get . However the real point of putting in larger injectors is to reduce the load on all the injectors so that they are not running too close to maximum duty cycle .
When I thought about it I realised that fitting one bank of injectors of a different size and then scaling them is like you had not even fitted larger injectors as far as the other two banks are concerned .
That is because the pcm now knows my P2s are bigger so will in turn reduce the pulses to those injectors to match the fueling of the the stock injectors when they were in that position. So instead of getting 480cc I will only get 380cc at the point where the other injectors are at 100% duty cycle.
So what should you do ? For now I decided to just revert back to the stock scaling on the P2s .
I did this last night and straight away noticed that i could reduce all my target lambda numbers over 4500rpm by 5% to get the same AFRs .
This seems to work fine for the 480cc injectors as they are only 20% larger than stock . But how does one handle 780cc injectors to get the max benefit from them?
I guess you have checked that when correctly scaled the other injectors still hit 100%?
maybe it is worth replacing the injectors that run out of headroom first and scale them correctly check to see if they continue past the point they normally hit 100%?
possibly the best solution is to replace all the injectors and correctly scale?
05-13-2009, 03:25 PM
#5
I can see your point.
I guess you have checked that when correctly scaled the other injectors still hit 100%?
maybe it is worth replacing the injectors that run out of headroom first and scale them correctly check to see if they continue past the point they normally hit 100%?
possibly the best solution is to replace all the injectors and correctly scale?
I'm guessing that if you put large injectors in one position only that you need to rescale them to a point somewhere in between stock and the true value to get more flow out of them while avoiding bogging when they kick in .
Agree the best solution is probably to upgrade all the injectors by a small margin and scale them correctly rather than to upgrade one bank with huge injectors .
If you get the blues then it seems sensible to put the yellows you take out into the P1 position (replacing the reds) then rescale such that they all reach 100% duty simultaneously .
05-14-2009, 09:48 AM
#6
The Local Idiot

Join Date: May 2008
Location: Big D, Texas
Posts: 406
Likes: 0
Received 0 Likes
on
0 Posts
It's all guess work until you figure out how the PCM actually manages the different injectors. I'm willing to bet it isn't as simple as your hypothetical, and that you're better off scaling the injectors properly though.
 05-14-2009, 03:13 PM
#8
I'm using Hymee Protuner
05-14-2009, 03:17 PM
#9
BUT : the information I have thus far is : if you don't scale the P2 480cc injectors you can drop all your target afrs by 9% from 5000rpm upwards .
This does imply that by not scaling I'm getting more output from the blue injectors .
Last edited by Brettus; 06-08-2009 at 01:57 AM.
 06-08-2009, 03:54 PM
#11

OE never goes to 100%. Doesn't even really get past 80%, even at full load.
Primaries go to 75% up to the start of the secondaries, at which point their DC drops to about 45% and the secondaries come on at 30% or so.
When the P2s come on line, the P1 and sec drop about 15% from wherever they are and the P2s start at 15% or so.
You are way over-thinking (or under-thinking) the OE fuel strategy.
Scale them.
Last edited by MazdaManiac; 06-08-2009 at 03:57 PM.
06-08-2009, 04:19 PM
#14
I seem to remember seeing that once .
If you can post it here that would really be a help but you have not answered my question .
Are you saying the p1 and sec. never go past 80-85% ?
What I'm really getting at is how does the pcm know to use more of the capacity of the larger injectors to prevent the other injectors from reaching their limit ?
 06-08-2009, 04:40 PM
#16
Here is part of a log I did on my Powermod a while back . I was told that the injectors monitored were the Secondaries . Before I put the blues in i had seen 100% DC on the secondaries ......
6214 RPM 8.9 PSI 10.7:1 A/F 88% TPS 94.8% DC OUT 9.08ms
6248 RPM 8.9 PSI 10.7:1 A/F 89% TPS 94.1% DC OUT 9.03ms
6265 RPM 8.9 PSI 10.7:1 A/F 89% TPS 93.7% DC OUT 9.00ms
6253 RPM 8.9 PSI 10.8:1 A/F 88% TPS 93.4% DC OUT 9.01ms
6276 RPM 8.9 PSI 10.8:1 A/F 90% TPS 95.4% DC OUT 8.97ms
6214 RPM 8.9 PSI 10.7:1 A/F 88% TPS 94.8% DC OUT 9.08ms
6248 RPM 8.9 PSI 10.7:1 A/F 89% TPS 94.1% DC OUT 9.03ms
6265 RPM 8.9 PSI 10.7:1 A/F 89% TPS 93.7% DC OUT 9.00ms
6253 RPM 8.9 PSI 10.8:1 A/F 88% TPS 93.4% DC OUT 9.01ms
6276 RPM 8.9 PSI 10.8:1 A/F 90% TPS 95.4% DC OUT 8.97ms
06-08-2009, 10:19 PM
#19
I'm still a little confused . Below is a full log from my Powermod . I'm pretty sure it was monitoring the secondaries - as you can see they kick in at 3372rpm and are at 20%DC as they come on stream.
The DC max shown here is around 96% - how can that be if they should only go to 85% ?
3213 RPM 0.2 "Hg 13.1:1 A/F 33% TPS 5.00V MAP IN 5.00V AFM IN 0.0% DC OUT 0.00ms 0% FUEL 0 IGN 0.0%
3233 RPM 0.1 PSI 13.1:1 A/F 34% TPS 5.00V MAP IN 5.00V AFM IN 0.0% DC OUT 0.00ms 0% FUEL 0 IGN 0.0%
3235 RPM 0.4 PSI 13.1:1 A/F 40% TPS 5.00V MAP IN 5.00V AFM IN 0.0% DC OUT 0.00ms 0% FUEL 0 IGN 0.0%
3244 RPM 0.9 PSI 13.1:1 A/F 49% TPS 5.00V MAP IN 5.00V AFM IN 0.0% DC OUT 0.00ms 0% FUEL 0 IGN 0.0%
3275 RPM 1.1 PSI 12.3:1 A/F 58% TPS 5.00V MAP IN 5.00V AFM IN 0.0% DC OUT 0.00ms 0% FUEL 0 IGN 0.0%
3295 RPM 1.5 PSI 12.3:1 A/F 66% TPS 5.00V MAP IN 5.00V AFM IN 0.0% DC OUT 0.00ms 0% FUEL 0 IGN 62.1%
3316 RPM 1.8 PSI 12.3:1 A/F 72% TPS 5.00V MAP IN 5.00V AFM IN 0.0% DC OUT 0.00ms 0% FUEL 0 IGN 62.1%
3333 RPM 1.9 PSI 12.3:1 A/F 84% TPS 5.00V MAP IN 5.00V AFM IN 0.0% DC OUT 0.00ms 0% FUEL 0 IGN 62.1%
3347 RPM 2.3 PSI 11.5:1 A/F 92% TPS 5.00V MAP IN 5.00V AFM IN 0.0% DC OUT 0.00ms 0% FUEL 0 IGN 62.1%
3357 RPM 2.5 PSI 11.5:1 A/F 95% TPS 5.00V MAP IN 5.00V AFM IN 0.0% DC OUT 0.00ms 0% FUEL 0 IGN 62.1%
3372 RPM 2.8 PSI 11.5:1 A/F 95% TPS 5.00V MAP IN 5.00V AFM IN 20.4% DC OUT 3.60ms 0% FUEL 0 IGN 62.1%
3413 RPM 3.2 PSI 11.5:1 A/F 93% TPS 5.00V MAP IN 5.00V AFM IN 21.0% DC OUT 3.68ms 0% FUEL 0 IGN 62.1%
3389 RPM 3.4 PSI 11.0:1 A/F 96% TPS 5.00V MAP IN 5.00V AFM IN 21.8% DC OUT 3.86ms 0% FUEL 0 IGN 62.1%
3445 RPM 3.7 PSI 11.0:1 A/F 97% TPS 5.00V MAP IN 5.00V AFM IN 22.7% DC OUT 3.95ms 0% FUEL 0 IGN 62.1%
3489 RPM 4.1 PSI 11.0:1 A/F 93% TPS 5.00V MAP IN 5.00V AFM IN 23.4% DC OUT 4.02ms 0% FUEL 0 IGN 62.1%
3478 RPM 4.3 PSI 11.0:1 A/F 93% TPS 5.00V MAP IN 5.00V AFM IN 23.5% DC OUT 4.06ms 0% FUEL 0 IGN 62.1%
3470 RPM 4.6 PSI 10.6:1 A/F 96% TPS 5.00V MAP IN 5.00V AFM IN 24.1% DC OUT 4.14ms 0% FUEL 0 IGN 62.1%
3547 RPM 4.8 PSI 10.6:1 A/F 94% TPS 5.00V MAP IN 5.00V AFM IN 25.1% DC OUT 4.24ms 0% FUEL 0 IGN 62.1%
3562 RPM 5.1 PSI 10.6:1 A/F 94% TPS 5.00V MAP IN 5.00V AFM IN 25.9% DC OUT 4.35ms 0% FUEL 0 IGN 62.1%
3558 RPM 5.5 PSI 10.6:1 A/F 94% TPS 5.00V MAP IN 5.00V AFM IN 26.4% DC OUT 4.44ms 0% FUEL 0 IGN 62.1%
3565 RPM 5.7 PSI 10.4:1 A/F 93% TPS 5.00V MAP IN 5.00V AFM IN 27.5% DC OUT 4.57ms 0% FUEL 0 IGN 62.1%
3595 RPM 6.0 PSI 10.4:1 A/F 96% TPS 5.00V MAP IN 5.00V AFM IN 28.1% DC OUT 4.64ms 0% FUEL 0 IGN 62.1%
3656 RPM 6.2 PSI 10.4:1 A/F 92% TPS 5.00V MAP IN 5.00V AFM IN 29.6% DC OUT 4.84ms 0% FUEL 0 IGN 62.1%
3672 RPM 6.6 PSI 10.4:1 A/F 95% TPS 5.00V MAP IN 5.00V AFM IN 28.1% DC OUT 4.57ms 0% FUEL 0 IGN 62.1%
3684 RPM 6.9 PSI 10.7:1 A/F 94% TPS 5.00V MAP IN 5.00V AFM IN 28.9% DC OUT 4.68ms 0% FUEL 0 IGN 62.1%
3702 RPM 7.1 PSI 10.7:1 A/F 94% TPS 5.00V MAP IN 5.00V AFM IN 29.5% DC OUT 4.74ms 0% FUEL 0 IGN 62.1%
3742 RPM 7.5 PSI 10.7:1 A/F 97% TPS 5.00V MAP IN 5.00V AFM IN 30.5% DC OUT 4.88ms 0% FUEL 0 IGN 62.1%
3761 RPM 7.7 PSI 10.7:1 A/F 91% TPS 5.00V MAP IN 5.00V AFM IN 31.7% DC OUT 5.02ms 0% FUEL 0 IGN 62.1%
3789 RPM 7.9 PSI 10.9:1 A/F 94% TPS 5.00V MAP IN 5.00V AFM IN 32.8% DC OUT 5.15ms 0% FUEL 0 IGN 62.1%
3833 RPM 8.2 PSI 10.9:1 A/F 96% TPS 5.00V MAP IN 5.00V AFM IN 33.4% DC OUT 5.23ms 0% FUEL 0 IGN 62.1%
3850 RPM 8.4 PSI 10.9:1 A/F 94% TPS 5.00V MAP IN 5.00V AFM IN 34.5% DC OUT 5.34ms 0% FUEL 0 IGN 62.1%
3865 RPM 8.6 PSI 10.9:1 A/F 94% TPS 5.00V MAP IN 5.00V AFM IN 34.8% DC OUT 5.38ms 0% FUEL 0 IGN 62.1%
3909 RPM 8.7 PSI 11.2:1 A/F 93% TPS 5.00V MAP IN 5.00V AFM IN 35.7% DC OUT 5.46ms 0% FUEL 0 IGN 62.1%
3940 RPM 8.9 PSI 11.2:1 A/F 92% TPS 5.00V MAP IN 5.00V AFM IN 36.2% DC OUT 5.47ms 0% FUEL 0 IGN 62.1%
3963 RPM 8.9 PSI 11.2:1 A/F 93% TPS 5.00V MAP IN 5.00V AFM IN 36.8% DC OUT 5.56ms 0% FUEL 0 IGN 62.1%
3989 RPM 9.1 PSI 11.2:1 A/F 92% TPS 5.00V MAP IN 5.00V AFM IN 38.9% DC OUT 5.86ms 0% FUEL 0 IGN 62.1%
4019 RPM 9.1 PSI 11.0:1 A/F 91% TPS 5.00V MAP IN 5.00V AFM IN 39.0% DC OUT 5.74ms 0% FUEL 0 IGN 62.1%
4046 RPM 9.1 PSI 11.0:1 A/F 93% TPS 5.00V MAP IN 5.00V AFM IN 40.0% DC OUT 5.90ms 0% FUEL 0 IGN 62.1%
4079 RPM 9.2 PSI 11.0:1 A/F 94% TPS 5.00V MAP IN 5.00V AFM IN 40.6% DC OUT 5.97ms 0% FUEL 0 IGN 62.1%
4103 RPM 9.1 PSI 11.0:1 A/F 95% TPS 5.00V MAP IN 5.00V AFM IN 41.4% DC OUT 6.02ms 0% FUEL 0 IGN 62.1%
4118 RPM 9.1 PSI 11.1:1 A/F 93% TPS 5.00V MAP IN 5.00V AFM IN 42.2% DC OUT 6.11ms 0% FUEL 0 IGN 62.1%
4153 RPM 9.1 PSI 11.1:1 A/F 92% TPS 5.00V MAP IN 5.00V AFM IN 43.0% DC OUT 6.17ms 0% FUEL 0 IGN 62.1%
4181 RPM 9.1 PSI 11.1:1 A/F 93% TPS 5.00V MAP IN 5.00V AFM IN 44.5% DC OUT 6.30ms 0% FUEL 0 IGN 62.1%
4241 RPM 9.1 PSI 11.1:1 A/F 94% TPS 5.00V MAP IN 5.00V AFM IN 45.7% DC OUT 6.47ms 0% FUEL 0 IGN 62.1%
4245 RPM 9.0 PSI 11.0:1 A/F 93% TPS 5.00V MAP IN 5.00V AFM IN 46.0% DC OUT 6.48ms 0% FUEL 0 IGN 62.1%
4286 RPM 9.0 PSI 11.0:1 A/F 94% TPS 5.00V MAP IN 5.00V AFM IN 47.1% DC OUT 6.59ms 0% FUEL 0 IGN 62.1%
4305 RPM 9.0 PSI 11.0:1 A/F 93% TPS 5.00V MAP IN 5.00V AFM IN 48.3% DC OUT 6.68ms 0% FUEL 0 IGN 62.1%
4338 RPM 9.0 PSI 11.0:1 A/F 93% TPS 5.00V MAP IN 5.00V AFM IN 48.6% DC OUT 6.73ms 0% FUEL 0 IGN 62.1%
4370 RPM 9.0 PSI 11.1:1 A/F 92% TPS 5.00V MAP IN 5.00V AFM IN 51.0% DC OUT 6.95ms 0% FUEL 0 IGN 62.1%
4409 RPM 9.1 PSI 11.1:1 A/F 93% TPS 5.00V MAP IN 5.00V AFM IN 52.3% DC OUT 7.09ms 0% FUEL 0 IGN 62.1%
4415 RPM 9.0 PSI 11.1:1 A/F 94% TPS 5.00V MAP IN 5.00V AFM IN 53.0% DC OUT 7.16ms 0% FUEL 0 IGN 62.1%
4458 RPM 9.1 PSI 11.1:1 A/F 93% TPS 5.00V MAP IN 5.00V AFM IN 54.0% DC OUT 7.27ms 0% FUEL 0 IGN 62.1%
4491 RPM 9.0 PSI 10.9:1 A/F 92% TPS 5.00V MAP IN 5.00V AFM IN 55.8% DC OUT 7.42ms 0% FUEL 0 IGN 62.1%
4518 RPM 9.0 PSI 10.9:1 A/F 92% TPS 5.00V MAP IN 5.00V AFM IN 56.9% DC OUT 7.54ms 0% FUEL 0 IGN 62.3%
4523 RPM 9.1 PSI 10.9:1 A/F 93% TPS 5.00V MAP IN 5.00V AFM IN 58.0% DC OUT 7.63ms 0% FUEL 0 IGN 62.3%
4611 RPM 9.0 PSI 10.9:1 A/F 93% TPS 5.00V MAP IN 5.00V AFM IN 60.0% DC OUT 7.77ms 0% FUEL 0 IGN 63.8%
4629 RPM 9.0 PSI 11.0:1 A/F 91% TPS 5.00V MAP IN 5.00V AFM IN 61.2% DC OUT 7.91ms 0% FUEL 0 IGN 63.8%
4618 RPM 9.0 PSI 11.0:1 A/F 93% TPS 5.00V MAP IN 5.00V AFM IN 61.0% DC OUT 7.89ms 0% FUEL 0 IGN 64.2%
4629 RPM 9.0 PSI 11.0:1 A/F 92% TPS 5.00V MAP IN 5.00V AFM IN 62.8% DC OUT 8.08ms 0% FUEL 0 IGN 64.8%
4732 RPM 9.0 PSI 11.0:1 A/F 91% TPS 5.00V MAP IN 5.00V AFM IN 65.9% DC OUT 8.31ms 0% FUEL 0 IGN 64.8%
4721 RPM 9.0 PSI 10.9:1 A/F 92% TPS 5.00V MAP IN 5.00V AFM IN 66.0% DC OUT 8.36ms 0% FUEL 0 IGN 66.0%
4726 RPM 9.0 PSI 10.9:1 A/F 92% TPS 5.00V MAP IN 5.00V AFM IN 66.6% DC OUT 8.42ms 0% FUEL 0 IGN 66.2%
4794 RPM 9.0 PSI 10.9:1 A/F 91% TPS 5.00V MAP IN 5.00V AFM IN 68.8% DC OUT 8.60ms 0% FUEL 0 IGN 66.2%
4821 RPM 9.1 PSI 10.9:1 A/F 93% TPS 5.00V MAP IN 5.00V AFM IN 70.0% DC OUT 8.68ms 0% FUEL 0 IGN 67.1%
4838 RPM 9.0 PSI 11.1:1 A/F 93% TPS 5.00V MAP IN 5.00V AFM IN 73.0% DC OUT 8.95ms 0% FUEL 0 IGN 67.1%
4985 RPM 9.0 PSI 11.1:1 A/F 91% TPS 5.00V MAP IN 5.00V AFM IN 77.2% DC OUT 9.27ms 0% FUEL 0 IGN 68.5%
4929 RPM 9.1 PSI 11.1:1 A/F 91% TPS 5.00V MAP IN 5.00V AFM IN 74.0% DC OUT 9.00ms 0% FUEL 0 IGN 68.9%
4911 RPM 9.1 PSI 11.1:1 A/F 91% TPS 5.00V MAP IN 5.00V AFM IN 76.1% DC OUT 9.27ms 0% FUEL 0 IGN 68.9%
4943 RPM 9.2 PSI 10.9:1 A/F 91% TPS 5.00V MAP IN 5.00V AFM IN 77.9% DC OUT 9.39ms 0% FUEL 0 IGN 69.1%
5004 RPM 9.1 PSI 10.9:1 A/F 90% TPS 5.00V MAP IN 5.00V AFM IN 80.8% DC OUT 9.54ms 0% FUEL 0 IGN 70.1%
5017 RPM 9.1 PSI 10.9:1 A/F 91% TPS 5.00V MAP IN 5.00V AFM IN 80.1% DC OUT 9.55ms 0% FUEL 0 IGN 70.1%
5043 RPM 9.2 PSI 10.9:1 A/F 92% TPS 5.00V MAP IN 5.00V AFM IN 79.9% DC OUT 9.55ms 0% FUEL 0 IGN 70.2%
5090 RPM 9.2 PSI 11.0:1 A/F 91% TPS 5.00V MAP IN 5.00V AFM IN 80.6% DC OUT 9.51ms 0% FUEL 0 IGN 70.2%
5120 RPM 9.2 PSI 11.0:1 A/F 90% TPS 5.00V MAP IN 5.00V AFM IN 80.9% DC OUT 9.52ms 0% FUEL 0 IGN 70.5%
5136 RPM 9.2 PSI 11.0:1 A/F 100% TPS 5.00V MAP IN 5.00V AFM IN 82.6% DC OUT 9.62ms 0% FUEL 0 IGN 70.7%
5161 RPM 9.3 PSI 11.0:1 A/F 90% TPS 5.00V MAP IN 5.00V AFM IN 83.5% DC OUT 9.63ms 0% FUEL 0 IGN 70.7%
5205 RPM 9.2 PSI 10.7:1 A/F 91% TPS 5.00V MAP IN 5.00V AFM IN 82.8% DC OUT 9.49ms 0% FUEL 0 IGN 70.8%
5229 RPM 9.2 PSI 10.7:1 A/F 89% TPS 5.00V MAP IN 5.00V AFM IN 82.8% DC OUT 9.48ms 0% FUEL 0 IGN 71.1%
5273 RPM 9.1 PSI 10.7:1 A/F 91% TPS 5.00V MAP IN 5.00V AFM IN 82.6% DC OUT 9.48ms 0% FUEL 0 IGN 71.1%
5310 RPM 9.2 PSI 10.7:1 A/F 92% TPS 5.00V MAP IN 5.00V AFM IN 84.3% DC OUT 9.56ms 0% FUEL 0 IGN 71.3%
5317 RPM 9.2 PSI 10.9:1 A/F 89% TPS 5.00V MAP IN 5.00V AFM IN 84.2% DC OUT 9.58ms 0% FUEL 0 IGN 71.3%
5389 RPM 9.2 PSI 10.9:1 A/F 89% TPS 5.00V MAP IN 5.00V AFM IN 84.2% DC OUT 9.45ms 0% FUEL 0 IGN 71.4%
5405 RPM 9.1 PSI 10.9:1 A/F 100% TPS 5.00V MAP IN 5.00V AFM IN 84.8% DC OUT 9.37ms 0% FUEL 0 IGN 71.7%
5398 RPM 9.2 PSI 10.9:1 A/F 89% TPS 5.00V MAP IN 5.00V AFM IN 85.1% DC OUT 9.57ms 0% FUEL 0 IGN 71.7%
5451 RPM 9.2 PSI 10.9:1 A/F 90% TPS 5.00V MAP IN 5.00V AFM IN 86.5% DC OUT 9.41ms 0% FUEL 0 IGN 71.9%
5520 RPM 9.1 PSI 10.9:1 A/F 91% TPS 5.00V MAP IN 5.00V AFM IN 85.9% DC OUT 9.38ms 0% FUEL 0 IGN 72.3%
5506 RPM 9.2 PSI 10.9:1 A/F 90% TPS 5.00V MAP IN 5.00V AFM IN 86.2% DC OUT 9.41ms 0% FUEL 0 IGN 72.2%
5535 RPM 9.2 PSI 10.9:1 A/F 91% TPS 5.00V MAP IN 5.00V AFM IN 87.3% DC OUT 9.45ms 0% FUEL 0 IGN 72.3%
5581 RPM 9.2 PSI 11.1:1 A/F 89% TPS 5.00V MAP IN 5.00V AFM IN 88.0% DC OUT 9.41ms 0% FUEL 0 IGN 72.3%
5632 RPM 9.1 PSI 11.1:1 A/F 90% TPS 5.00V MAP IN 5.00V AFM IN 87.3% DC OUT 9.38ms 0% FUEL 0 IGN 72.9%
5650 RPM 9.1 PSI 11.1:1 A/F 90% TPS 5.00V MAP IN 5.00V AFM IN 89.2% DC OUT 9.41ms 0% FUEL 0 IGN 0.0%
5650 RPM 9.1 PSI 11.1:1 A/F 91% TPS 5.00V MAP IN 5.00V AFM IN 90.1% DC OUT 9.43ms 0% FUEL 0 IGN 0.0%
5709 RPM 8.9 PSI 11.0:1 A/F 91% TPS 5.00V MAP IN 5.00V AFM IN 88.8% DC OUT 9.31ms 0% FUEL 0 IGN 73.7%
5744 RPM 8.6 PSI 11.0:1 A/F 89% TPS 5.00V MAP IN 5.00V AFM IN 90.4% DC OUT 9.14ms 0% FUEL 0 IGN 73.7%
5733 RPM 8.5 PSI 11.0:1 A/F 90% TPS 5.00V MAP IN 5.00V AFM IN 87.7% DC OUT 9.04ms 0% FUEL 0 IGN 74.0%
5785 RPM 8.2 PSI 11.0:1 A/F 91% TPS 5.00V MAP IN 5.00V AFM IN 86.6% DC OUT 8.96ms 0% FUEL 0 IGN 74.6%
5828 RPM 8.0 PSI 10.9:1 A/F 90% TPS 5.00V MAP IN 5.00V AFM IN 84.4% DC OUT 8.92ms 0% FUEL 0 IGN 74.6%
5834 RPM 8.0 PSI 10.9:1 A/F 91% TPS 5.00V MAP IN 5.00V AFM IN 86.5% DC OUT 8.99ms 0% FUEL 0 IGN 74.7%
5850 RPM 8.0 PSI 10.9:1 A/F 90% TPS 5.00V MAP IN 5.00V AFM IN 87.1% DC OUT 8.97ms 0% FUEL 0 IGN 75.0%
5883 RPM 8.1 PSI 10.9:1 A/F 89% TPS 5.00V MAP IN 5.00V AFM IN 87.9% DC OUT 9.02ms 0% FUEL 0 IGN 75.0%
5902 RPM 8.2 PSI 10.9:1 A/F 91% TPS 5.00V MAP IN 5.00V AFM IN 89.3% DC OUT 9.07ms 0% FUEL 0 IGN 75.3%
5934 RPM 8.3 PSI 10.9:1 A/F 89% TPS 5.00V MAP IN 5.00V AFM IN 90.6% DC OUT 9.11ms 0% FUEL 0 IGN 75.3%
5965 RPM 8.4 PSI 10.9:1 A/F 89% TPS 5.00V MAP IN 5.00V AFM IN 91.9% DC OUT 9.16ms 0% FUEL 0 IGN 75.6%
6053 RPM 8.5 PSI 10.9:1 A/F 89% TPS 5.00V MAP IN 5.00V AFM IN 94.1% DC OUT 9.14ms 0% FUEL 0 IGN 76.4%
6061 RPM 8.5 PSI 10.7:1 A/F 90% TPS 5.00V MAP IN 5.00V AFM IN 94.0% DC OUT 9.19ms 0% FUEL 0 IGN 76.4%
6029 RPM 8.7 PSI 10.7:1 A/F 90% TPS 5.00V MAP IN 5.00V AFM IN 94.9% DC OUT 9.26ms 0% FUEL 0 IGN 76.2%
6108 RPM 8.8 PSI 10.7:1 A/F 89% TPS 5.00V MAP IN 5.00V AFM IN 96.8% DC OUT 9.47ms 0% FUEL 0 IGN 76.5%
6136 RPM 8.8 PSI 10.7:1 A/F 90% TPS 5.00V MAP IN 5.00V AFM IN 93.1% DC OUT 9.12ms 0% FUEL 0 IGN 76.5%
6150 RPM 8.9 PSI 10.7:1 A/F 90% TPS 5.00V MAP IN 5.00V AFM IN 94.1% DC OUT 9.18ms 0% FUEL 0 IGN 76.7%
6214 RPM 8.9 PSI 10.7:1 A/F 88% TPS 5.00V MAP IN 5.00V AFM IN 94.8% DC OUT 9.08ms 0% FUEL 0 IGN 76.7%
6248 RPM 8.9 PSI 10.7:1 A/F 89% TPS 5.00V MAP IN 5.00V AFM IN 94.1% DC OUT 9.03ms 0% FUEL 0 IGN 77.0%
6265 RPM 8.9 PSI 10.7:1 A/F 89% TPS 5.00V MAP IN 5.00V AFM IN 93.7% DC OUT 9.00ms 0% FUEL 0 IGN 77.1%
6253 RPM 8.9 PSI 10.8:1 A/F 88% TPS 5.00V MAP IN 5.00V AFM IN 93.4% DC OUT 9.01ms 0% FUEL 0 IGN 77.1%
6276 RPM 8.9 PSI 10.8:1 A/F 90% TPS 5.00V MAP IN 5.00V AFM IN 95.4% DC OUT 8.97ms 0% FUEL 0 IGN 77.2%
6304 RPM 8.9 PSI 10.8:1 A/F 88% TPS 5.00V MAP IN 5.00V AFM IN 96.0% DC OUT 8.90ms 0% FUEL 0 IGN 77.4%
6382 RPM 8.9 PSI 10.8:1 A/F 89% TPS 5.00V MAP IN 5.00V AFM IN 94.5% DC OUT 8.81ms 0% FUEL 0 IGN 77.4%
6410 RPM 8.9 PSI 10.8:1 A/F 90% TPS 5.00V MAP IN 5.00V AFM IN 95.1% DC OUT 8.78ms 0% FUEL 0 IGN 77.7%
6413 RPM 8.9 PSI 10.8:1 A/F 89% TPS 5.00V MAP IN 5.00V AFM IN 93.7% DC OUT 8.77ms 0% FUEL 0 IGN 77.7%
6422 RPM 8.9 PSI 10.8:1 A/F 89% TPS 5.00V MAP IN 5.00V AFM IN 93.8% DC OUT 8.74ms 0% FUEL 0 IGN 77.7%
6495 RPM 9.0 PSI 10.8:1 A/F 88% TPS 5.00V MAP IN 5.00V AFM IN 92.1% DC OUT 8.63ms 0% FUEL 0 IGN 78.2%
6516 RPM 9.0 PSI 10.8:1 A/F 88% TPS 5.00V MAP IN 5.00V AFM IN 92.9% DC OUT 8.62ms 0% FUEL 0 IGN 78.2%
6530 RPM 9.0 PSI 10.8:1 A/F 90% TPS 5.00V MAP IN 5.00V AFM IN 93.9% DC OUT 8.60ms 0% FUEL 0 IGN 78.2%
6538 RPM 9.0 PSI 10.8:1 A/F 88% TPS 5.00V MAP IN 5.00V AFM IN 93.7% DC OUT 8.59ms 0% FUEL 0 IGN 78.2%
6579 RPM 9.1 PSI 10.8:1 A/F 89% TPS 5.00V MAP IN 5.00V AFM IN 94.4% DC OUT 8.52ms 0% FUEL 0 IGN 78.3%
6647 RPM 9.1 PSI 10.8:1 A/F 89% TPS 5.00V MAP IN 5.00V AFM IN 93.4% DC OUT 8.42ms 0% FUEL 0 IGN 78.7%
6638 RPM 9.1 PSI 10.8:1 A/F 88% TPS 5.00V MAP IN 5.00V AFM IN 93.2% DC OUT 8.45ms 0% FUEL 0 IGN 78.7%
6654 RPM 9.1 PSI 10.8:1 A/F 89% TPS 5.00V MAP IN 5.00V AFM IN 93.3% DC OUT 8.43ms 0% FUEL 0 IGN 78.6%
6683 RPM 9.2 PSI 10.8:1 A/F 88% TPS 5.00V MAP IN 5.00V AFM IN 93.1% DC OUT 8.37ms 0% FUEL 0 IGN 78.9%
6706 RPM 9.1 PSI 10.7:1 A/F 88% TPS 5.00V MAP IN 5.00V AFM IN 93.2% DC OUT 8.36ms 0% FUEL 0 IGN 78.9%
6721 RPM 9.1 PSI 10.7:1 A/F 90% TPS 5.00V MAP IN 5.00V AFM IN 95.5% DC OUT 8.34ms 0% FUEL 0 IGN 79.0%
6808 RPM 9.2 PSI 10.7:1 A/F 89% TPS 5.00V MAP IN 5.00V AFM IN 92.0% DC OUT 8.21ms 0% FUEL 0 IGN 79.0%
6816 RPM 9.1 PSI 10.7:1 A/F 89% TPS 5.00V MAP IN 5.00V AFM IN 90.7% DC OUT 8.23ms 0% FUEL 0 IGN 79.4%
6791 RPM 9.1 PSI 10.9:1 A/F 90% TPS 5.00V MAP IN 5.00V AFM IN 94.0% DC OUT 8.23ms 0% FUEL 0 IGN 79.2%
6834 RPM 9.1 PSI 10.9:1 A/F 88% TPS 5.00V MAP IN 5.00V AFM IN 89.9% DC OUT 8.18ms 0% FUEL 0 IGN 79.2%
6874 RPM 9.1 PSI 10.9:1 A/F 90% TPS 5.00V MAP IN 5.00V AFM IN 95.7% DC OUT 8.12ms 0% FUEL 0 IGN 79.6%
6902 RPM 9.1 PSI 10.9:1 A/F 89% TPS 5.00V MAP IN 5.00V AFM IN 92.1% DC OUT 8.11ms 0% FUEL 0 IGN 79.7%
6927 RPM 9.1 PSI 10.7:1 A/F 88% TPS 5.00V MAP IN 5.00V AFM IN 92.9% DC OUT 8.06ms 0% FUEL 0 IGN 79.7%
6937 RPM 9.1 PSI 10.7:1 A/F 90% TPS 5.00V MAP IN 5.00V AFM IN 92.7% DC OUT 8.06ms 0% FUEL 0 IGN 79.8%
6954 RPM 9.0 PSI 10.7:1 A/F 88% TPS 5.00V MAP IN 5.00V AFM IN 91.4% DC OUT 8.04ms 0% FUEL 0 IGN 79.8%
7026 RPM 8.9 PSI 10.7:1 A/F 90% TPS 5.00V MAP IN 5.00V AFM IN 94.8% DC OUT 7.93ms 0% FUEL 0 IGN 80.0%
Last edited by Brettus; 06-08-2009 at 10:38 PM.
06-08-2009, 10:29 PM
#21
/\ you miss the point of why I started this thread which was to understand if fitting larger injectors and scaling them was actually achieving what you set out to do .
That being to reduce the duty cycle to a safe level on ALL the injectors .
MM says they are limited to 85% - my logs don't support that information . I'm not sure what to make of that .
That being to reduce the duty cycle to a safe level on ALL the injectors .
MM says they are limited to 85% - my logs don't support that information . I'm not sure what to make of that .
Last edited by Brettus; 06-08-2009 at 10:33 PM.
06-08-2009, 11:14 PM
#22
3-wheeler
Join Date: Dec 2005
Location: Phoenix
Posts: 2,734
Likes: 0
Received 0 Likes
on
0 Posts
I'm going out on a limb here but if the overall duty cycle is a calculated value and not something which is directly transmitted from the injector itself, having incorrectly scaled injectors will yield incorrect duty cycle values.
Now, based on your logs one would conclude that the injectors would have been limited having reported a duty cycle above 85%.
So, either the log information is incorrect or for whatever reason the PCM is seeing a different duty cycle value.
Now, based on your logs one would conclude that the injectors would have been limited having reported a duty cycle above 85%.
So, either the log information is incorrect or for whatever reason the PCM is seeing a different duty cycle value.
06-08-2009, 11:33 PM
#23
I'm going out on a limb here but if the overall duty cycle is a calculated value and not something which is directly transmitted from the injector itself, having incorrectly scaled injectors will yield incorrect duty cycle values.
Now, based on your logs one would conclude that the injectors would have been limited having reported a duty cycle above 85%.
So, either the log information is incorrect or for whatever reason the PCM is seeing a different duty cycle value.
Now, based on your logs one would conclude that the injectors would have been limited having reported a duty cycle above 85%.
So, either the log information is incorrect or for whatever reason the PCM is seeing a different duty cycle value.
And the injectors monitored were the secondaries which were stock .
06-09-2009, 12:11 AM
#24
1) I got my duty cycle info from actually logging the PWM at the individual injectors. Its not a reported value.
2) The "relationship" between the injectors is fixed and tied to the commanded values in the fuel tables. The PCM believes there is a 1:1 value. When you enter a scaling value, you are not altering the 1:1 ratio. You are just changing the value of "1"!
2) The "relationship" between the injectors is fixed and tied to the commanded values in the fuel tables. The PCM believes there is a 1:1 value. When you enter a scaling value, you are not altering the 1:1 ratio. You are just changing the value of "1"!

Thread
Thread Starter
Forum
Replies
Last Post