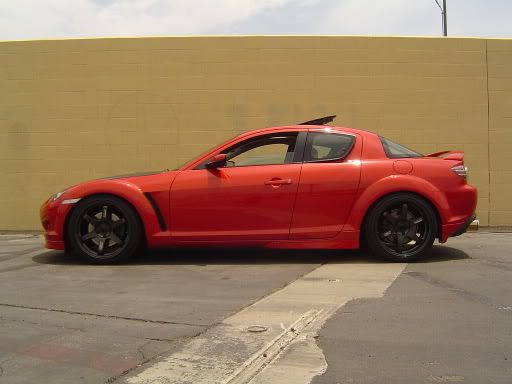
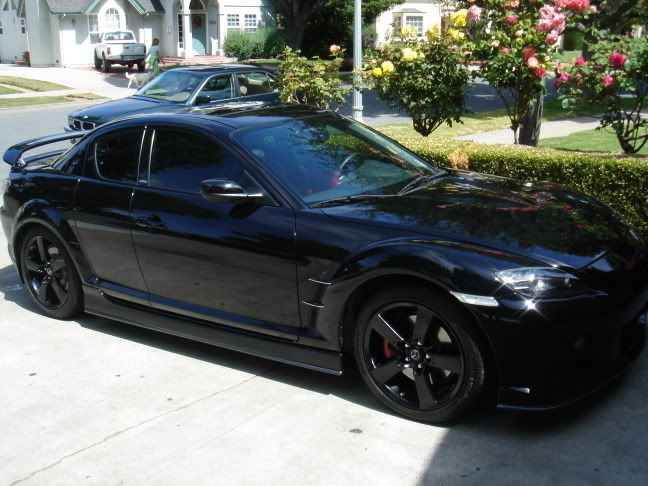
"Paint Rims Black" thread
#1
"Paint Rims Black" thread
What happened to that one guy (don't remember forum name of person) who was gonna paint there 'rims' black? I was considering painting the OEMs and was hoping that guy would come through so I could see how they turned out.
Anyone know what/who i'm talking about?
Anyone know what/who i'm talking about?
Last edited by Cody Red; 10-12-2007 at 02:28 PM.
#2
Originally Posted by CohdeyTakahashi
Anyone know what/who i'm talking about?
I know nothing.
Originally Posted by CohdeyTakahashi
Yes, I searched, and if you search now, you'll only find this thread...

https://www.rx8club.com/showthread.p...ted+OEM+wheels
https://www.rx8club.com/showthread.p...ted+OEM+wheels
#4
#9
heres mine for ya...

Shitty pic on a camera phone, and since then the hubs and clipers have been painted silver (looks much cleaner ) Oh and I painted the insides of the rim black, didnt like the two tone look as much as I had thought I would.
enjoy... btw I did the job myself using Duplicolor metal primer, black detailing paint, and rim clear coat. Total it was a 2 day job by myself, sanding, washing, preping, and painting. The end result is great though, and for about $40 in materal cost, the look is hard to beat for the money.
GL!!

Shitty pic on a camera phone, and since then the hubs and clipers have been painted silver (looks much cleaner
 ) Oh and I painted the insides of the rim black, didnt like the two tone look as much as I had thought I would.
enjoy... btw I did the job myself using Duplicolor metal primer, black detailing paint, and rim clear coat. Total it was a 2 day job by myself, sanding, washing, preping, and painting. The end result is great though, and for about $40 in materal cost, the look is hard to beat for the money.
GL!!
#12
^very nice. I'd get black wheels but, i'm on a budget... Plus i love the OEM wheels, so hopefully they turn out good with paint. Not really feeling the PC version, and i'll prolly end up getting lowering springs so it'll look better.
#15
Just a little bit of wisdom: If you are going to DIY paint them like I did I have a few tips that I learned while doing mine.
1. Some people say you dont need to prime the rims... DO IT. Sand with high grit lightly, then wash VERY well, then prime. This will ensure the black goes on nice and flat.
2. Make sure you wait for each layer to COMPLETELY dry. At least 10 minutes between layers, enough time to where the paint isnt tacky to the touch.
3. Wipe down the rims after EVERY COAT with a shammy cloth. If you dont, you'll notice by the time you start clear coating the paint will have a dusty resudue, and when you spray over that it looks bad (not smooth and shiney). This is especially important when applying the clear coat, as it has more of a tendancy to get chalky with overspray.
4. I know it will be hard to resist putting them on the car, but LET THEM CURE FOR A DAY at least. If not the paint will still be soft enough to get flaked off. Youll notice this especially when putting the lug nuts on, it will strip the paint right off if its not cured.
5. Use LOTS of clear coat for the center (lug nut area) and lip of the rim. This will help with the flaking of paint near the lugs (after repeated removals of the rims) and the clear coat on the lip will help defend any minor curb-type scratches from getting all the way down to silver rim.
I hope if you decide to DIY these tips will keep you from making some of the minor errors I did, and that way you only do each rim 1 time ( I had to start over on one of them)
GL man, and be sure to post pics if/when you get it done!
#17
As you (all) may know.. I just did the center and spokes and left the outer rim silver.
I've had several ask me questions on how to do this.. so I'll just offer my 2 cents on the issue.
The wheels are primed beneath the silver paint. I sanded off the outer layer of paint using a fine sandpaper until I got down to the original primer. I painted right over that and had good results but you can prime if you want to.
Before you paint - wash the wheel very good using a good detergent to clean off all residues or remaining sandpaper dust.
Of course take the wheel off the car.. lay it flat when you paint it to reduce likelihood of runs.
Mask off areas you do not want to paint... obviously.
I used glossy "high performance enamel" paint. It turned out great (in my opinion).
Don't spray it on too thick. Do multiple thin layers so they dry faster and cover better.
Like SoFL_RX8 said, make sure each layer dries completely! You can clear coat if you want - I didn't and I think it looks fine. The choice is yours. I didn't want to risk having it run, drip or flake off later so I skipped that part.
That's really about it.
#18
IstanbulNotConstantinople
Joined: Jul 2004
Posts: 513
Likes: 0
From: Fontana (but in the good part, by Rancho), CA
I almost painted mine, but I was too worried about messing it up.
The calipers were painted, but keeping them clean was a nightmare.
I had my rims powdercoated, and they're easy to clean and shine, so I had the calipers powdercoated too.

The calipers were painted, but keeping them clean was a nightmare.
I had my rims powdercoated, and they're easy to clean and shine, so I had the calipers powdercoated too.

#20
Cool. Great info. I'm gonna print this out in fact. Thanks too all you of, 'specially SoFL_RX8 and tiggerlee for provided pics and suggestions.
I'll def. post pics too.
I'll def. post pics too.


