Question for those running non-oem sway bars
 04-25-2010, 01:47 PM
#1
Question for those running non-oem sway bars
Coming from a racing background I'm used to tightening up the sway bar yet it should be free when push/pulling on the side of the car to see it's travel. In other words, it should rotate without much friction/binding so that it stays free in the car.
After tightening down my Progress bars to spec I have to say it takes quite a bit of a pull to rotate it around the bushings. It does move obviously and perhaps I'm used to the lightweight setup of a race car contrast to this car weighing twice as much and maybe it means nothing with how much weight will be on it moving it up and down with the suspension.
Just wanted to see if anyone there messed with their sway bars during installation until they felt quite free to rotate in the bushing. Free not as in chucks around in there, but free as in it's effortless to rotate by hand pivoting within the bushing without being able to move in any other axis of degrees than the one for rotating.. For me it takes quite a lot of pull on those bars, sometimes both hands to work it into rotating until it's moved enough. The bar is aligned up with the brackets in the same height so I know it's not binded up. Maybe this means nothing when under dynamic loading with how much the car weighs.
Last edited by Vlaze; 04-25-2010 at 01:50 PM.
 04-27-2010, 05:51 PM
#2
Rotary Addict

Vlaze,
I noticed the exact same issue after installing my Progress Tech bars. I found that the front is very hard to move up and down. I can imagine that this would definitely have some effect on the rebound of the suspension but I might be wrong. I remedied the issue slightly by liberally applying prothane to the bushings. The grease itself is very sticky and doesn't so much as lubricate but rather prevent noise and wear I believe. I will be re-greasing my bushings next month and I will give you an update. You can try loosening the nuts a little and driving around. See if you can feel any difference in the car's willingness to transfer load or rebound from being compressed.
I noticed the exact same issue after installing my Progress Tech bars. I found that the front is very hard to move up and down. I can imagine that this would definitely have some effect on the rebound of the suspension but I might be wrong. I remedied the issue slightly by liberally applying prothane to the bushings. The grease itself is very sticky and doesn't so much as lubricate but rather prevent noise and wear I believe. I will be re-greasing my bushings next month and I will give you an update. You can try loosening the nuts a little and driving around. See if you can feel any difference in the car's willingness to transfer load or rebound from being compressed.
04-27-2010, 07:34 PM
#3
Registered
When I installed my Hotchkis sway bars they were very easy to move up and down with no end-links attached. I did use an obscene amount of Royal Purple Ultra-Perfomance Synthetic Grease on the new poly bushings during the install though. Most of it squeezed out and had to be cleaned up before lowering the car, but damn those sways moved smoothly. Try more/better grease and see if it helps. Typically the grease packet that comes with your sways is the worst of the worst grease and shouldn't be used for anything, that's why it's free.
04-28-2010, 12:29 AM
#4

This is a common problem with many aftermarket sways. The problem is probably the bracket that holds the bushings to the chassis. To see if your Progress bars have this problem, do the following.
Get the car up on jacks again and take one of the wheels off. Unbolt the bracket and remove the bracket & bushing from the car (you can leave the end of the sway attached to the control arm).
Snap the bushing back into the bracket, and place the assembly on the ground, with the flat part of the bushing resting against the ground (as if you were going to bolt the bushing & bracket down to the garage floor).
Is there a gap between the bracket & the ground? If you use your thumbs to push the bracket down so that it touches the ground, does the hole in the bushing become obviously oval?
If the answer is yes, the problem is that when you bolt the bracket to the car, the bushing is deforming on the bar but since the bar prevents the bushing from becoming oval, you just compress the bushing material and the bushing turns into a clamp as you tighten the bolts. Not good.
There are two ways to solve this - place washers between the bracket & the chassis, or use a belt sander to remove material from the bottom of the bushing. If you do the latter, be careful to make sure you leave enough material in the bushing so the bar doesn't tear through. And make sure there is *some* compression of the bushing in the bracket.
Hope this makes sense. As I said, this is a common problem, and you definitely want the bar to rotate reasonably freely in the bushings.
edit - I had to do this on my Whiteline front bar.
04-28-2010, 02:25 PM
#5
Playing in parking lots

Join Date: Apr 2008
Posts: 49
Likes: 0
Received 0 Likes
on
0 Posts
This is a common problem with many aftermarket sways. The problem is probably the bracket that holds the bushings to the chassis. To see if your Progress bars have this problem, do the following.
Get the car up on jacks again and take one of the wheels off. Unbolt the bracket and remove the bracket & bushing from the car (you can leave the end of the sway attached to the control arm).
Snap the bushing back into the bracket, and place the assembly on the ground, with the flat part of the bushing resting against the ground (as if you were going to bolt the bushing & bracket down to the garage floor).
Is there a gap between the bracket & the ground? If you use your thumbs to push the bracket down so that it touches the ground, does the hole in the bushing become obviously oval?
If the answer is yes, the problem is that when you bolt the bracket to the car, the bushing is deforming on the bar but since the bar prevents the bushing from becoming oval, you just compress the bushing material and the bushing turns into a clamp as you tighten the bolts. Not good.
There are two ways to solve this - place washers between the bracket & the chassis, or use a belt sander to remove material from the bottom of the bushing. If you do the latter, be careful to make sure you leave enough material in the bushing so the bar doesn't tear through. And make sure there is *some* compression of the bushing in the bracket.
Hope this makes sense. As I said, this is a common problem, and you definitely want the bar to rotate reasonably freely in the bushings.
edit - I had to do this on my Whiteline front bar.
Get the car up on jacks again and take one of the wheels off. Unbolt the bracket and remove the bracket & bushing from the car (you can leave the end of the sway attached to the control arm).
Snap the bushing back into the bracket, and place the assembly on the ground, with the flat part of the bushing resting against the ground (as if you were going to bolt the bushing & bracket down to the garage floor).
Is there a gap between the bracket & the ground? If you use your thumbs to push the bracket down so that it touches the ground, does the hole in the bushing become obviously oval?
If the answer is yes, the problem is that when you bolt the bracket to the car, the bushing is deforming on the bar but since the bar prevents the bushing from becoming oval, you just compress the bushing material and the bushing turns into a clamp as you tighten the bolts. Not good.
There are two ways to solve this - place washers between the bracket & the chassis, or use a belt sander to remove material from the bottom of the bushing. If you do the latter, be careful to make sure you leave enough material in the bushing so the bar doesn't tear through. And make sure there is *some* compression of the bushing in the bracket.
Hope this makes sense. As I said, this is a common problem, and you definitely want the bar to rotate reasonably freely in the bushings.
edit - I had to do this on my Whiteline front bar.
Another solution is to insert a washer between the bracket and chassis on one side of each bracket, in order to create some more freedom. Andy Hollis talks about this in a recent article in Grassroots Motorsports.
 04-28-2010, 03:01 PM
#7
went back to srsly broke
iTrader: (2)

Join Date: Mar 2009
Location: Flushing, NY
Posts: 2,040
Likes: 0
Received 0 Likes
on
0 Posts
I will be testing what George suggests with the washers on Saturday. Additionally, I asked my friend Alzors to let me use his lithium grease. I used the energy suspension Formula-5 (or something like that) grease, which is extremely sticky. He runs the Progress tech sway bars like me, and he states his rears can move with relative freedom. I remember trying to shift my rear bar around to install the end-links, and I needed a large amount of force with both hands to move them.
I'll let you guys know the result on Saturday night or so.
bingo - what do you mean by "insert a washer on one side of each bracket"?
I'll let you guys know the result on Saturday night or so.
bingo - what do you mean by "insert a washer on one side of each bracket"?
Last edited by JinDesu; 04-28-2010 at 03:05 PM.
04-28-2010, 05:06 PM
#8
I always just thought that was normal for a big bar. The resistance was about the same when i used the bushings supplied by progress tech, as well as (after one broke) bushings from Energy Suspension. (those are good bushis by the way, and have built-in greasing points). I can move it up or down with one hand with perhaps 10-15 pounds of force. I always assumed that was negligable compared to the mass of the car rolling....is that not true? I really dont know.
Just adding more lubricant doesnt help, it just squishes out the sides. Don't ever-torque the brackets, cause that will just make this squishing worse...
Just adding more lubricant doesnt help, it just squishes out the sides. Don't ever-torque the brackets, cause that will just make this squishing worse...
04-29-2010, 06:22 AM
#10
went back to srsly broke
iTrader: (2)
Join Date: Mar 2009
Location: Flushing, NY
Posts: 2,040
Likes: 0
Received 0 Likes
on
0 Posts
My incredibly calibrated arms tell me it takes more than 10-15lbs to shift the rears 
But yes, I believe they are too tight. I'd like to at least be able to move them with one hand.
But yes, I believe they are too tight. I'd like to at least be able to move them with one hand.
04-29-2010, 07:29 AM
#11
My same exact way of thinking is what most believed, the bushing is being squished down as I figured. I'll try adding a washer to each bolt for each clamps all around tonight.
05-03-2010, 10:10 AM
#12
Whelp, the washers definitely helped loosen it up. The front is not as loose as I'd like it to be, but it doesn't take much effort to rotate them.
Another thing I found out not mentioned on previous threads; if you use Progress anti sway bars and lower your car, you will contact the headlight sensor link on the rear. I lowered only 1-2 inches on the rear and could see it was going to hit no matter what. I'm surprised not a single soul mentioned this about these bars when lowered.
The bracket that bolts to the link up to the sensor itself has a perpendicular blend the whole length to stiffen it up. I had to grind it off where the bracket bends so I could straighten it out more to position the link at an angle as to not let the end of the anti sway bar hit it.
05-03-2010, 10:34 AM
#13
I got some greasable swaybar bushings from Summit Racing to solve the problem.
Similar to this: http://www.summitracing.com/parts/ENS-9-5161R/
Similar to this: http://www.summitracing.com/parts/ENS-9-5161R/
05-03-2010, 10:48 AM
#15
went back to srsly broke
iTrader: (2)
Join Date: Mar 2009
Location: Flushing, NY
Posts: 2,040
Likes: 0
Received 0 Likes
on
0 Posts
Another thing I found out not mentioned on previous threads; if you use Progress anti sway bars and lower your car, you will contact the headlight sensor link on the rear. I lowered only 1-2 inches on the rear and could see it was going to hit no matter what. I'm surprised not a single soul mentioned this about these bars when lowered.
The bracket that bolts to the link up to the sensor itself has a perpendicular blend the whole length to stiffen it up. I had to grind it off where the bracket bends so I could straighten it out more to position the link at an angle as to not let the end of the anti sway bar hit it.
The bracket that bolts to the link up to the sensor itself has a perpendicular blend the whole length to stiffen it up. I had to grind it off where the bracket bends so I could straighten it out more to position the link at an angle as to not let the end of the anti sway bar hit it.
Can you give more detail as to your fix? Mine doesn't touch while the car is on the ground, but I was going to put something between the bar and the sensor link to check if there was contact during driving.
05-03-2010, 10:55 AM
#16
These have polyurethane bushings. For the stock ones, you would need to drill and tap the bracket to accept the grease zerk. A hole would have to be drilled in the rubber bushing and aligned with the modified bracket to get the grease to the point needing lubrication.
05-03-2010, 10:55 AM
#17
For the fix I did you have to take the link out that connects to the bracket, and then the bracket from the sensor itself. The bracket that goes into the sensor has a rectangular slot on it, remember this so when you put it back on it aligns up otherwise the sensor won't work.
When you inspect the bracket, it has 2 bends. Along the full length of the bracket is a blend (as I call it) or a bend if you prefer to call it that, that runs perpendicular to the face of the bracket the entire length; this prevents you from simply taking a hammer and straighten the bends out without twisting it. If you straighten those 2 bends out, it will angle the link that bolts up to it, and down to the lower trailing toe link that goes to the frame and LR wheel hub. This will give you adequate room for the end links to move around without hitting it.
In order to straighten this bracket, you have to grind or cut away some of that "blend" I mentioned that stiffens the bracket up. I used a dremel grinder and took away the blend right on the corner of those 2 bends so I could straighten out the bracket.
I know it sounds confusing but even though I'm freaking exhaust after this weekend I'll take a picture tonight to show what I did.
05-03-2010, 11:00 AM
#18
went back to srsly broke
iTrader: (2)
Join Date: Mar 2009
Location: Flushing, NY
Posts: 2,040
Likes: 0
Received 0 Likes
on
0 Posts
Alright - I'll wait for a picture, because I was completely lost through the entire explanation. Mostly because I don't remember what the headlight sensor link looks like, I'll check it tonight or something.

 05-05-2010, 09:47 PM
#21
Ok...a few days late here, sorry Jin.
So I took two shots of it trying to show what I did. This 1st shot here shows from a good view what will happen if you install the Progress bar and lower your car down around a 1in drop in the rear or more; if the car travels enough it will hit the sway bar end as shown. This is using Evo-r end links. For the rear one it comes with a long extended end and the other part of the link screws into it with a male thread and a nut for tightening down once you have the adjustment length you want. I wound up removing that nut because I had to tighten in the joint as much as I could in an attempt to get the swar bar horizontal which it still was angled upward some after doing all this.

The bottom two arrows show what I call the sensor link and the sensor bracket that work with the headlight sensor for the rear. The top 2 arrows show where I grinded away material. The lines show the bends in the bracket itself. There are 2 main bends in it that are shown by diagonal vertical red lines while the diagonal horizontal one represents what I refer to as a blend. The blend is essentially a bend in the bracket that follows along the bracket length including the 2 bends and stiffens it up making it virtually impossible to straighten those 2 bends out unless you remove material where they are which is what I did where the top 2 arrows are pointing. You can see them with some shine of the metal and an oval groove from me using the dremel.
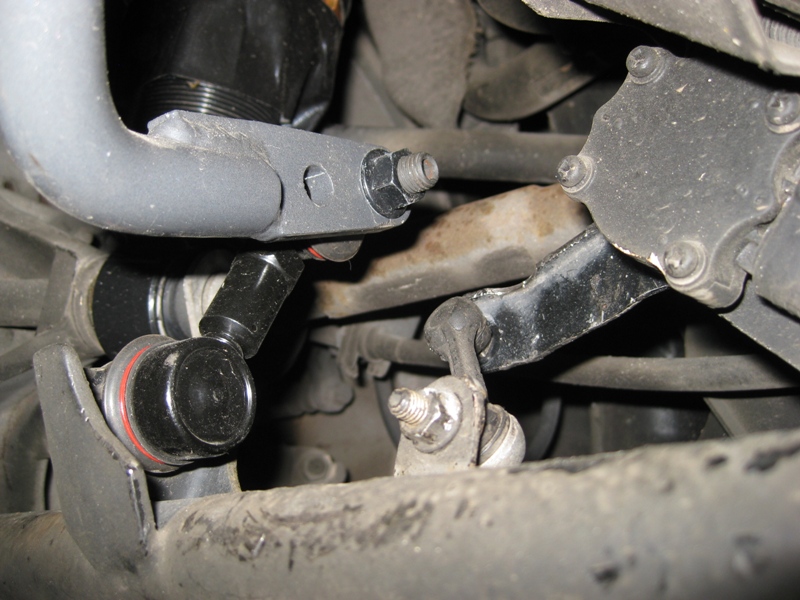
Once enough material is removed, you can hammer it out to straighten the bracket out some and thus angling the sensor link away from the swaybar end which works out to the 2nd picture. I didn't couldn't get a fully clear justified shot but you can see, it will clear the swaybar now when it travels.
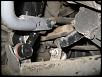
So I took two shots of it trying to show what I did. This 1st shot here shows from a good view what will happen if you install the Progress bar and lower your car down around a 1in drop in the rear or more; if the car travels enough it will hit the sway bar end as shown. This is using Evo-r end links. For the rear one it comes with a long extended end and the other part of the link screws into it with a male thread and a nut for tightening down once you have the adjustment length you want. I wound up removing that nut because I had to tighten in the joint as much as I could in an attempt to get the swar bar horizontal which it still was angled upward some after doing all this.
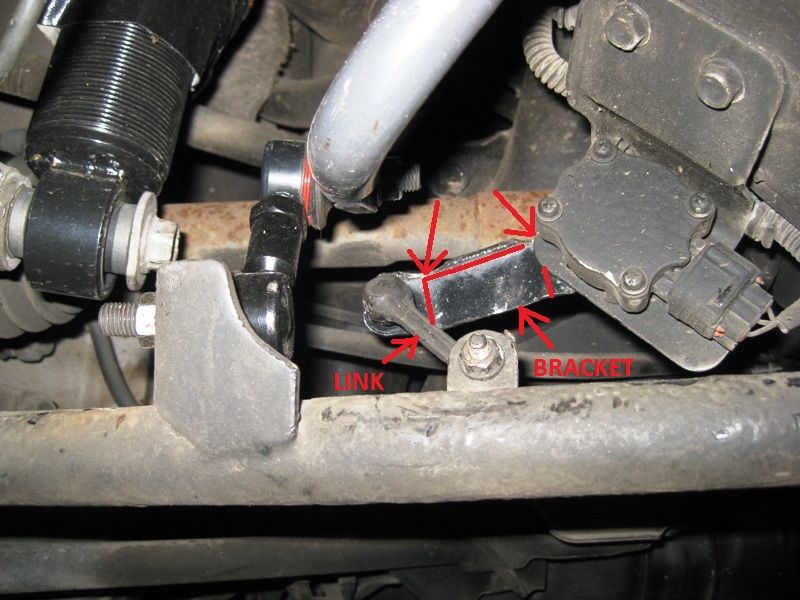
The bottom two arrows show what I call the sensor link and the sensor bracket that work with the headlight sensor for the rear. The top 2 arrows show where I grinded away material. The lines show the bends in the bracket itself. There are 2 main bends in it that are shown by diagonal vertical red lines while the diagonal horizontal one represents what I refer to as a blend. The blend is essentially a bend in the bracket that follows along the bracket length including the 2 bends and stiffens it up making it virtually impossible to straighten those 2 bends out unless you remove material where they are which is what I did where the top 2 arrows are pointing. You can see them with some shine of the metal and an oval groove from me using the dremel.
Once enough material is removed, you can hammer it out to straighten the bracket out some and thus angling the sensor link away from the swaybar end which works out to the 2nd picture. I didn't couldn't get a fully clear justified shot but you can see, it will clear the swaybar now when it travels.
Last edited by Vlaze; 05-05-2010 at 10:01 PM.
05-05-2010, 10:01 PM
#22
went back to srsly broke
iTrader: (2)
Join Date: Mar 2009
Location: Flushing, NY
Posts: 2,040
Likes: 0
Received 0 Likes
on
0 Posts
So basically you shifted that head-light sensor bracket out of the way a little bit, right? Doesn't that change the head-light sensor aim a little bit?
I'm not sure mine is as lowered as yours where the head-light sensor bracket gets in the way, but I think the head-light sensor end-link is right under my progress tech bar. I'll see if I can use your solution when I get a chance.
I'm not sure mine is as lowered as yours where the head-light sensor bracket gets in the way, but I think the head-light sensor end-link is right under my progress tech bar. I'll see if I can use your solution when I get a chance.
05-05-2010, 10:05 PM
#23
Looking at that setup, I'm wondering if you've installed the bar backwards? I never had to do this with my Whiteline bar & Evo endlinks, and my links are much more perpendicular than yours.
Not trying to be rude, just wondering - something there doesn't look right to me.
Not trying to be rude, just wondering - something there doesn't look right to me.
05-05-2010, 10:13 PM
#24
I didn't shift the bracket out of the way with how that sounds; I modified the bracket by straightening the main 2 bends in it so it angled the sensor link away from being directly underneath the sway bar. It shouldn't really change the head light aim because you're not changing the position of the bracket, you're just angling out the link some.
As I mentioned previously, when you remove the bracket off the sensor itself you will see it has a rectangular slot in the bracket, and a mating rectangular boss on the sensor itself you need to hold it into when reinstalling it. Otherwise it won't work period. When I did this and drove at night on I noticed no difference whatsoever.
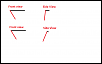
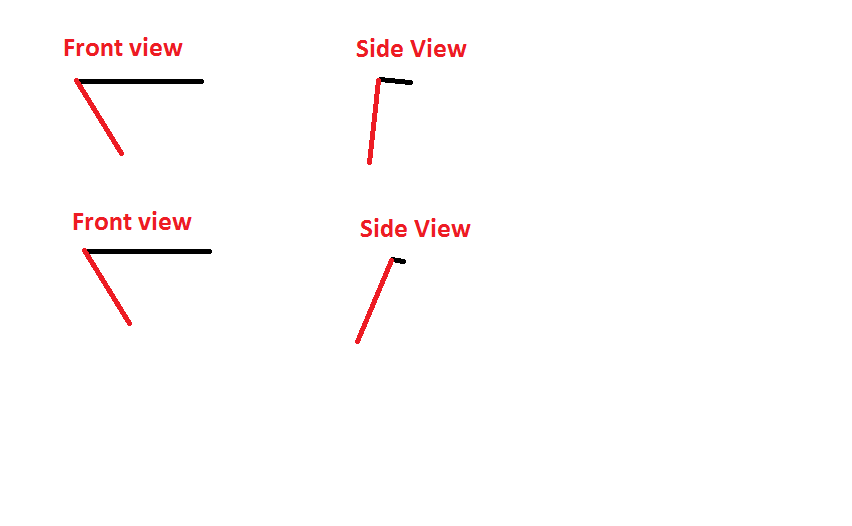
Here's a painting to try again to explain....
The front view is what you see in Pic 1. The side view is what I attempted to grab in pic 2 but you can't see with other stuff in the way. The bottom side view is the angle of the link changed highlighted in red while black is the bracket itself. The bracket position angle relative to the sensor is the same.
As I mentioned previously, when you remove the bracket off the sensor itself you will see it has a rectangular slot in the bracket, and a mating rectangular boss on the sensor itself you need to hold it into when reinstalling it. Otherwise it won't work period. When I did this and drove at night on I noticed no difference whatsoever.
Here's a painting to try again to explain....
The front view is what you see in Pic 1. The side view is what I attempted to grab in pic 2 but you can't see with other stuff in the way. The bottom side view is the angle of the link changed highlighted in red while black is the bracket itself. The bracket position angle relative to the sensor is the same.
 05-05-2010, 10:15 PM
#25
Looking at that setup, I'm wondering if you've installed the bar backwards? I never had to do this with my Whiteline bar & Evo endlinks, and my links are much more perpendicular than yours.
Not trying to be rude, just wondering - something there doesn't look right to me.
Not trying to be rude, just wondering - something there doesn't look right to me.
If you can get some shots of yours with the rears on some blocks as in suspension not in full droop George, that would be nice for cross reference. All I know is for sure that the sway bar is installed correctly, so I can't help how it is based on lowering the car. I just try to accommodate it, and make sure there is no preload. As long as no preload is present I'm not worried about it.
Last edited by Vlaze; 05-05-2010 at 10:25 PM.