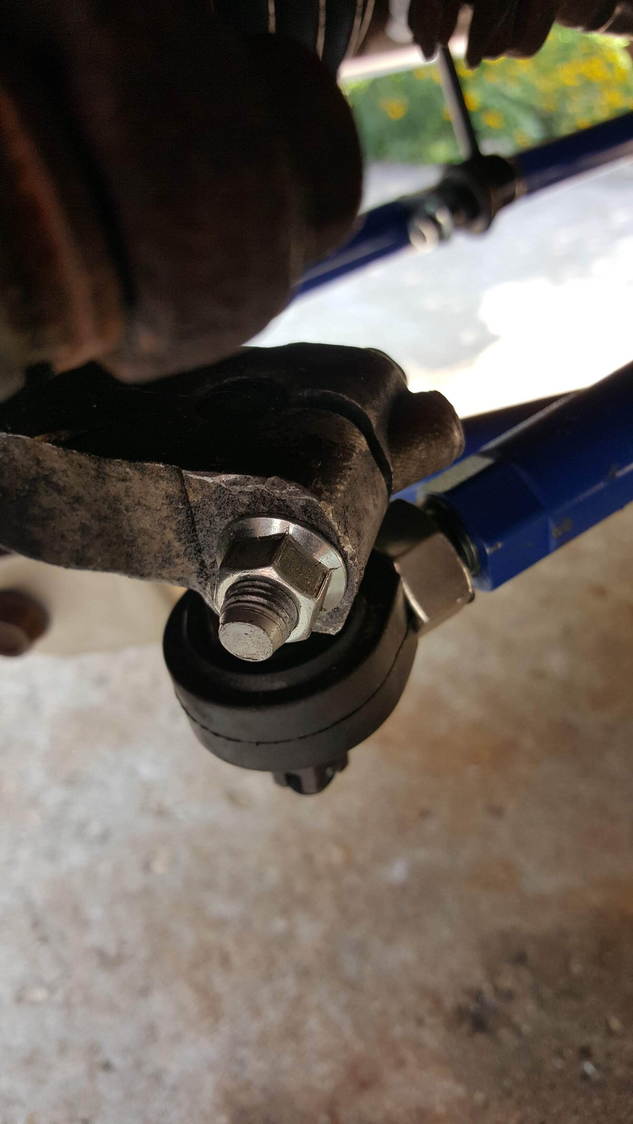
Removing Rear Toe Link from Knuckle
#1
Removing Rear Toe Link from Knuckle
I'm upgrading all my rear suspension arms and the last link to replace is the toe link. However, coming from a life of building pre-1990 Nissans I've never run into an arm like this. It's clamped into the knuckle/upright with a bolt going through it (guessing there's a spherical bearing in there?). The nut is off, but the bolt doesn't move so I'm assuming it doesn't come out. I figured I could take a chisel and hammer into the split where the end goes in to spread it out some, but I don't want to damage anything. Anyone have any tips?
#2
That one can be a cast iron bitch. Mine are both stuck..
The plan, next time I have the car up, is PB Blaster and an air chisel with an anvil end. Sooner or later it will have to come out. Plan D is a new hub. The bolt is supposed to come out. It has to in order to let the arm out. The arm has an indentation that the bolt fits into.
Plan E is to cut the bolt out and address each end separately, again with the chisel. And, Plan F is the new hub. I already bought the new bolts.
#4
I had a friend check all-data and it shows the bolt out of the U-joint. I bit the bullet and bought a 1250lbft impact gun and it didn't even budge it. I'm about to just say screw it and get new rear knuckles.
#5
#7
Upgrading all the front suspension arms was a breeze, but the rear of this car has been a pain. The cam bolts for the lateral links were totally seized. I gave up on those and just cut them out with an angle grinder and cut-off wheel. Took 20 minutes to cut both out after spending a few hours trying to get them out other ways. Ordered new bolts for the lateral links as well as the trailing arms as well. It's been a lot of work, but it's nice knowing that literally every suspension arm has been upgraded.
#8
I ended up getting the knuckles off eBay. I made sure to grab a pair that already had that toe end bolt removed of course. The bolt that goes in the knuckle to hold the end in place is splined so you can't just get a class 10 replacement and throw it in. I got the splined bolts through Jim Ellis Mazda, but they ended up having to source them from Canada so I'm still waiting for them to come in. The part number for the splined bolts is 9YA9-91-004 if anyone runs into the same issue.
#10
Um ... for the record the OE bolt is splined on the hex head end like a wheel stud specifically so it can’t/ won’t turn or come out if the nut ever came off. The toe link stud has a groove in it that the bolt shaft partially fits through so it also can’t fall or come out with the bolt in place, because if the end link ever fell out at speed the results for the car and occupants would likely be catastrophic.  So it’s designed this way for safety purposes.
You have to press or beat the bolt out first, then the end link stud will come out. When you install the bolt the nut will pull the splined end back into place, but it’s a good idea to get the splines mated up where with the groove indentations so it goes in easier. Typically a strong C-clamp and oversize socket for the bolt to press up into will push it right out.
.
 So it’s designed this way for safety purposes.
You have to press or beat the bolt out first, then the end link stud will come out. When you install the bolt the nut will pull the splined end back into place, but it’s a good idea to get the splines mated up where with the groove indentations so it goes in easier. Typically a strong C-clamp and oversize socket for the bolt to press up into will push it right out.
.
Last edited by TeamRX8; 05-18-2019 at 01:40 PM.
#11
Like Team said, that's a press job. I used a giant C clamp, a socket, and a little heat to get mine out as mine was quite corroded. Do yourself a favor and use a little antiseize when you reassemble.
#12
Thanks, forgot to mention that. High temp nickel anti-seize is standard-procedure101 on any mechanical part I take apart, lol. Sooner or later I’m the person most likely to be messing with it again.
Thread
Thread Starter
Forum
Replies
Last Post
ripigs
Series I Wheels, Tires, Brakes & Suspension
6
12-01-2014 03:37 PM
oldBeggar010
Series I Wheels, Tires, Brakes & Suspension
22
05-09-2013 03:45 PM
RoXy00
Series I Wheels, Tires, Brakes & Suspension
1
02-03-2008 12:45 PM


