Sway Bars
 05-31-2009, 03:14 PM
#326
justjim
Join Date: Aug 2008
Location: St. Petersburg, Florida
Posts: 345
Likes: 0
Received 6 Likes
on
3 Posts
Finally got my front and rear sway bars in. Time was running short before my event and Brice from Fluid Motorsports was able to ship the front and I got it the next day. I got the rear bar from ptuning.com and it arrived in 2 days.
While I was waiting for the rear I installed the front. Based on some descriptions in this and the DIY thread I was anticipating difficulty with the front but it turned out to be relatively easy. The key apparently is to do what the Progress installation instructions say and what is alluded to in the DIY Racing Beat sway bar installation thread. The Progress instructions say to remove the lower splash tray and the lower radiator brackets. The DIY RB thread mentions removing the upper splash tray bolt and loosening the tray. I found that if I took the weighted average of the 2 instructions (I removed some of the trays attachments, 4 bolts and 4 plastic connectors) and just loosened the splash track and removed the radiator brackets I was able to work the bar forward and over the steering rack and it came out relatively easy just working by myself. There is a kink in the tie rods that gives you a little extra room to work the bar end over the tie rod. New bar went in the same as the old one came out. As recommended I used Energy Suspension zerk fitted bushing caps for the front and bought some of the Prothane grease (OMG that grease is like gorilla spunk, it is REALLY sticky and I got it all over everything and all my tools are all funky now ).
).  Here's an important note to everybody, the Progress instructions end with an incorrect and confusing (to those that don't already know better) comment. STEP 3 states "THIS IS AN ADJUSTABLE SWAY BAR. THE HOLE TOWARD THE FRONT OF THE VECHICLE (sic) IS THE SOFEST (sic) SETTING. CHARACTRISTICS (sic) IN HANDLING HAVE BEEN ALTERED. USE EXTREME CAUTION DURING DRIVING. Attach the end links to the bar. The hole toward the front of the car is the firmest setting." As you can see the two sentences are contradictory. When I read the first part in CAPS I thought they're nuts, then I read the correct instruction at the end. I'm going to try and contact them and see if they can fix this before somebody loses their car into a wall. I'll also try to get them to correct their spelling
 The statement in CAPS is a cut and paste lifted from the rear bar instructions. The statement in CAPS is correct for the rear bar ONLY since it is installed facing the opposite direction. The stiffer setting is always closest to the main sway bar cross arm (ie the shortest lever arm is stiffer).
Next day the rears came in and again based on the threads I was anticipating an easy install. I had some trouble because one of the endlinks was stubborn but a bigger wrench and a captured allen wrench got it off eventually. Things then began to go more smoothly, I drilled an tapped the Progress rear bushing caps and installed zerk fittings purchased at Autozone. Future note, if you drill for the zerk fittings angle them down a little bit, I centered them and the muffler prevents my grease hose nipple from attaching properly. I ran into a minor snag when I was having trouble getting the bushing caps installed. Turns out the Progress bushing caps are just a tad too wide for the OEM studs and nuts. As a result if you tighten the bottom nut before the top the socket wrench won't fit over the top nut because it is too close to the cap. For the longest time I thought I had stripped the nut and was cursing it. When I took the cap back off and started over I realized what had happened. Tighten the top cap nut first with a socket then you can easily tighten the bottom cap nut with a open end wrench.
I set the front bar in the middle of 3 holes and the rear bar on the softer of the 2 holes. I won't have a complete and accurate assessment until I get to Sebring on June 13. The car handles well enough now that it is difficult to find the limits on the street without endangering the populace. I was able to go out to my brake bedding road on Sunday and throw the car around a bit and it is much flatter in the corners and seems pretty neutral, transitioning from mild understeer to mild oversteer with throttle. When it did break loose is wasn't dramatic and the car felt like it was under control. Currently I'm on OEM springs and shocks, -1.2 camber front and -1.8 camber rear. Tire pressures are 35 psi front and rear. All in all I'm very happy with the performance. Now if I can just get the gorilla spunk off of my tools I'm good .
.
While I was waiting for the rear I installed the front. Based on some descriptions in this and the DIY thread I was anticipating difficulty with the front but it turned out to be relatively easy. The key apparently is to do what the Progress installation instructions say and what is alluded to in the DIY Racing Beat sway bar installation thread. The Progress instructions say to remove the lower splash tray and the lower radiator brackets. The DIY RB thread mentions removing the upper splash tray bolt and loosening the tray. I found that if I took the weighted average of the 2 instructions (I removed some of the trays attachments, 4 bolts and 4 plastic connectors) and just loosened the splash track and removed the radiator brackets I was able to work the bar forward and over the steering rack and it came out relatively easy just working by myself. There is a kink in the tie rods that gives you a little extra room to work the bar end over the tie rod. New bar went in the same as the old one came out. As recommended I used Energy Suspension zerk fitted bushing caps for the front and bought some of the Prothane grease (OMG that grease is like gorilla spunk, it is REALLY sticky and I got it all over everything and all my tools are all funky now
). Here's an important note to everybody, the Progress instructions end with an incorrect and confusing (to those that don't already know better) comment. STEP 3 states "THIS IS AN ADJUSTABLE SWAY BAR. THE HOLE TOWARD THE FRONT OF THE VECHICLE (sic) IS THE SOFEST (sic) SETTING. CHARACTRISTICS (sic) IN HANDLING HAVE BEEN ALTERED. USE EXTREME CAUTION DURING DRIVING. Attach the end links to the bar. The hole toward the front of the car is the firmest setting." As you can see the two sentences are contradictory. When I read the first part in CAPS I thought they're nuts, then I read the correct instruction at the end. I'm going to try and contact them and see if they can fix this before somebody loses their car into a wall. I'll also try to get them to correct their spelling The statement in CAPS is a cut and paste lifted from the rear bar instructions. The statement in CAPS is correct for the rear bar ONLY since it is installed facing the opposite direction. The stiffer setting is always closest to the main sway bar cross arm (ie the shortest lever arm is stiffer).Next day the rears came in and again based on the threads I was anticipating an easy install. I had some trouble because one of the endlinks was stubborn but a bigger wrench and a captured allen wrench got it off eventually. Things then began to go more smoothly, I drilled an tapped the Progress rear bushing caps and installed zerk fittings purchased at Autozone. Future note, if you drill for the zerk fittings angle them down a little bit, I centered them and the muffler prevents my grease hose nipple from attaching properly. I ran into a minor snag when I was having trouble getting the bushing caps installed. Turns out the Progress bushing caps are just a tad too wide for the OEM studs and nuts. As a result if you tighten the bottom nut before the top the socket wrench won't fit over the top nut because it is too close to the cap. For the longest time I thought I had stripped the nut and was cursing it. When I took the cap back off and started over I realized what had happened. Tighten the top cap nut first with a socket then you can easily tighten the bottom cap nut with a open end wrench.
I set the front bar in the middle of 3 holes and the rear bar on the softer of the 2 holes. I won't have a complete and accurate assessment until I get to Sebring on June 13. The car handles well enough now that it is difficult to find the limits on the street without endangering the populace. I was able to go out to my brake bedding road on Sunday and throw the car around a bit and it is much flatter in the corners and seems pretty neutral, transitioning from mild understeer to mild oversteer with throttle. When it did break loose is wasn't dramatic and the car felt like it was under control. Currently I'm on OEM springs and shocks, -1.2 camber front and -1.8 camber rear. Tire pressures are 35 psi front and rear. All in all I'm very happy with the performance. Now if I can just get the gorilla spunk off of my tools I'm good
.
Last edited by justjim; 05-31-2009 at 03:30 PM.
 06-15-2009, 12:26 PM
#327
justjim
Join Date: Aug 2008
Location: St. Petersburg, Florida
Posts: 345
Likes: 0
Received 6 Likes
on
3 Posts
I got a chance to track test my Progress front and rear sway bars Saturday at Sebring. Started off with the rear bar on soft and the front bar on the middle hole. I'm running Hankook 245/40/17 R-compounds with the OEM springs and shocks and my camber maxed out at -1.2 in the front, 38psi front and rear. With that setup I had too much understeer at the track. I tried dropping the rear tire pressures a couple of psi which helped but wasn't enough. I moved the rear bar to full stiff at lunch time. Stiffening the rear bar helped balance the car, there was still a touch of understeer at turn in, but backing off the throttle would bring the rear around controllably. Perhpaps I could benefit with a little toe out for the front and rear? The Progress bars made the car nice and flat in the high speed sweepers and through the esses. I wasn't able to better my best time but I blame that on the 98+ degrees at the track. Late in the day I corded my R-compounds and went back to 225/45/18 street tires. Swoope showed up in the afternoon after I changed the tires and rode around with me, there was lots of squealing and weeping on gnashing of teeth with the street tires, but the car was well balanced on street tires as well with the new sway bar settings. Swoope only had minor burns from me using the car heater to cool off the engine on a very hot track day
Last edited by justjim; 06-15-2009 at 06:31 PM.
06-15-2009, 12:53 PM
#328
Momentum Keeps Me Going

Shows how the car is inherently balanced and even slightly out of balance sway settings make a difference. Great how adj bars allow seeing these changes, and give the ability to tune to any particular handling sweet spot you want. Tire pressure is a bit more tricky due to temp deltas esp. cross carwise. So much fun making it right 
06-15-2009, 12:54 PM
#329
Registered User

Join Date: Sep 2006
Posts: 483
Likes: 0
Received 0 Likes
on
0 Posts
I'm running Hankook 245/40/17 R-compounds with the OEM springs and shocks and my camber maxed out at -1.2 in the front, 38psi front and rear. With that setup I had too much understeer at the track. I tried dropping the rear tire pressures a couple of psi which helped but wasn't enough. I moved the rear bar to full stiff at lunch time. Stiffening the rear bar helped balance the car, there was still a touch of understeer at turn in, but backing off the throttle would bring the rear around controllably. Perhpaps I could benefit with a little toe in for the front and rear?
b4 I didnt know how to trial braking, I used to get a lot of understeer
Now I know the weight transfer, use trial braking + counter steer, it just works fine

I guess you brake on the straight, then turn and give some gas, right?
You may try brake at the same braking point, then leave some brake, bring brake in the apex, when you hit the apex, then release all and step on the gas
Reason why is the weight, if you brake on the straight, first the weight all goes to the front, but when you release the brake and turn and put some gas, the weight all goes to the rear, then your front tire will not have enough weight to grip the ground. At this moment, most people will think, wow the front tires has no grip, screaming and understeer, but actually is not, just because your way to drive.
If you change to way you drive, brake at the same braking point, leave some brake when you turn, and keep the weight to the front, you will have a lot more grip than the other way. When tou hit the apex and fast the exit, then you full gas to hit the exit. (you may have a little oversteer, just counter steer a little, then you will be fine)
ps:the fastest way to take corners is between Grip and Drift
here is a video of the instructor who thought how to drive on track
( Look at his steering carefully and here when he give gas!!!)
Winner of Skip Barbra
Winner of Red line time attack
[EMBED]<object width="425" height="344"><param name="movie" value="http://www.youtube.com/v/1ejcySX0JTc&hl=en&fs=1&color1=0xe1600f&color2=0xfe bd01"></param><param name="allowFullScreen" value="true"></param><param name="allowscriptaccess" value="always"></param><embed src="http://www.youtube.com/v/1ejcySX0JTc&hl=en&fs=1&color1=0xe1600f&color2=0xfe bd01" type="application/x-shockwave-flash" allowscriptaccess="always" allowfullscreen="true" width="425" height="344"></embed></object> [/EMBED]
06-15-2009, 12:57 PM
#330
Registered User
Join Date: Sep 2006
Posts: 483
Likes: 0
Received 0 Likes
on
0 Posts
Right now I'm using
32mm front sway bar
19mm rear
both of them from tanabe
I love it
also with megan coilovers 8Kg 6Kg
mazdaspeed F+R strut bars
and 4 pieces under braces
with Mazdaspeed spoiler
Camber -3 front, -2.5 rear
I love this set up !
32mm front sway bar
19mm rear
both of them from tanabe
I love it
also with megan coilovers 8Kg 6Kg
mazdaspeed F+R strut bars
and 4 pieces under braces
with Mazdaspeed spoiler
Camber -3 front, -2.5 rear
I love this set up !
Last edited by philipchan; 06-15-2009 at 01:05 PM.
 06-15-2009, 01:51 PM
#332
Registered User
Join Date: Sep 2006
Posts: 483
Likes: 0
Received 0 Likes
on
0 Posts
yea...the Z06 team invite him to be the driver to the red line time attack
Some more video for the same person
What about this then
NA 1.6 Miata with GT wing and R tires
drifting all the way...lol
So hard to drift for only 100 hp
[EMBED]<object width="425" height="344"><param name="movie" value="http://www.youtube.com/v/gV1z4AL-4b8&hl=en&fs=1&color1=0xe1600f&color2=0xfebd01"></param><param name="allowFullScreen" value="true"></param><param name="allowscriptaccess" value="always"></param><embed src="http://www.youtube.com/v/gV1z4AL-4b8&hl=en&fs=1&color1=0xe1600f&color2=0xfebd01" type="application/x-shockwave-flash" allowscriptaccess="always" allowfullscreen="true" width="425" height="344"></embed></object>[/EMBED]
and he actually own a stock s2k
counter steering all the way
[EMBED]<object width="425" height="344"><param name="movie" value="http://www.youtube.com/v/g7s2bqwGVYw&hl=en&fs=1&color1=0xe1600f&color2=0xfe bd01"></param><param name="allowFullScreen" value="true"></param><param name="allowscriptaccess" value="always"></param><embed src="http://www.youtube.com/v/g7s2bqwGVYw&hl=en&fs=1&color1=0xe1600f&color2=0xfe bd01" type="application/x-shockwave-flash" allowscriptaccess="always" allowfullscreen="true" width="425" height="344"></embed></object>[/EMBED]
Last edited by philipchan; 06-15-2009 at 01:54 PM.
06-15-2009, 06:41 PM
#333
justjim
Join Date: Aug 2008
Location: St. Petersburg, Florida
Posts: 345
Likes: 0
Received 6 Likes
on
3 Posts
You may wanna try trial braking, it helps a lot of understeer
b4 I didnt know how to trial braking, I used to get a lot of understeer
Now I know the weight transfer, use trial braking + counter steer, it just works fine
I guess you brake on the straight, then turn and give some gas, right?
You may try brake at the same braking point, then leave some brake, bring brake in the apex, when you hit the apex, then release all and step on the gas
Reason why is the weight, if you brake on the straight, first the weight all goes to the front, but when you release the brake and turn and put some gas, the weight all goes to the rear, then your front tire will not have enough weight to grip the ground. At this moment, most people will think, wow the front tires has no grip, screaming and understeer, but actually is not, just because your way to drive.
If you change to way you drive, brake at the same braking point, leave some brake when you turn, and keep the weight to the front, you will have a lot more grip than the other way. When tou hit the apex and fast the exit, then you full gas to hit the exit. (you may have a little oversteer, just counter steer a little, then you will be fine)
ps:the fastest way to take corners is between Grip and Drift
06-15-2009, 06:43 PM
#334
Registered User
Join Date: Sep 2006
Posts: 483
Likes: 0
Received 0 Likes
on
0 Posts
Well that is good advice, however I was in fact trail braking and am well familiar with the concept. Perhaps Swoope can offer a critique as he was sitting there cooking in the passenger seat. As I said above after I reset the rear sway at lunch the car had much better balance and it was easy enough to get the rear around by feathering the throttle through the apex.

Urrr, I hate tracing during the summer time

Last edited by philipchan; 06-15-2009 at 06:46 PM.
 06-15-2009, 07:04 PM
#336
Registered User
Join Date: Sep 2006
Posts: 483
Likes: 0
Received 0 Likes
on
0 Posts
and depends on what tire, R tires should be hot 38~42, best is around 40
but still depends the temperature of the tires after run
inside, middle and out side
should be close to each other
Last edited by philipchan; 06-15-2009 at 07:07 PM.
06-15-2009, 08:16 PM
#337
justjim
Join Date: Aug 2008
Location: St. Petersburg, Florida
Posts: 345
Likes: 0
Received 6 Likes
on
3 Posts
Fronts were already at optimum pressure for lateral traction. Overinflating or underinflating a tire from optimum will lessen the traction, the traction vs air pressure graph is, however, a lopsided bell curve. That is. traction falls off more gradually on the underinflation side of the bell curve and it is easier to calibrate the traction on the low pressure side of optimum. Traction falls off more abruptly on the high pressure side of the bell curve which makes for a twitchy car that breaks away with less warning and is less well suited to a high speed road course but maybe OK for a lower speed autocross. As a result, I prefer to lower my tire pressures from optimum to reduce traction. Furthermore, in the rear, I can maintain a better fooprint under braking with an underinflated tire.
Last edited by justjim; 06-15-2009 at 08:18 PM.
 06-03-2010, 09:41 AM
#339
Rotary Addict

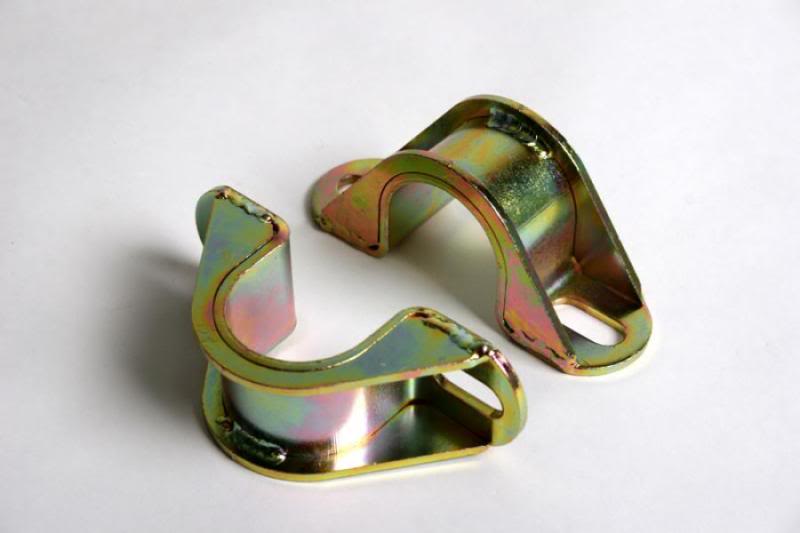
Progress Tech is now using their own redesigned bracket for the front bars on the RX-8. It will flex much less under load and not contort or bend from any off-track excursions. haha I have them on my car now. Trust me, these things are beefy.
http://www.progressauto.com/products.../productID/636
http://www.progressauto.com/products.../productID/636
 06-12-2011, 07:34 AM
#341
Momentum Keeps Me Going
Progress Tech is now using their own redesigned bracket for the front bars on the RX-8. It will flex much less under load and not contort or bend from any off-track excursions. haha I have them on my car now. Trust me, these things are beefy.
http://www.progressauto.com/products.../productID/636

http://www.progressauto.com/products.../productID/636
 07-24-2011, 02:21 PM
#343

Regarding the issue of periodic bushing regreasing, has anyone tried this product? Sounds promising and there's even a positive testimonial regarding sway bushings in the Amazon reviews. It would be nice not to have to remove and regrease (or deal with a grease gun and zerks) if you could just point and shoot with a spray can.
Wurth HHS-2000 / HHS-K Penetrating High Temperature Lubricant
http://www.amazon.com/Wurth-HHS-2000.../dp/B0002XRDLE
Wurth HHS-2000 / HHS-K Penetrating High Temperature Lubricant
http://www.amazon.com/Wurth-HHS-2000.../dp/B0002XRDLE
01-09-2012, 09:49 AM
#344
Registered
iTrader: (6)

Join Date: Jun 2007
Location: Pleasanton, CA
Posts: 1,781
Likes: 0
Received 0 Likes
on
0 Posts
Was adjusting my bars the other day while I greased the bushings and forgot to spray down the adjustment nuts that hold the endlink to the swaybar holes prior to removal and ended up slightly rounding one of them and now have to figure out how I'm going to remove this? I read some people were using a "nut crusher" tool or something, but I was thinking I'd just go out and buy a dremel for this type of job.
Does anyone know the threading size of the 14" nut that holds the swaybar endlink to the swaybar holes itself? Before I try anything I wanna have a replacement nut in order to be able to drive my car after.
Does anyone know the threading size of the 14" nut that holds the swaybar endlink to the swaybar holes itself? Before I try anything I wanna have a replacement nut in order to be able to drive my car after.
Last edited by Nopstnz8; 01-09-2012 at 09:53 AM.
01-10-2012, 03:06 AM
#345
Was adjusting my bars the other day while I greased the bushings and forgot to spray down the adjustment nuts that hold the endlink to the swaybar holes prior to removal and ended up slightly rounding one of them and now have to figure out how I'm going to remove this? I read some people were using a "nut crusher" tool or something, but I was thinking I'd just go out and buy a dremel for this type of job.
Does anyone know the threading size of the 14" nut that holds the swaybar endlink to the swaybar holes itself? Before I try anything I wanna have a replacement nut in order to be able to drive my car after.
Does anyone know the threading size of the 14" nut that holds the swaybar endlink to the swaybar holes itself? Before I try anything I wanna have a replacement nut in order to be able to drive my car after.
01-10-2012, 12:12 PM
#346
Registered
iTrader: (6)
Join Date: Jun 2007
Location: Pleasanton, CA
Posts: 1,781
Likes: 0
Received 0 Likes
on
0 Posts
Drive to the hardware store and take the nut off the other side. Bring it in with you and find a match. Or take it off at home, swing the link away from the bar, and drive to the store with the bar disconnected from the link. It's not going to hurt anything as long as you drive carefully.
Wait... Reread your post... So I **can** drive with the endlink disconnected or fully off if I have to, drive to a hardware store, buy the nut, then reinstall the endlink when I get home? If necessary?
Someone has to know the proper nut size to buy?
01-11-2012, 01:53 PM
#347
Being off at college, I don't have another car I can take, and I'd prefer just to replace the nut without having to take off the endlink because I don't want to strip the other connecting part.
Wait... Reread your post... So I **can** drive with the endlink disconnected or fully off if I have to, drive to a hardware store, buy the nut, then reinstall the endlink when I get home? If necessary?
Someone has to know the proper nut size to buy?
Wait... Reread your post... So I **can** drive with the endlink disconnected or fully off if I have to, drive to a hardware store, buy the nut, then reinstall the endlink when I get home? If necessary?
Someone has to know the proper nut size to buy?
01-11-2012, 05:53 PM
#348
Registered
iTrader: (6)
Join Date: Jun 2007
Location: Pleasanton, CA
Posts: 1,781
Likes: 0
Received 0 Likes
on
0 Posts
^^So are the endlink nuts the same size on both sides? And now back to the original question? How should I safely go about removing the rounded one? Would a dremel be a feasible method?
01-12-2012, 01:47 PM
#349
If you plan to continue doing your own work, you need to make friends with a mechanic you can call with questions.
I'd try a vise grip on the nut before going the dremel route. And for future reference, download an owner's manual to make sure you're not over-torquing your nuts. I tighten my endlinks a couple of ft-lbs more than the spec, but even at that tightness, you shouldn't have problems rounding off the nut. I assume you own a torque wrench?
01-12-2012, 01:52 PM
#350

Vice grip is fine if you can get a good grip on it, make sure you use an allen key to prevent the link from spinning with the nut
a nut-cracker is something i have used to get a nut off of an endlink on a friends car that was rusted on hard. Just go slow and you may manage to get it off without damaging threads.