
DIY: Series II 2009 RX-8 Oil Change
 10-09-2009, 01:50 PM
#1

DIY: Series II 2009 RX-8 Oil Change
Hopefully this will help other members who have been looking for a DIY oil change guide (and I apologize if one exists but I could not find a detailed one).
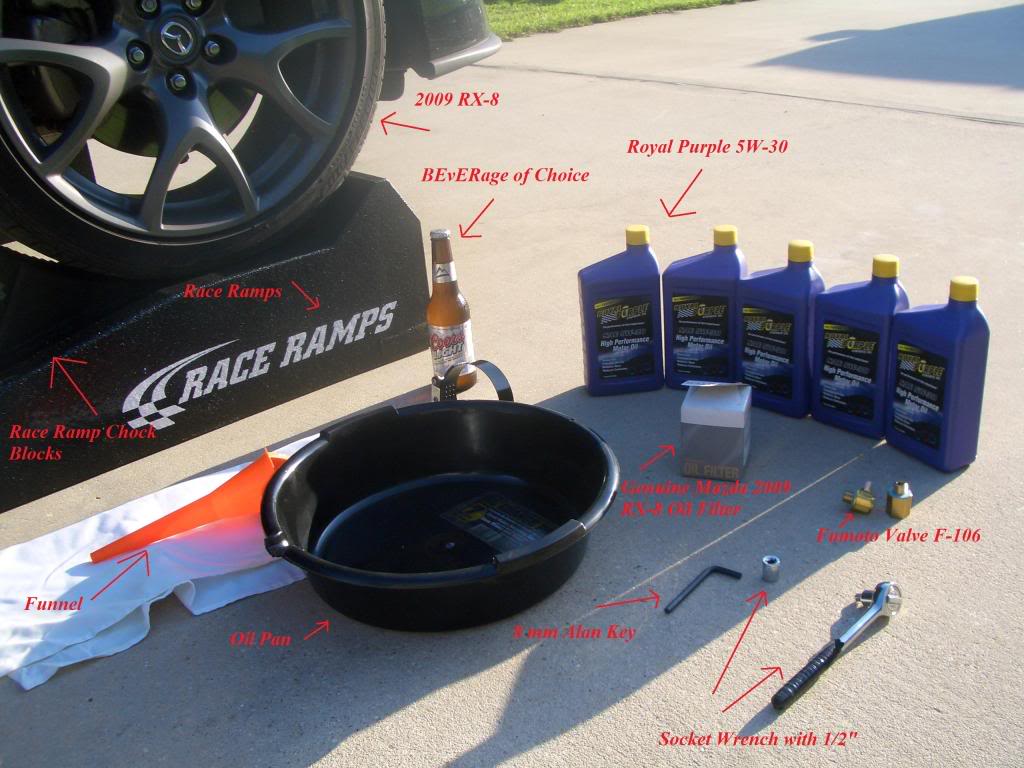
Oil Change Parts Required:
Oil Change Parts/Tools Optional:
Procedure:
Step 1:
Lay out race ramps on smooth even surface (sweep away any rocks or debris).
Drive up to the ramps, check to ensure even approach and readjust if needed.
Drive onto ramps put car in park (for Autos) or reverse (for manuals) and use the E-brake. Turn the car off.
Insert Chock Blocks behind wheels (as shown in Figure 1).
Lay out all needed tools/parts nearby.
Figure 1
Step 2:
Pop Hood
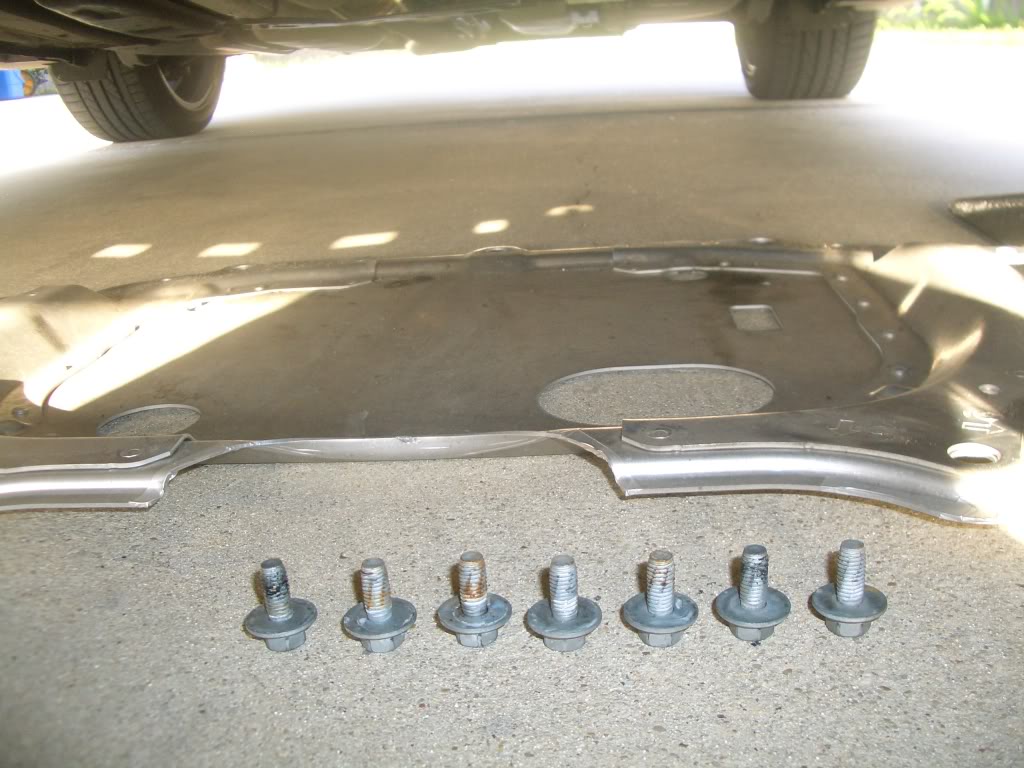
From underneath the car locate the silver oil sump cover and remove the 7x 1/2" hex bolts. See Figure 2 for reference:
Figure 2

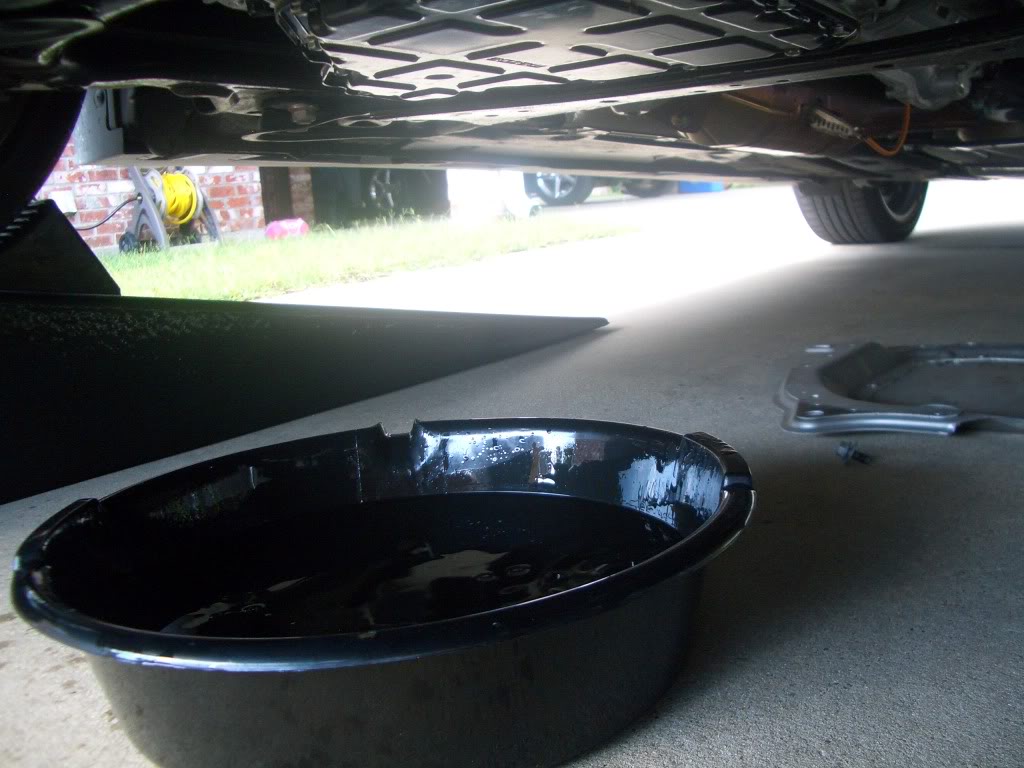
Put this cover to the side for now.
Figure 3
Using gloves (as the oil may be very hot) use the 8mm alan key to remove the recessed oil plug. Be sure that your oil pan is positioned below the plug to catch all of the oil. This step will take about 5-10 minutes so go grab some shop towels and your BEvERage and take a break.
Figure 4
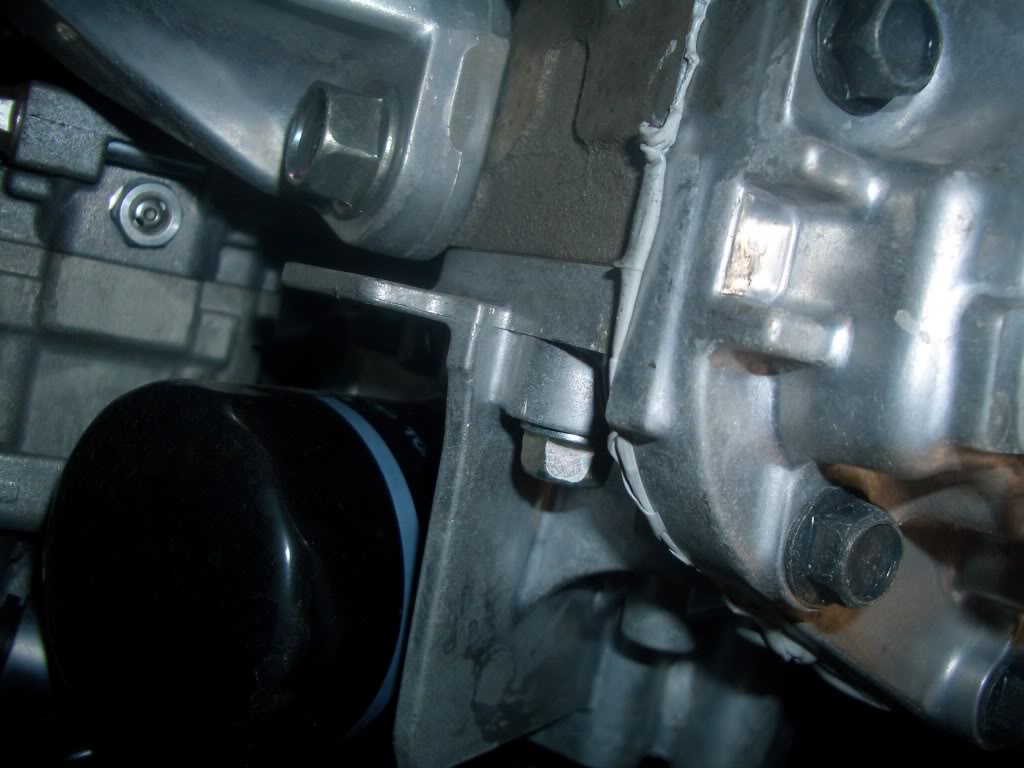
After all of the oil has drained from the sump, locate and remove the oil filter. Oil filter location can be seen in Figure 5.
Figure 5
This is the hardest step and I recommend picking up the same tool the technicians at the dealership use the remove this filter. If you have already gotten this far and cannot get the oil filter off then use the screwdriver method. (Not ideal as your used filter will look something like Figure 6.)
Figure 6
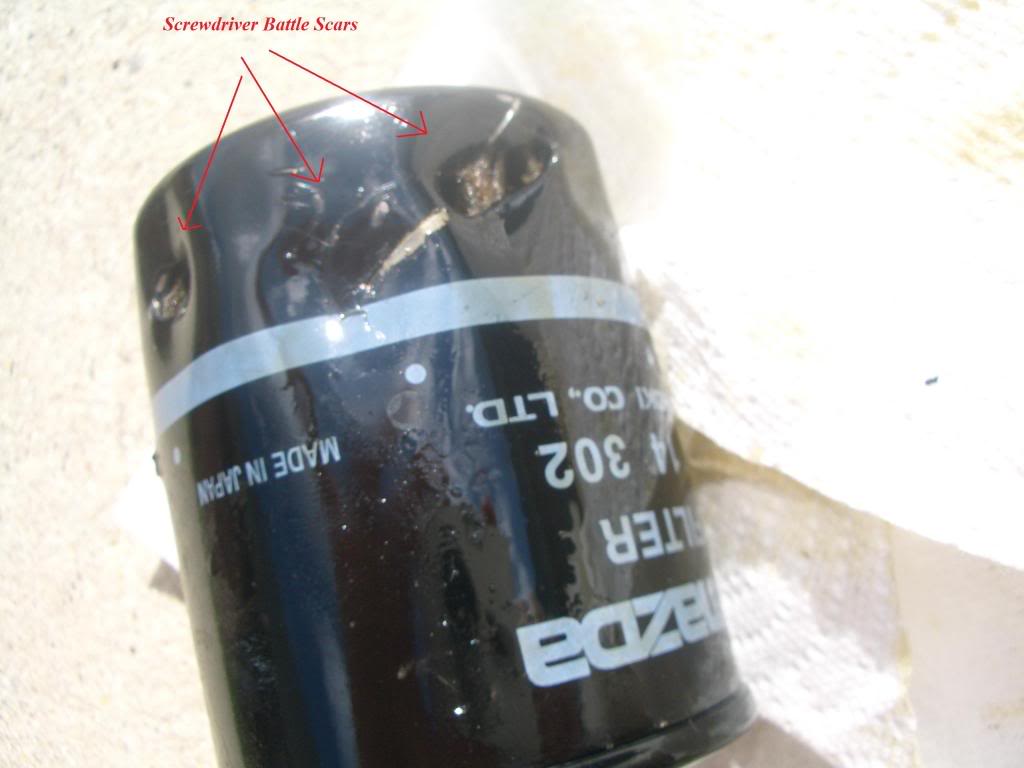
Essentially what you do is puncture the oil filter (use a hammer if needed) with a long screwdriver and use that as leverage to loosen the filter.
After the filter is removed lightly lube your new filter's seal with new oil. Then screw it on hand tight. (Or tighter if you have the correct oil filter wrench tool.)
Figure 7
Next, install your Fumoto oil plug (or regular OEM plug) back into the oil sump as shown in Figure 8.
*Tip from Pico - Replace the crush washer on the drain plug every or every other oil change.
Figure 8
Fill engine oil reservoir with 5-6 qt's of quality 5W-30 oil. This is where a funnel is handy.
Figure 9
Now turn on the engine for a few minutes and look for leaks (I do not recommend going under the vehicle while it is running even with the chock blocks in place.)
If leaks are found simply tighten the leaking part. If no leaks are detected turn off the engine and reinstall the oil sump cover. CAUTION the oil sump surface including the Fumoto valve if used will be hot. Use gloves if needed.
Figure 10
Oil Change Complete.
Thank you all for reading. Hopefully this helps out with changing your own oil.
Feel free to add advice/tips/tricks or PM me errors in this procedure.
This was my first time ever changing my own oil (in the RX-8).
Oil Change Parts Required:
- Oil Filter - http://www.finishlineperformance.com...cat=273&page=1
- Oil Pan - Walmart
- Oil (5W-20) - Amazon.com: Royal Purple Street Synthetic Motor Oil - SAE 5w30, Quart Bottle, Pack of 12: Automotive
- RX-8 - http://www.mazdausa.com/MusaWeb/disp...RX8#/colors360
Oil Change Parts/Tools Optional:
- Fumoto Oil Plug Drain Valves (HIGHLY recommended) - [url=http://www.qwikvalve.com/F-106-14mm-1.5.html[/url]
- Funnel
- Socket Wrench with 1/2" Hex Socket
- 8 mm Alan Key
- Race Ramps - 56" Ramps - Car Ramps | Get your Car Up 8"! | Race Ramps, your best solution for Lightweight Low Profile Car Ramps!
- Chock Blocks
- Gloves
- BEvERage
Procedure:
Step 1:
Lay out race ramps on smooth even surface (sweep away any rocks or debris).
Drive up to the ramps, check to ensure even approach and readjust if needed.
Drive onto ramps put car in park (for Autos) or reverse (for manuals) and use the E-brake. Turn the car off.
Insert Chock Blocks behind wheels (as shown in Figure 1).
Lay out all needed tools/parts nearby.
Figure 1
Step 2:
Pop Hood
From underneath the car locate the silver oil sump cover and remove the 7x 1/2" hex bolts. See Figure 2 for reference:
Figure 2
Put this cover to the side for now.
Figure 3
Using gloves (as the oil may be very hot) use the 8mm alan key to remove the recessed oil plug. Be sure that your oil pan is positioned below the plug to catch all of the oil. This step will take about 5-10 minutes so go grab some shop towels and your BEvERage and take a break.
Figure 4
After all of the oil has drained from the sump, locate and remove the oil filter. Oil filter location can be seen in Figure 5.
Figure 5
This is the hardest step and I recommend picking up the same tool the technicians at the dealership use the remove this filter. If you have already gotten this far and cannot get the oil filter off then use the screwdriver method. (Not ideal as your used filter will look something like Figure 6.)
Figure 6
Essentially what you do is puncture the oil filter (use a hammer if needed) with a long screwdriver and use that as leverage to loosen the filter.
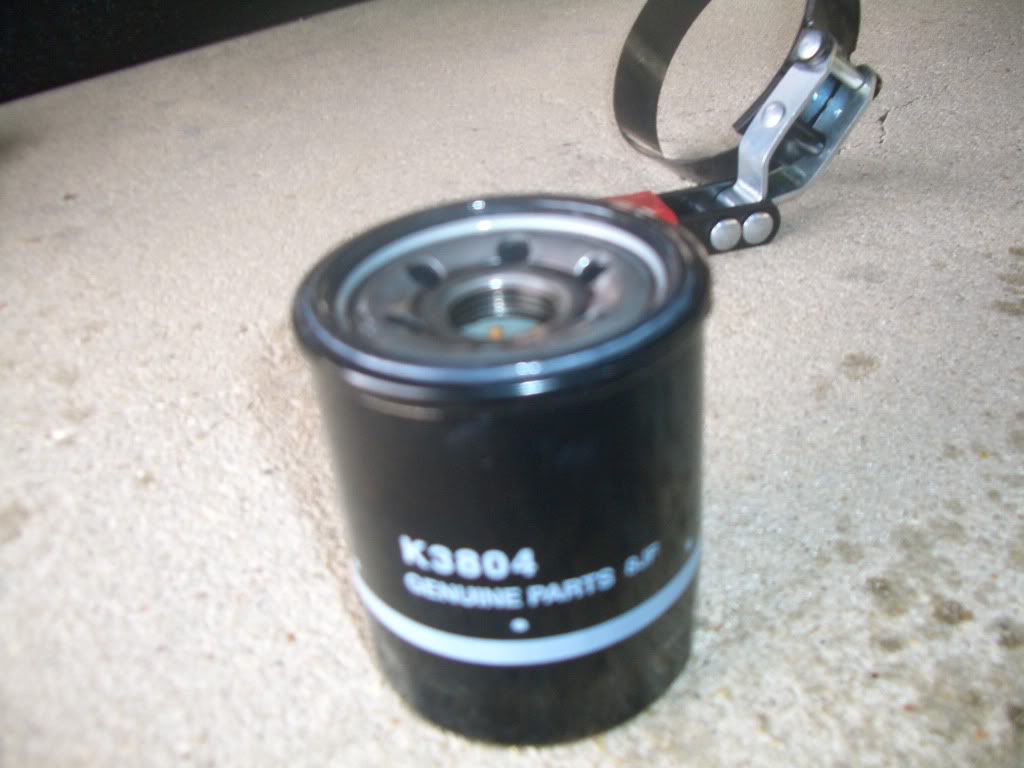
After the filter is removed lightly lube your new filter's seal with new oil. Then screw it on hand tight. (Or tighter if you have the correct oil filter wrench tool.)
Figure 7
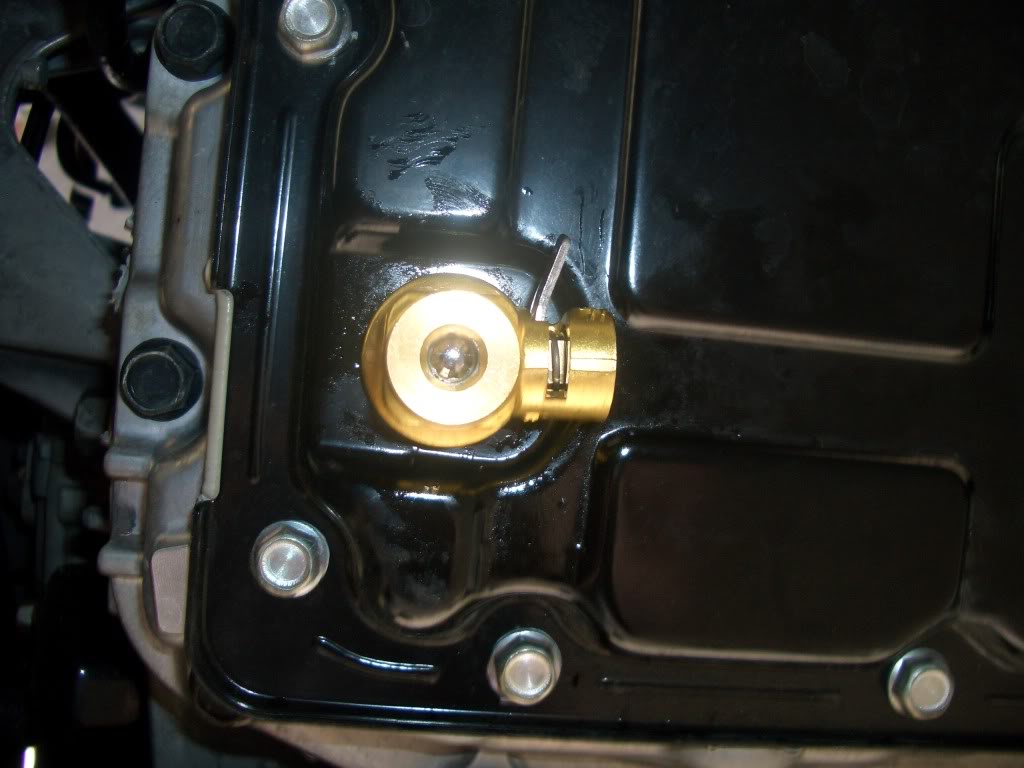
Next, install your Fumoto oil plug (or regular OEM plug) back into the oil sump as shown in Figure 8.
*Tip from Pico - Replace the crush washer on the drain plug every or every other oil change.
Figure 8
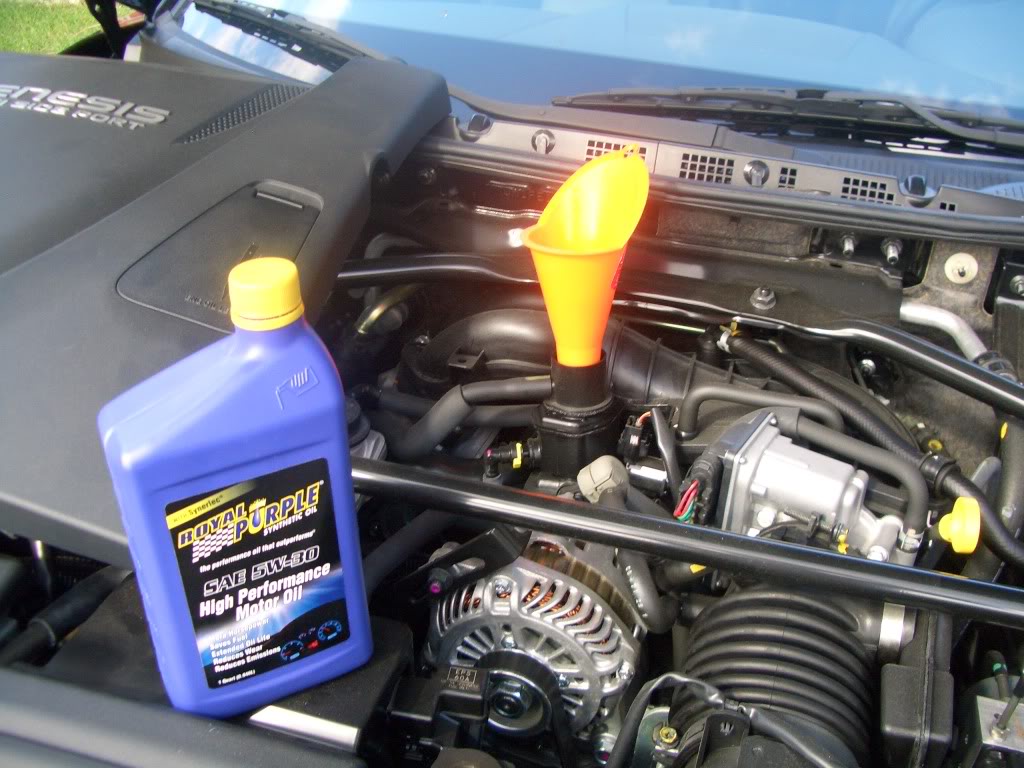
Fill engine oil reservoir with 5-6 qt's of quality 5W-30 oil. This is where a funnel is handy.
Figure 9
Now turn on the engine for a few minutes and look for leaks (I do not recommend going under the vehicle while it is running even with the chock blocks in place.)
If leaks are found simply tighten the leaking part. If no leaks are detected turn off the engine and reinstall the oil sump cover. CAUTION the oil sump surface including the Fumoto valve if used will be hot. Use gloves if needed.
Figure 10
Oil Change Complete.
Thank you all for reading. Hopefully this helps out with changing your own oil.
Feel free to add advice/tips/tricks or PM me errors in this procedure.
This was my first time ever changing my own oil (in the RX-8).
Last edited by Are-Ex-Eight; 10-10-2009 at 09:57 AM.


 10-10-2009, 12:22 AM
#9
Registered User

Join Date: Aug 2009
Location: Northwest
Posts: 98
Likes: 0
Received 0 Likes
on
0 Posts
Do you have to drop the sump cover to get to the drain plug?
Does anyone know the plug torque spec? I'm a motorcycle mechanic and fussy about torque cause I'm used to aluminum or magnesium cases.
Does anyone know the plug torque spec? I'm a motorcycle mechanic and fussy about torque cause I'm used to aluminum or magnesium cases.
 10-10-2009, 09:05 AM
#11
Torque - ask your dealer, I would guess 18 ft lbs as that's pretty standard for bolts on oil systems. I just crank it tight with a crescent wrench (the Fumoto valve). Not sure how you would torque this without a 8mm hex straight alan key connected to your 8mm socket on a torque wrench.
And thanks for all the comments guys, it's nice to give something back to the site that has helped me with a ton of stuff on my 8. These forums are invaluable when it comes to troubleshooting or DIY's.
Last edited by Are-Ex-Eight; 10-10-2009 at 09:10 AM.
10-10-2009, 09:18 AM
#12
Registered

Join Date: Sep 2009
Location: SF Bay Area
Posts: 250
Likes: 0
Received 0 Likes
on
0 Posts
10-10-2009, 09:23 AM
#13
It's Complicated
iTrader: (2)

Join Date: Feb 2008
Location: Dirty Jerz
Posts: 1,780
Likes: 0
Received 0 Likes
on
0 Posts
The one thing you might want to add would be replacing the crush washer located on the drain bolt. This could be done every or every other oil change. Nonetheless, Good article
The '09 has great location's for the fill and dipstick. only took Mazda 5 years to see that checking oil was a bitch haha
The '09 has great location's for the fill and dipstick. only took Mazda 5 years to see that checking oil was a bitch haha
10-10-2009, 09:58 AM
#14
The one thing you might want to add would be replacing the crush washer located on the drain bolt. This could be done every or every other oil change. Nonetheless, Good article
The '09 has great location's for the fill and dipstick. only took Mazda 5 years to see that checking oil was a bitch haha
The '09 has great location's for the fill and dipstick. only took Mazda 5 years to see that checking oil was a bitch haha
 06-12-2010, 05:16 PM
#17

the 09+ stock oil pressure is too high for EVERY aftermarket filter out there(which is around 13-17 psi). and chances are 1/2 the time your aftermarket filter will be in bypass mode = not filtering anything.
So use Stock filter for 09+ RX-8.
06-13-2010, 12:34 PM
#20
Registered

 10-23-2013, 02:44 AM
#22
Registered

Fumoto Valve for S2
Evening, all. I just finished using this DIY to complete my first self-performed oil change on the RX-8. Was really helpful.
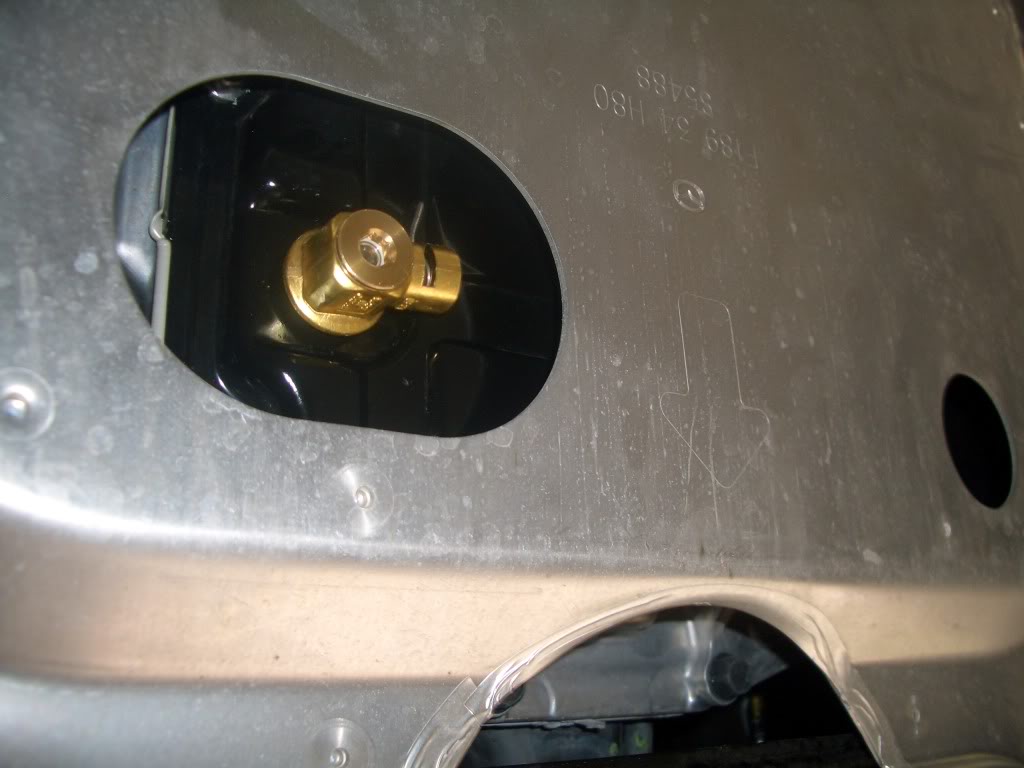
BUT... for the benefit of other S2 owners who contemplate ordering a Fumoto Valve and run into articles here with part numbers for S1 cars, take note: The S2's oil plug, while still recessed, is on the bottom of the oil pan, whereas on the S1 it's on the bottom side of the oil pan.
That means S2 owners shouldn't try to use the recommended Fumoto adapter for the S1 (ADL-106), and if you try to use the adapter on a series 2, it will look stupid, it will stick out an inch or so beyond the metal under tray, and it will create a nasty ground clearance issue for you.
The pics in this article show both a valve with an adapter alongside it (uninstalled) and also the Fumoto valve installed without the adapter. Don't be confused -- the adapter is no good for you if you drive an S2.
The standard Fumoto valve (I ordered F106S b/c I wanted a hose nipple) fits just fine with an additional crush washer used as a spacer. So far no leaks. I will watch the valve carefully for signs of leakage and update this thread if I have any problems.
Oh, and I also found the dealer installed an S1 filter the last time they did an oil change on this car. What's up with that? Make sure you're using the right filter for the S2 also (Mazda Genuine, part number N3R1-14-302). If you want to know why, just search.
- C.
12-22-2017, 04:02 PM
#23

Oil Dipstick Part Number
I couldn't find anywhere to put this information so I think this thread is most appropriate. I, unfortunately, had the ring on my dipstick break off. I don't know why but it did. I dont wish that on anyone. It sucks. It was IMPOSSIBLE to find the part number here since I know that buying it online is cheaper but I couldn't find the right one, so I went ahead and bought it from the dealer. The part number for a Series 2 Renesis oil dipstick is N3R1-10-450B. Hopefully this helps anyone that might encounter a broken dipstick.
11-26-2022, 03:52 PM
#24

question on removing oil drain plug
I was going to try to do a quick oil change myself instead of the dealer this time on my 2010 RX8. I see from the explanations there is that metal cover that must be removed. So I don't have ramps or anything so I was hoping to just reach under and remove the plug and let it drain.
So since the plug is there in the opening of the metal cover is there any reason I couldn't just remove the plug without taking off the metal cover? I know I can reach it as I just tried.
Or would that be a bad idea?
And just reaching underneath with the metal cover on would I have any chance of getting the plug back on?
Lastly is the plug just an 8mm allen bolt?
Thanks for any help if there is still anyone out there reading this thread.
11-26-2022, 04:44 PM
#25
Registered

I was going to try to do a quick oil change myself instead of the dealer this time on my 2010 RX8. I see from the explanations there is that metal cover that must be removed. So I don't have ramps or anything so I was hoping to just reach under and remove the plug and let it drain.
So since the plug is there in the opening of the metal cover is there any reason I couldn't just remove the plug without taking off the metal cover? I know I can reach it as I just tried.
Or would that be a bad idea?
And just reaching underneath with the metal cover on would I have any chance of getting the plug back on?
Lastly is the plug just an 8mm allen bolt?
Thanks for any help if there is still anyone out there reading this thread.
So since the plug is there in the opening of the metal cover is there any reason I couldn't just remove the plug without taking off the metal cover? I know I can reach it as I just tried.
Or would that be a bad idea?
And just reaching underneath with the metal cover on would I have any chance of getting the plug back on?
Lastly is the plug just an 8mm allen bolt?
Thanks for any help if there is still anyone out there reading this thread.
The following users liked this post:
simsim99 (11-26-2022)