
DIY: Remove SSV (beta/teaser video)
 10-16-2009, 07:59 AM
#1

DIY: Remove SSV (video)
Here is the video for removing the SSV:
This post was updated to help resolve the SSV related codes so nobody rushes into doing this when it could be something else generating the error codes.
Lessons learned and member suggestions have been compiled into this one post so nobody has to read the whole thread for answers
If you plan on removing the valve because a "valve stuck open/closed" error was generated, please verify the valve is actually stuck before performing this task.
If you want to remove and clean the SSV for preventative maintenance purposes, I see no problem in that.
To test the SSV to see if its indeed stuck, follow this DIY for troubleshooting the intake valves:
https://www.rx8club.com/series-i-do-yourself-forum-73/diy-troubleshoot-intake-valves-174009/
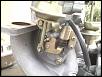
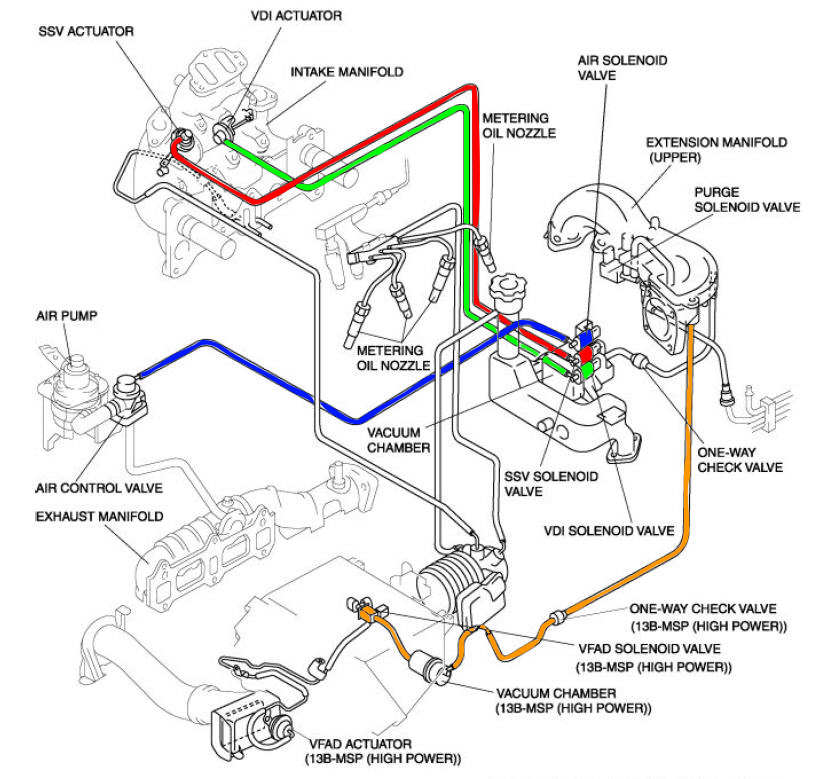
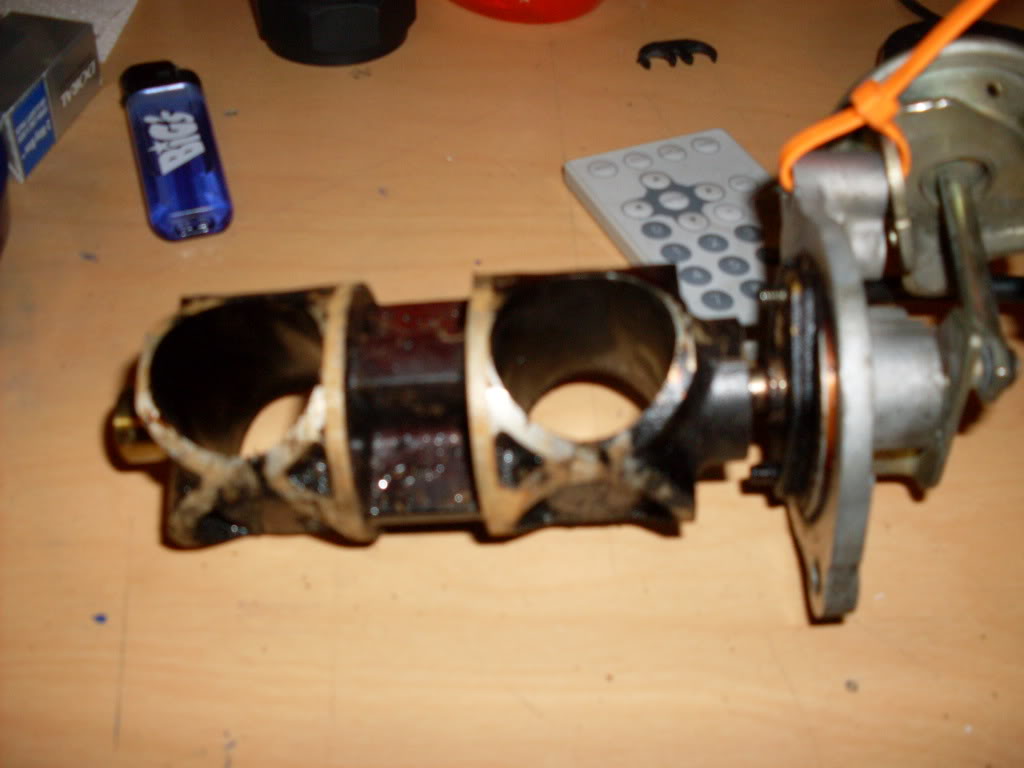
Here is an up-close shot at the SSV assembly:
If you find that the valve moves smoothly and the actuator holds vacuum when applied, move onto the SSV solenoid:
https://www.rx8club.com/series-i-do-yourself-forum-73/diy-test-solenoid-190364/
With the solenoid out, also clean the electrical contacts.
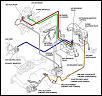
This shows where the solenoids are located:

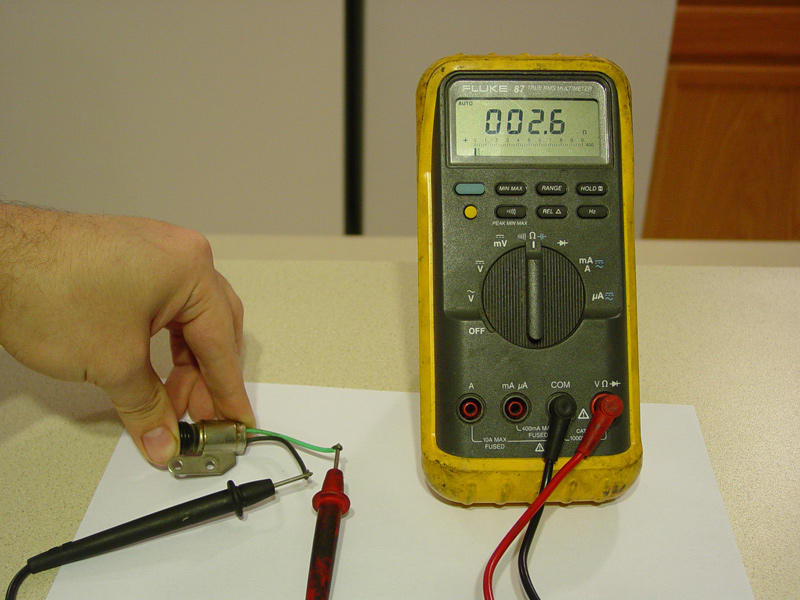
If the solenoid appears to function properly, test the impact switch.
You'll need to disconnected the harness which is near the switch and valve.
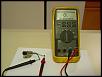
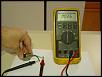
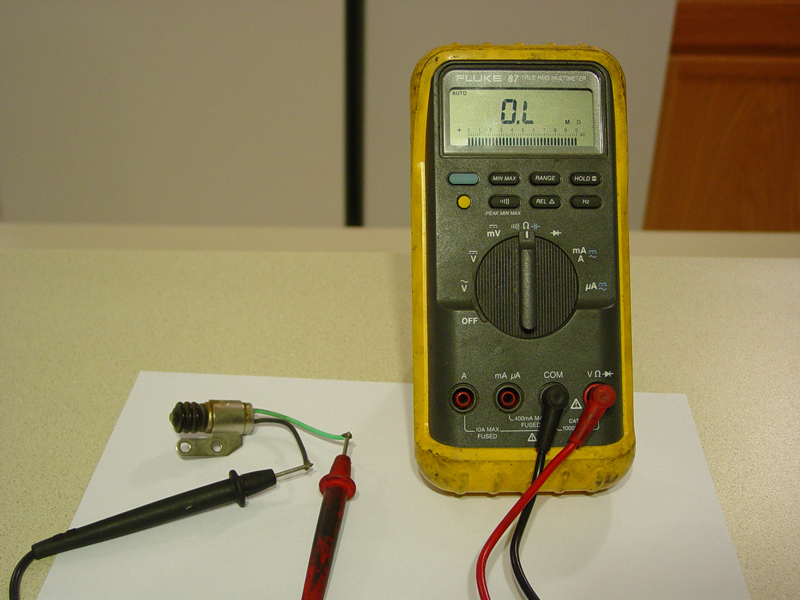
Then use a meter to test the resistance across the two terminals in the connector.
The switch is N/O (normally open) so you shouldn't read anything at first, then when you press the switch you should see between 2-3ohms.
If when testing the valve operations you noticed it stuck or sticking, then follow the video guide and remove/clean the valve.
On a difficulty scale of 1 to 5, I might rate this at 3.
Not as difficult as replacing the clutch/flywheel or pulling the engine, but definitely not for someone who is just learning to work on cars.
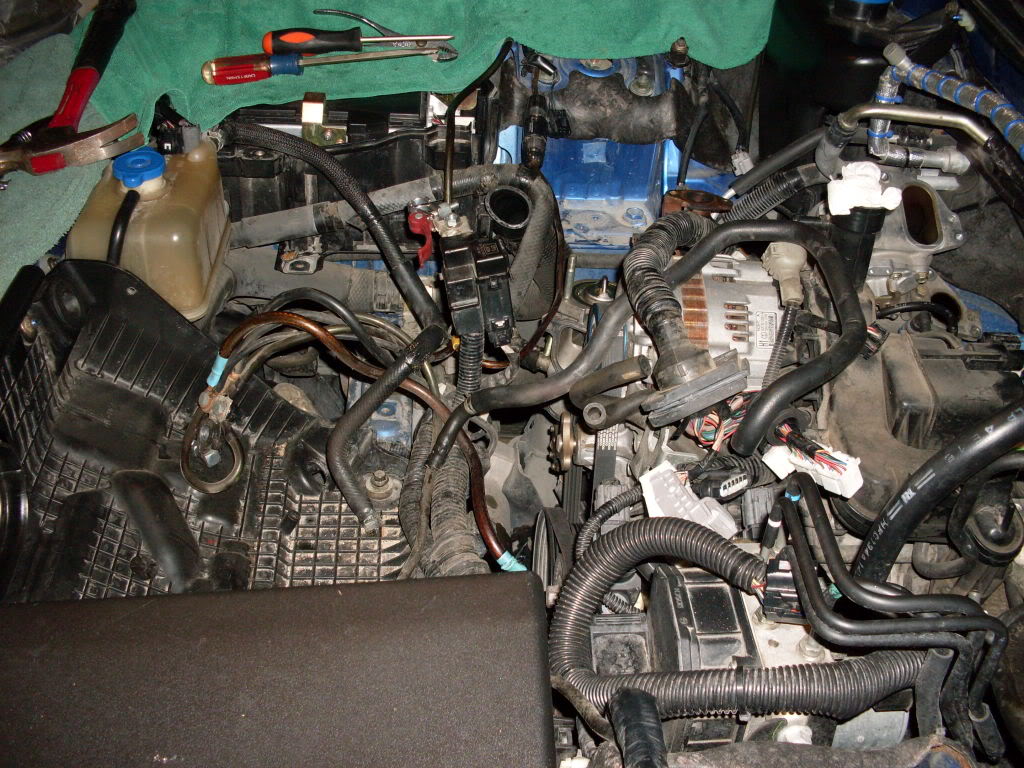
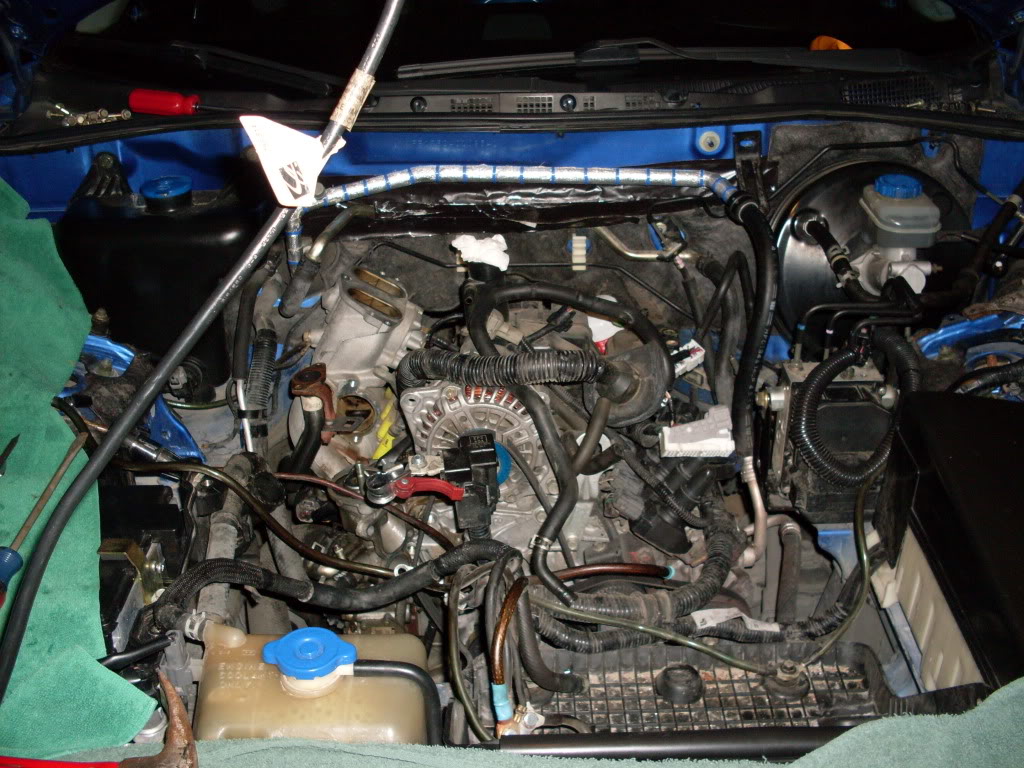
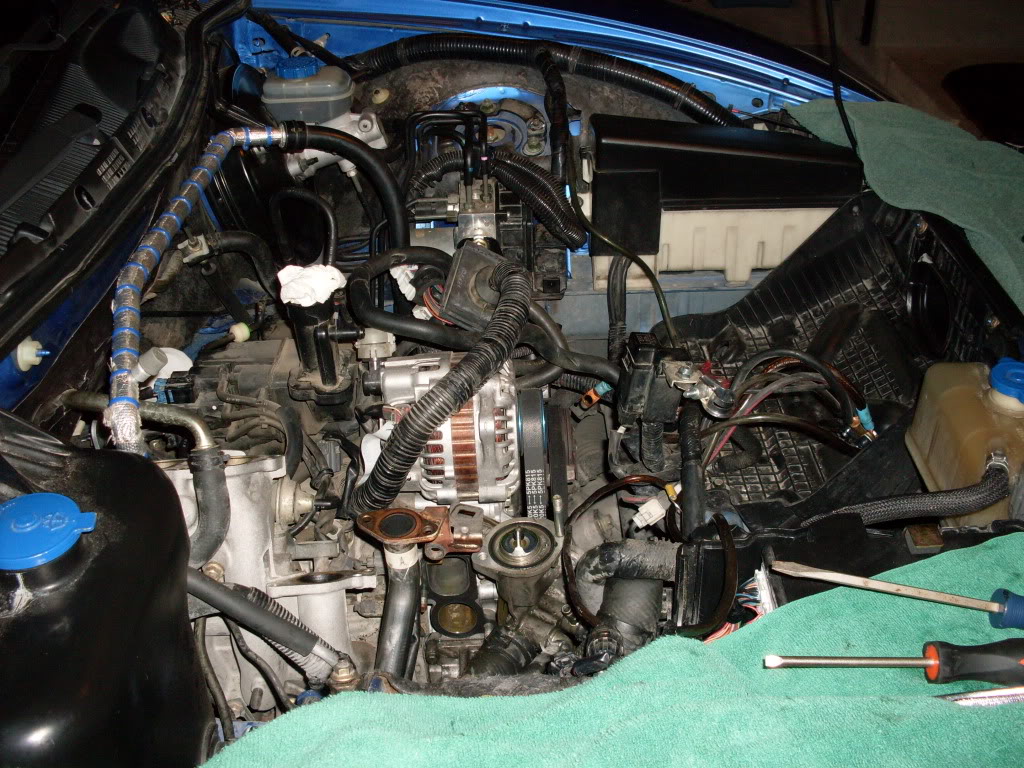
The basic components to remove are:
Now with just removing these components it'll be a very tight fit and difficult to reach some of the bolts, which makes it easier to drop them into the abyss (I had a magnet rod to catch them just in case).
The few times I performed this I experimented taking some components off while leaving others still installed, then I mixed them up next time.
This can be considered optional, but I found removing additional components made the removal AND reinstalling simpler.
Here are additional components to remove:
Hard pipe- Having this in the way made it difficult to remove the thermostat.
You also needed to bend it slightly out of the way to slide the SSV out.
Difficult to align the SSV gasket during installation.
Air Pump- This removed made it easier to reach some bolt.
This is very easy to remove and takes a couple minutes, why not do it to save some hassle.
PCM Wires- The wire loom the goes to the PCM is difficult to work around and moving this out of the way will free up some room.
IMPORTANT:
The video shows us spraying the carb cleaner into the housing.
What you also want to do is stick a shop rag in there and lay in on the bottom, covering the runners so when you spray into the housing, the build-up doesn't run into the engine.
Having no rags covering the runners can cause start-up issues and fowl the spark plugs.
You can wipe the bottom with carb cleaner sprayed onto a shop rag to finish the job.
Some of you might remember when a stuck SSV was first introduced back in Dec '08 when I was working on Vyndictive's stalling issues:
https://www.rx8club.com/series-i-trouble-shooting-95/rpm-dropping-%3D-engine-stalling-162200/
We managed to free-up the valve, but knew that it was only a temporary fix.
His car ran great all summer, but now that Ohio's temps are dropping into the 30s, he started having issues again almost similar to last year.
Part Numbers:
SSV Solenoid- KL0118741
Impact Switch- N3H4189B1
Thanks to Ash for this:
This post was updated to help resolve the SSV related codes so nobody rushes into doing this when it could be something else generating the error codes.
Lessons learned and member suggestions have been compiled into this one post so nobody has to read the whole thread for answers
If you plan on removing the valve because a "valve stuck open/closed" error was generated, please verify the valve is actually stuck before performing this task.
If you want to remove and clean the SSV for preventative maintenance purposes, I see no problem in that.
To test the SSV to see if its indeed stuck, follow this DIY for troubleshooting the intake valves:
https://www.rx8club.com/series-i-do-yourself-forum-73/diy-troubleshoot-intake-valves-174009/
Here is an up-close shot at the SSV assembly:

If you find that the valve moves smoothly and the actuator holds vacuum when applied, move onto the SSV solenoid:
https://www.rx8club.com/series-i-do-yourself-forum-73/diy-test-solenoid-190364/
With the solenoid out, also clean the electrical contacts.
This shows where the solenoids are located:

If the solenoid appears to function properly, test the impact switch.
You'll need to disconnected the harness which is near the switch and valve.
Then use a meter to test the resistance across the two terminals in the connector.
The switch is N/O (normally open) so you shouldn't read anything at first, then when you press the switch you should see between 2-3ohms.
If when testing the valve operations you noticed it stuck or sticking, then follow the video guide and remove/clean the valve.
On a difficulty scale of 1 to 5, I might rate this at 3.
Not as difficult as replacing the clutch/flywheel or pulling the engine, but definitely not for someone who is just learning to work on cars.
The basic components to remove are:
- Battery and battery box
- ACV (Air control Valve)
- Water Pump Pulley
- Drive Belt
- Alternator Bracket
- Thermostat
- SSV
Now with just removing these components it'll be a very tight fit and difficult to reach some of the bolts, which makes it easier to drop them into the abyss (I had a magnet rod to catch them just in case).
The few times I performed this I experimented taking some components off while leaving others still installed, then I mixed them up next time.
This can be considered optional, but I found removing additional components made the removal AND reinstalling simpler.
Here are additional components to remove:
- Hard pipe from the ACV to the exhaust manifold.
- Air Pump
- Disconnect wires to PCM.
Hard pipe- Having this in the way made it difficult to remove the thermostat.
You also needed to bend it slightly out of the way to slide the SSV out.
Difficult to align the SSV gasket during installation.
Air Pump- This removed made it easier to reach some bolt.
This is very easy to remove and takes a couple minutes, why not do it to save some hassle.
PCM Wires- The wire loom the goes to the PCM is difficult to work around and moving this out of the way will free up some room.
IMPORTANT:
The video shows us spraying the carb cleaner into the housing.
What you also want to do is stick a shop rag in there and lay in on the bottom, covering the runners so when you spray into the housing, the build-up doesn't run into the engine.
Having no rags covering the runners can cause start-up issues and fowl the spark plugs.
You can wipe the bottom with carb cleaner sprayed onto a shop rag to finish the job.
Some of you might remember when a stuck SSV was first introduced back in Dec '08 when I was working on Vyndictive's stalling issues:
https://www.rx8club.com/series-i-trouble-shooting-95/rpm-dropping-%3D-engine-stalling-162200/
We managed to free-up the valve, but knew that it was only a temporary fix.
His car ran great all summer, but now that Ohio's temps are dropping into the 30s, he started having issues again almost similar to last year.
Part Numbers:
SSV Solenoid- KL0118741
Impact Switch- N3H4189B1
Thanks to Ash for this:
Just thought I would put up the Part Number of the Modified Mazda SSV and Bolt..You Must also order the LONGER Bolt.
N3H5-20-160F SSV Valve .....Must be an F
9979-60-640 Bolt...Longer....Must use this bolt with this new SSV
N3H4-20-155A Gasket SSV
N3H1-13-996 Gasket , ACV (2, if needed for air pipe)
N3H5-20-160F SSV Valve .....Must be an F
9979-60-640 Bolt...Longer....Must use this bolt with this new SSV
N3H4-20-155A Gasket SSV
N3H1-13-996 Gasket , ACV (2, if needed for air pipe)
Last edited by Jon316G; 10-28-2011 at 09:14 AM. Reason: Moved video link to the top

The following 4 users liked this post by Jon316G:
Little White Rotary (08-01-2023),
rickymaz8 (08-24-2020),
Silverhorn (01-18-2022),
wannawankel (10-12-2019)
10-16-2009, 09:53 AM
#2

Excellent work Jon...
To think, all of this from taking your car to midas for an oil change instead of doing it yourself AND not having a proper catch can. . . .
Lessons:
1. Unless this looks like fun. Do your own oil changes.
2. Put on a catch can. . . for 40 bucks, the piece of mind alone is worth it.
3. This problem is hard to diagnose because it is similar with so many other problems of the RX8. (plugs, coils, fuel pump, bad gas, etc)
Also, I am one furry man-beast!
 10-17-2009, 02:35 PM
#4
Super Moderator
Love your work Jon...excellent... much appreciated.
12-08-2009, 11:53 PM
#6
Please read through this thread:
https://www.rx8club.com/showthread.p...ighlight=P2070
The following users liked this post:
wannawankel (05-05-2020)
 12-09-2009, 12:22 AM
#8
What you saw in that video wasn't "normal" buildup, but what can occur if you overfill your engine oil.
Vyndictive learned the hard way to do his own oil changes instead of trusting Mitas
This incident is why he bought a catch can right away!
Vyndictive learned the hard way to do his own oil changes instead of trusting Mitas
This incident is why he bought a catch can right away!
12-09-2009, 03:17 PM
#9
I ate the last taco...

Join Date: Sep 2009
Location: Texas!
Posts: 10
Likes: 0
Received 0 Likes
on
0 Posts
Understood... The CEL actually went away this morning and it "feels" like the vavles are working again so it must not have been seriously stuck. Still, I think I'll take the UIM off and hose it all down with a little carb cleaner. My 8 does have nearly 93k on the clock... I'll install an oil catch can as well.
12-09-2009, 06:44 PM
#10
Surf Hard, Drive Hard

Join Date: Feb 2007
Location: Indialantic, Florida
Posts: 7,840
Likes: 0
Received 12 Likes
on
9 Posts
Don't see what the big deal is. 
According to the video, you had it out in about 4 minutes tops!
In all seriousness, that looks like a major pain in the @ss!
I was kinda shocked to see how much was on there!
I realize this was probably an somewhat extreme case.
Good job on the video!
I just hope I never have to use it!
According to the video, you had it out in about 4 minutes tops!
In all seriousness, that looks like a major pain in the @ss!
I was kinda shocked to see how much was on there!
I realize this was probably an somewhat extreme case.
Good job on the video!
I just hope I never have to use it!
12-09-2009, 07:21 PM
#11
LOL... yeah, it probably took an hour total to get it out.
I was training Vyndictive and letting him do it himself (I always encourage people to work on their own car) so I cut out most of the unnecessary stuff.
It really isn't that big of a pain, just need patients and a little bit of knowledge of what you're doing.
Even though the video shows me pulling the valve out quickly, it doesn't show the tremendous about of time spent to get it going.
All the crud really fused the valve into the housing and we had to squirt carb cleaner onto a portion of the valve that was exposed, and then work the valve in and out until it finally came out.
But like you said, this was an extreme case.
When I pulled my valve, it slide out with very little resistance.
12-16-2009, 08:49 AM
#12
Registered User

Join Date: Feb 2009
Location: Pataskala, Ohio
Posts: 11
Likes: 0
Received 0 Likes
on
0 Posts
Carbon buildup
Hey guys/gals. Just back to reading some threads. I had the intake manifold valve cleaned last November from the carbon buildup. My check engine light has come on a few times since then and I took it to Advance Auto for the code, but was able to make the light go out after some hard driving. Unfortunately, it's back on again and the cold temps in Ohio is making it hard to get the engine hot enough to burn it off. Since I was quoted a cost of over $2000 to get it cleaned, I'm trying to avoid that. Seems to me that there should be a recall to fix this. Anyway, I've read some of the threads giving instructions to clean it (thanks Jon for the video) but not sure my husband will be able to do this. I've seen some threads mentioning Seafoam, but not sure what that is. My car's a 2004 manual with over 80,000 miles. I'm not experiencing any performance issues (and hope I won't) but want to find a way to avoid the buildup.
As a side note, I'm wondering if the automatic transmissions are having this problem. How would they keep the RPM's high enough to burn it off?
Can anyone tell me what the Seafoam is and how to use it? I love driving this car and would like to keep it for another five years. Any other tips would be appreciated.
12-16-2009, 04:48 PM
#13
SweetBlue04- Where in Ohio do you live?
Maybe we can meet-up and I can show you and your husband how to do it.
Seafoam is used to "decarb" the engine.
Unfortunately, if you squirt the fluid into the intake manifold's maintenance ports, it'll never reach the SSV.
And trying to squirt it through the upper intake manifold not only gets a small percentage of the closed valve, but some of the fluid also goes down the auxiliary runners and never reaches the SSV.
So you really can't get a good soaking on the valve this way.
 12-16-2009, 06:56 PM
#15
Registered
iTrader: (3)

Join Date: Aug 2004
Location: chicago
Posts: 436
Likes: 0
Received 0 Likes
on
0 Posts
This is sweet man, thank you. I planned to do this this weekend, and the video will definitely make the process quicker and easier. I'm going to be taking off the manifold as well since I have the Pettit SC and need to change the sc oil and work on a few other things.
Any other things to clean out if all the stuff is removed?
Also some time ago I had that marbles in a can sound show up. Happened a while back but its been relatively quiet lately, then again I haven't pushed the car much because of the weather. Anyway I've read that the sound can be related to the SSV. Any idea?
thanks
12-17-2009, 07:37 AM
#16
Registered User
Join Date: Feb 2009
Location: Pataskala, Ohio
Posts: 11
Likes: 0
Received 0 Likes
on
0 Posts
Unfortunately, we live about 25 miles east of Columbus in the Pataskala area. Hubby is a do-it-yourselfer but is clueless when it comes to the RX8. Basic maintenance is about all he has been able to do.
01-07-2010, 12:21 AM
#18
Registered

Join Date: Mar 2008
Location: Ledyard, CT
Posts: 81
Likes: 0
Received 0 Likes
on
0 Posts
I have had this problem with the ssv being stuck open from last summer of 09. The code came up and I took the car in to have it looked at. They told me that they hooked up a hand pump and the ssv open and closed normally. Then they said that I would have to pay a 200-300 dollars to have them find the problem. So I have not had them fix it yet. During the end of the summer the engine light would stay on and turn off every onece in awhile. Then when it started to get really cold this past month, I have not seen the engine light come on at all. So is that the engine doesnt need to use the ssv as much when it is cold out and I mean 35 and below. Do you think that when it warms up this spring that I will see the engine light come on again. Also has anyone ever have to have the selonoid or switch replaced? Would they have to remove the engine to replace those two parts.
01-07-2010, 12:32 AM
#19
If the valve opens and closes smoothly, then its either the impact switch (which tells the PCM that the valve is open or closed) or its the solenoid (or connection to the solenoid).
No.
To get to the solenoids, you'll need to remove the upper intake manifold (the black piece).
You'll see three solenoids almost in front of the oil filter. The SSV solenoid is the middle one.
I would first disconnect the electrical connection and clean it with contact cleaner, then see if that takes care of it.
If that doesn't work, then I would swap it with one of the other solenoids
Preferably the AIR solenoid which is the top one, and see if that works.
Last edited by Jon316G; 01-07-2010 at 12:39 AM.
01-16-2010, 10:09 AM
#20

well for the last week my car had starting bogging down around 4500 rpm. I checked the coils and wires and the plugs are only a month old. So I checked the SSV valve acuator and the valve is frozen solid.
thanks for the video jon..
took me about 8 hours altogether but my car now runs like a beast unleashed...
thanks for the video jon..
took me about 8 hours altogether but my car now runs like a beast unleashed...
01-16-2010, 04:12 PM
#22
Super Moderator
Nice work...
Even "Blue" zip ties!!!...
Even "Blue" zip ties!!!...
01-23-2010, 10:22 PM
#23
Registered
Join Date: Mar 2003
Location: Austin,Tx
Posts: 229
Likes: 0
Received 0 Likes
on
0 Posts
I'm in the process of doing this myself. How did you get to the third (back/hidden) nut in the UIM? What's the trick. I can seem to reach it very well. Did you have to remove the piece that is used to fill the oil? It seems to be attached to the manifold also.
01-23-2010, 10:27 PM
#24
I've used a combination of extensions and u-joints to get it off.
I've also used a combination wrench to give it a few turn until I could turn it by hand.
Wish there was a simple trick, but it usually ends up in a few curse words.
But once you get the bolts removed from the UIM, you might remove the oil cap to make lifting the UIM out easier.