
DIY: You CAN lower the power seat!
 09-24-2010, 02:10 PM
#1

DIY: You CAN lower the power seat!
I am a 6 foot leather seat and sunroof owner. Yeah, I know, but the car was pretty. All is good until track day. Helmet is a bitch.
Today the seat came out. Now the back of the seat is 7/8" lower. Overall head position looks to be down at least 5/8", maybe more. I need to get out there with a helmet. Right now too tired.
The good news is I think there is a lot easier way to do it than what I went through, and only taking the seat out one time in less than 2 hours. I know there are several out there over the years that have asked, but no real answer. My car did not have the two piece foam seat some have referenced. There is a total of $5 in parts from autozone involved, and a few good whacks with a hammer.
I have pics for the hard way, but I would not do it that way. I will share what it is supposed to look like when you are done when I edit this post. Too freaking tired now. Hopefully someone can verify the easy way and DIY that. Stupid seat is heavy and I think I had it in and out 10 times.

 09-24-2010, 04:14 PM
#3
Details
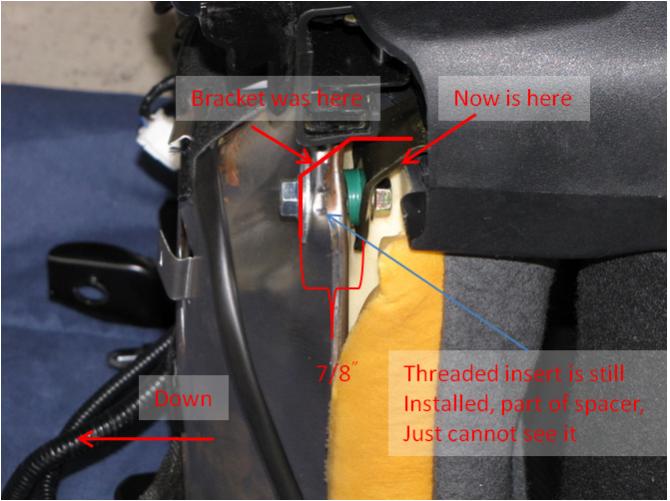
The back of the seat pan is held up by two brackets that are part of the power seat height adjuster system. The brackets go under the seat pan. If you slide the carpet piece at the back over, you can see them. The bolts go through from the bottom into a threaded piece welded to the top of the seat pan.
The idea is to take out the bolts, swing the brackets out of the way, put the brackets above the seat pan, add a spacer, and then bolt it all back together. You CANNOT just use the same inserts. The welds will not hold. You need to bolt through them and add a fender washer [edited, used to say bolt, not washer] on the bottom of the pan.
Along the way you will run into a sensor under the seat that seems to keep track of where the seat is. The seat pan will hit it if you lower it. There is an indentation in the pan for the sensor, just make it bigger. I have a wonderful little 2lb sledge for jobs like this. I was able to hit it when the seat was all the way out, and in pieces. I think you could use a short steel bar and a hammer to reshape the pan around the sensor if you were careful. That will save a TON of work. You get to the bolts that hold the front of the seat pan in through all the controls and side plastic pieces.
The only other metal bending is to bend down the edges to allow the bracket to fit in the rear corners. I am not sure if this is really needed with the spacers I ended up going with (6 5/16" washers taped together, real high tech). I had already bent it to try without the spacers first. You may be good without it.
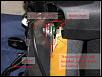
The attached picture is what it would look like when done. Notice the fender washer I added. I have no idea how much support the bracket provided, and wanted to make sure things stayed in place. [edit, the pictures are with the seat in the garage, rotated 90 degrees. If the seat is in stalled, it will look like the picture rotated 90 degrees counter clock wise]
I think you could pull the seat, expand the recess around the sensor, swing the braces out of the way, add the spacers and put it all back together. I was just so happy to get it all back together that I did not want to pull it apart again. I did get the spacers in without taking the front loose (had to drive to autozone for parts). I just did not test the full process.
One other thing I did is reach in and pull the insulation out from between the top of the cross member and the carpet. Clearance is kind of close in here.
Other notes:
White connector sucks to get apart.
Be careful with seat, it has airbags in it, would suck if it exploded.
Bolts were M8-1.24 x 30mm, Nuts were M8-1.25 flanged. washers were 5/16ths.
Picture of what it should look like:
[UPDATE]
Folks have done this mode, with the seats in the car, without disconnecting wires and without needing to worry about bending metal around the sensor thing.
Basic process is to: raise the seat all the way, pull back the cloth at the back, undo the bolts, flip the brackets, use the longer bolt and spacer, with a large fender washer, and then put it back together. There are some pointers in the following posts. I also did the passenger side this way, and it worked well. Thanks everyone who helped work the easy way.
For parts, from SebtownRX8:
If you go to Lowes its on Isle 16 in the pull out doors mustard yellow labled MM 0.8-1.25 bolt/nut/washers
[Update to the Update]
Thanks Athinkerguy4life. Here is a video of the process. Athink also pulled the dead pedal for more room. I never thought of that. Will look at it though.
https://www.rx8club.com/series-i-do-...-video-258529/
The idea is to take out the bolts, swing the brackets out of the way, put the brackets above the seat pan, add a spacer, and then bolt it all back together. You CANNOT just use the same inserts. The welds will not hold. You need to bolt through them and add a fender washer [edited, used to say bolt, not washer] on the bottom of the pan.
Along the way you will run into a sensor under the seat that seems to keep track of where the seat is. The seat pan will hit it if you lower it. There is an indentation in the pan for the sensor, just make it bigger. I have a wonderful little 2lb sledge for jobs like this. I was able to hit it when the seat was all the way out, and in pieces. I think you could use a short steel bar and a hammer to reshape the pan around the sensor if you were careful. That will save a TON of work. You get to the bolts that hold the front of the seat pan in through all the controls and side plastic pieces.
The only other metal bending is to bend down the edges to allow the bracket to fit in the rear corners. I am not sure if this is really needed with the spacers I ended up going with (6 5/16" washers taped together, real high tech). I had already bent it to try without the spacers first. You may be good without it.
The attached picture is what it would look like when done. Notice the fender washer I added. I have no idea how much support the bracket provided, and wanted to make sure things stayed in place. [edit, the pictures are with the seat in the garage, rotated 90 degrees. If the seat is in stalled, it will look like the picture rotated 90 degrees counter clock wise]
I think you could pull the seat, expand the recess around the sensor, swing the braces out of the way, add the spacers and put it all back together. I was just so happy to get it all back together that I did not want to pull it apart again. I did get the spacers in without taking the front loose (had to drive to autozone for parts). I just did not test the full process.
One other thing I did is reach in and pull the insulation out from between the top of the cross member and the carpet. Clearance is kind of close in here.
Other notes:
White connector sucks to get apart.
Be careful with seat, it has airbags in it, would suck if it exploded.
Bolts were M8-1.24 x 30mm, Nuts were M8-1.25 flanged. washers were 5/16ths.
Picture of what it should look like:
[UPDATE]
Folks have done this mode, with the seats in the car, without disconnecting wires and without needing to worry about bending metal around the sensor thing.
Basic process is to: raise the seat all the way, pull back the cloth at the back, undo the bolts, flip the brackets, use the longer bolt and spacer, with a large fender washer, and then put it back together. There are some pointers in the following posts. I also did the passenger side this way, and it worked well. Thanks everyone who helped work the easy way.
For parts, from SebtownRX8:
If you go to Lowes its on Isle 16 in the pull out doors mustard yellow labled MM 0.8-1.25 bolt/nut/washers
[Update to the Update]
Thanks Athinkerguy4life. Here is a video of the process. Athink also pulled the dead pedal for more room. I never thought of that. Will look at it though.
https://www.rx8club.com/series-i-do-...-video-258529/
Last edited by 04Green; 09-05-2011 at 11:53 AM.


 09-25-2010, 01:36 PM
#15

Yeah same here, 6'3" and I usually ride with my head tilted a little to the side cause of the little extra space the sun roof gives. I'm got some vacation time comming up and will use it to try this out. So I've got plenty of time and not have to worry about getting everything together quickly.
09-26-2010, 05:38 PM
#17
09-26-2010, 06:10 PM
#19
I undertand the math, I was more interested in that fact that does it really feel like you gained extra head room. If your only 6" and the helment lets say adds an inch, so now your looking at a 6'1" person and if you're still touching the roof, even if only slightly, then it's not going to do much for me to do this mod. Let alone if I tryed to wear a helmet. I'm almost pushing 6'3" so I'm more or less wondering if it's even going to be worth my time. I suppose anything would make it a little more confortable. Also do you still have total fuctionality of your power seats?
09-26-2010, 06:58 PM
#20
First question
That is why there is a big *** fender washer. It has about the same surface area as the bracket. It is hanging from a bolt attached to the bracket, so it should have the same support. An ME could tell me how this is not as strong as the original configuration, mostly from how the loads are passed through the bracket, but on paper it does not look like much of a loss. Remember, the metal pan keeps the two brackets tied together, so the load is still vertical.
Think of it as a new longer bracket, that involves a bolt.
So far so good.
It looks like your using then sheet metal to hold you in place and not a bracket.
Think of it as a new longer bracket, that involves a bolt.
So far so good.
09-26-2010, 07:12 PM
#21
I undertand the math, I was more interested in that fact that does it really feel like you gained extra head room. If your only 6" and the helment lets say adds an inch, so now your looking at a 6'1" person and if you're still touching the roof, even if only slightly, then it's not going to do much for me to do this mod. Let alone if I tryed to wear a helmet. I'm almost pushing 6'3" so I'm more or less wondering if it's even going to be worth my time. I suppose anything would make it a little more confortable. Also do you still have total fuctionality of your power seats?
There is a more complex piece. My butt is lower, which means my legs are at a different angle, which changes a little where my knees are, which changes how close to the dash they are. Also, with my butt down, my shoulders are down, and that makes them a little closer to the steering wheel. Then I recline my seat back a little. That changes the angle of my upper body (reclined) and makes me a little shorter. Also, my head being back gets me to a part of the roof that is a little higher. All those little bits add up. Your arms are likely longer than mine, which makes you seat further back, which gets you to a different place on the roof as well.
Here is a thought. I THINK you can remove the bolts, and swing the brackets out of the way with the seat in the car, I can do mine, but I crimped the pan. If you can, put a block of wood under it that lets it drop 3/4". Then test.
As for full functionality, I pulled the insulation out from under the carpet to get more clearance over the cross member. I also moved the wires away from the lowest part of the seat pan. It gets close but I do not think it hits all the way forward with the seat all the way down. Where it would hit is half way up, so the drop there is less, and the wires cleared before.
Best I got man, sorry.
09-26-2010, 07:14 PM
#22
Ok thanks for the updated diagram, everything makes sense to me as to what you actually did now. I dont think I'd have to worry about support loss, I suffer from what they call scrawny white boy syndrom so I wouldn't be putting much weight on it anyways.
09-26-2010, 07:28 PM
#23
Hey works for me, I'll see what I can figure out in a few weeks when I get the time to try it out. No one has room to complain considering no one else has tryed to do it let alone do a DIY on it. Yeah it never dawned on me that my knees would change possition with the seat lowered. Some scientist I turned out to be lol. I'm thinking that it will not only give me a bit more knee room, but i can actually recline the seat some more becuase my arms will reach better. The problem I've always had is when I recline for the head room, my arm reach is longer which makes it a pain on steering.
I'll see what I can figure out and I'll post pictures of everything.
I'll see what I can figure out and I'll post pictures of everything.

 10-10-2010, 05:49 PM
#25
Damn, I was hoping to get my lowered seat mod done but its going to be pushed back awhile. Good chance I'm relocating so my free time for play is all gone. Someone else should try this and mabe we all can figure out a good and easy way to get this done and post it on the DIY section.