
View Poll Results: Was this DIY Helpful?


Voters: 74. You may not vote on this poll
DIY: Painting your OEM Rims
 11-17-2010, 08:44 PM
#1
DIY: Painting your OEM Rims
So I decided to make my own DIY after reading a bunch of the other ones here on the forum. Alot of the them offer great info but I felt there was a few things missing. So here goes.
To start, gather all materials:
1. Cleaner/De-greaser (for cleaning rims) something like simple green will work. I bought something called orange cleaner at pep boys and was half price and worked great!
2. Primer: I used Duplicolor Sandable Primer in Dark Gray. The color of your primer will be determined by the color of the final coat. Find the primer color that is closest to the color you want to end up with. (4 cans)
3. Paint: I used Duplicolor High Performance Wheel coating in Gunmetal. (4 cans)
4. Sandpaper: Duplicolor suggests 320 grit sandpaper. I used 220 grit since Pep Boys was all out of 320 at the time. ( 5 sheets)
5. Masking Tape: Good 'Ol Masking tape. (2 Rolls)
6. Trash Bags: I trimmed trash bags to mask off the tires. Saves money on using a ton of masking tape. (about 5 bags)
7. Sponge/Scrubby: I used a dishwasher scrubby to aid in the cleaning process. I had a ton of brake dust and grime to get off.
8. Drop Cloth: If your going to be painting anywhere near anything, make sure you use a drop cloth and cover any over spray areas. Also, if you are painting outside, use the drop cloth in the direction of the wind to block over spray from drifting toward things you don't want to get paint on.
9. Cardboard Boxes: I used cardboard boxes as a platform to paint on.
 11-17-2010, 09:09 PM
#2
Now that you have gathered materials your ready to get started!
1. Remove wheels from car.
2. Clean wheels as thoroughly as possible! For the first cleaning just make sure all brake dust and dirt is removed.
3. Take your sandpaper and get to work. Using 320 grit sandpaper you should not have to use too much force on the wheel. You really just want to scuff the wheel as much as possible over all areas of the wheel. I used water during this process as my sandpaper was water safe. I suggest buying wet sand approved sandpaper so you can cut down on dust and debris.
4. Clean wheels again. This time being very thorough, the cleaner the wheel, the better the paint will stick.
5. Masking is somewhat tricky and time consuming, but remain patient as it is a very important part of the process. I started with a trash bag and trimmed it as close to the wheel as I could and covered the tire about 90%. I then masked the rest of the wheel using standard masking tape making sure to get the tape under the lip around the wheel. Some people use index cards for this, but as it was somewhat windy they did not work for me.
6. Time for the primer, I prefer to make the primer a little wetter than most, so 4 cans of primer got me two somewhat wet coats of primer. If you are a light sprayer you should be able to get three or four coats of primer per can. Remember: Follow the directions on the can!! Our cans suggested waiting ten minutes between coats of primer.
7. Once you have used up your primer its now time to get something to eat, because you should wait at least an hour before moving on to your color coat.
8. Now you can go for the color! Remember, light coats are best. Start with the back of the wheel then go to the front as you will get some coverage in the back from spraying through the spokes of the wheel. (Word to the wise: If you drip or find a hair or other impurity in your paint, you have two options. First, you could leave it be, do nothing, and live with it. Or, your other option is to try and get it out, and if this is the direction you choose to go, make sure you let the paint dry first! We made the mistake of trying to get out a hair and it messed up the whole spoke. So make sure you let it dry completely first, then try and sand down any spots you may have.
9. Now that your color coats are all on, its time to wait again. Wait at least 1 hour before handling, and at least 3 hours before even attempting to put the wheels back on the car. Duplicolor suggests 7 hours to dry.
10. If your doing a clear coat, which I did not, you would follow the same process but wait an hour between color coat and clear coat.
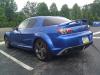
12. Your done! Put the wheels back on the car and take some pictures to show all your friends!
Let me know if anyone has any questions and Ill try and help you out.
1. Remove wheels from car.
2. Clean wheels as thoroughly as possible! For the first cleaning just make sure all brake dust and dirt is removed.
3. Take your sandpaper and get to work. Using 320 grit sandpaper you should not have to use too much force on the wheel. You really just want to scuff the wheel as much as possible over all areas of the wheel. I used water during this process as my sandpaper was water safe. I suggest buying wet sand approved sandpaper so you can cut down on dust and debris.
4. Clean wheels again. This time being very thorough, the cleaner the wheel, the better the paint will stick.
5. Masking is somewhat tricky and time consuming, but remain patient as it is a very important part of the process. I started with a trash bag and trimmed it as close to the wheel as I could and covered the tire about 90%. I then masked the rest of the wheel using standard masking tape making sure to get the tape under the lip around the wheel. Some people use index cards for this, but as it was somewhat windy they did not work for me.
6. Time for the primer, I prefer to make the primer a little wetter than most, so 4 cans of primer got me two somewhat wet coats of primer. If you are a light sprayer you should be able to get three or four coats of primer per can. Remember: Follow the directions on the can!! Our cans suggested waiting ten minutes between coats of primer.
7. Once you have used up your primer its now time to get something to eat, because you should wait at least an hour before moving on to your color coat.
8. Now you can go for the color! Remember, light coats are best. Start with the back of the wheel then go to the front as you will get some coverage in the back from spraying through the spokes of the wheel. (Word to the wise: If you drip or find a hair or other impurity in your paint, you have two options. First, you could leave it be, do nothing, and live with it. Or, your other option is to try and get it out, and if this is the direction you choose to go, make sure you let the paint dry first! We made the mistake of trying to get out a hair and it messed up the whole spoke. So make sure you let it dry completely first, then try and sand down any spots you may have.
9. Now that your color coats are all on, its time to wait again. Wait at least 1 hour before handling, and at least 3 hours before even attempting to put the wheels back on the car. Duplicolor suggests 7 hours to dry.
10. If your doing a clear coat, which I did not, you would follow the same process but wait an hour between color coat and clear coat.
12. Your done! Put the wheels back on the car and take some pictures to show all your friends!
Let me know if anyone has any questions and Ill try and help you out.
 11-18-2010, 02:08 PM
#4
Registered

Join Date: Mar 2010
Posts: 93
Likes: 0
Received 0 Likes
on
0 Posts
Looks good. I am thinking about doing this, this weekend.
one question, living in Michigan it gets cold at night now that were getting closer to winter, what is the avg temp best for painting and priming, cause i kno if it is to cold, it wont stick.
-Brandon
one question, living in Michigan it gets cold at night now that were getting closer to winter, what is the avg temp best for painting and priming, cause i kno if it is to cold, it wont stick.
-Brandon
11-18-2010, 02:37 PM
#5
I don't know off hand but I will check the cans when I get home and let you know. Im thinking though that if you are painting during the day and letting it dry over night you should have no problem. I believe the temp only effects when your actually painting but I could be wrong.

 11-18-2010, 05:49 PM
#7
OK i checked the cans for you, Duplicolor suggests temperatures between 60 and 92F. But I did mine this past weekend and it was about 55F during the days. So depending on the weather where you are get out there and get those wheels painted!
11-18-2010, 08:36 PM
#8
Registered User

Join Date: Feb 2010
Location: Utah
Posts: 94
Likes: 0
Received 0 Likes
on
0 Posts
Looks pretty good bro, although I would have definitely clear coated those. or gotten a shinier gunmetal color, they look really grey to me.
and...this is great for rattle can, but for a more permanent and higher quality finish i would suggest to everyone else to use legitimate auto paint. I painted my wheels using a chrystler paint code, and they turned out great and the finished product is like its factory. All for about 90 bucks, and my process was very similar to yours.
Again, great job!
Build thread Link on how I did mine in my sig.
11-18-2010, 09:42 PM
#9
Thanks Kinky.. I decided not to go with a clear coat because I liked the "flat" look. There is a good bit of metallic in the paint that can not be seen in the pictures because I took them just as the sun was going down. Ill try to get some better pics up when the sun is shining. What do you mean by legitimate auto paint? I used paint that was specifically for wheels. I do not have access to a spray gun or spray booth so that was not an option for me. Im really pleased with the spray can method as far as how it looks. We will have to see about durability though. Thanks for the thoughts!
11-19-2010, 02:11 PM
#10
Registered User
Join Date: Feb 2010
Location: Utah
Posts: 94
Likes: 0
Received 0 Likes
on
0 Posts
Thanks Kinky.. I decided not to go with a clear coat because I liked the "flat" look. There is a good bit of metallic in the paint that can not be seen in the pictures because I took them just as the sun was going down. Ill try to get some better pics up when the sun is shining. What do you mean by legitimate auto paint? I used paint that was specifically for wheels. I do not have access to a spray gun or spray booth so that was not an option for me. Im really pleased with the spray can method as far as how it looks. We will have to see about durability though. Thanks for the thoughts!
11-19-2010, 02:18 PM
#11
Not Faster Thn Ryans Spd3

Join Date: May 2009
Location: Miami, Florida / St. Louis, MO
Posts: 422
Likes: 0
Received 0 Likes
on
0 Posts
Great DIY I played with the idea of doing this for a long time but really could'nt think of a good reliable way to paint em, this would have been great! Eventually went aftermarket lol....
11-19-2010, 02:57 PM
#12
I think we all plan on going aftermarket at some point but this is a great inexpensive way to change the look of the wheel and the overall attitude of the car. If/when I do go for aftermarket wheels I will at least have a nice set of oems for winter!
11-19-2010, 05:18 PM
#13
Here is an updated close up pic for those who are wondering on the color and finish. As you can see there is a fair bit of sparkle in the paint, but again this shot was taken at night as well, we havent really had a sunny day here for a few days. Ignore the rusty brake rotor as well  And yes, the wheels are dirty already, it rained all week.
And yes, the wheels are dirty already, it rained all week.
11-22-2010, 10:41 AM
#15
Registered
Join Date: Mar 2010
Posts: 93
Likes: 0
Received 0 Likes
on
0 Posts
Im thinking about doing white on my shinka, photoshoped it and it looks bad ***.
HOWEVER
I do not see that duplicolor makes a WHITE color paint. This may be a stupid question...but can i go to a home depot and get some white paint there? or is there something special in this wheel paint, that makes it wheel paint..?
EDIT,
ok i found this..
http://www.duplicolor.com/products/wheelCoating/
now i just have to find a place that has it..
11-22-2010, 02:02 PM
#16
Registered
Join Date: Mar 2010
Posts: 93
Likes: 0
Received 0 Likes
on
0 Posts
ok, I have found this...everywhere i go there is no such thing as white wheel coating...even though duplicolor says it exists in the link above.
will this paint work?
will this paint work?
Last edited by littlejob; 11-22-2010 at 02:04 PM.
12-04-2010, 07:10 PM
#19
Registered

Join Date: Nov 2010
Posts: 13
Likes: 0
Received 0 Likes
on
0 Posts
i just did this today. i actually did the same color as you. but my 8 is silver so. It looks awesome. a little running on one or two spots but otherwise i couldnt be happier. thanks for the inspiration to do this!


