
DIY: Installing Series II Fuel Pump in Series I
 03-10-2012, 07:22 AM
#1
Registered
Thread Starter

Join Date: Jun 2007
Location: Jessup, MD
Posts: 123
Likes: 0
Received 0 Likes
on
0 Posts
DIY: Installing Series II Fuel Pump in Series I
First a little background on why I even installed a Series II fuel pump. As many of you probably know, the Series I fuel pump is known to have many problems. The problem I was experiencing was fuel starvation on the track on hard left hand turns. Many have reported this problem when their fuel was getting on the low side. In my case, I was getting fuel starvation after only being down a few gallons. I researched many solutions and decided on going with the Series II fuel pump since my car is fairly stock. I am happy to report I just tested the new pump at the track and no fuel problems.
Standard Disclaimer:I take no responsibility on your results following this DIY. Follow at your own risk!
Acknowledgements:
olddragger - For convincing me to go this route and all the help.
Parmer8 - For all the help
staticlag - For post on removing fuel pump
This is my first DIY so hopefully this will be useful.
Before starting on my DIY please read the following post:
https://www.rx8club.com/showpost.php...3&postcount=62
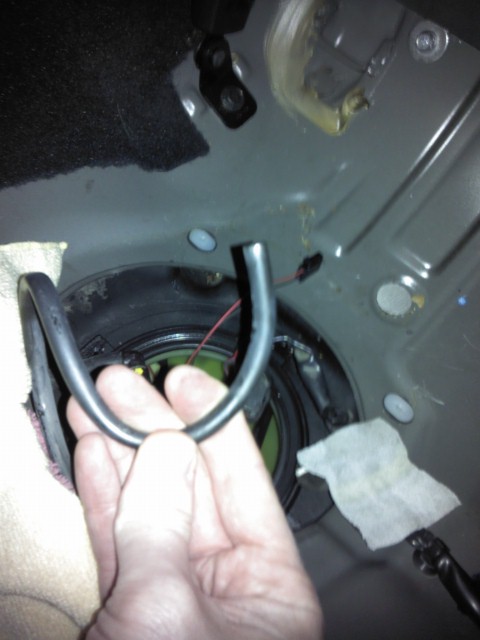
I will say removing and reinstalling the ring holding in the fuel pump is by far the hardest part. I bought a tool from Amazon which didn't work for me and just ended up in me breaking tabs on the ring. The only thing I did not follow, but should have was breaking off the black lock tabs. If you don't do this it will be very difficult to rotate the ring, but is possible. Again, this is the hardest part. Other than the ring everything else is very straight forward so don't let it discourage you. And yes WD40 is your friend! It really seemed to help a lot. Drench that thing! I had to use WD40 on both removing and installing since I kept the lock tabs in place.
Standard Disclaimer:I take no responsibility on your results following this DIY. Follow at your own risk!
Acknowledgements:
olddragger - For convincing me to go this route and all the help.
Parmer8 - For all the help
staticlag - For post on removing fuel pump
This is my first DIY so hopefully this will be useful.
Before starting on my DIY please read the following post:
https://www.rx8club.com/showpost.php...3&postcount=62
I will say removing and reinstalling the ring holding in the fuel pump is by far the hardest part. I bought a tool from Amazon which didn't work for me and just ended up in me breaking tabs on the ring. The only thing I did not follow, but should have was breaking off the black lock tabs. If you don't do this it will be very difficult to rotate the ring, but is possible. Again, this is the hardest part. Other than the ring everything else is very straight forward so don't let it discourage you. And yes WD40 is your friend! It really seemed to help a lot. Drench that thing! I had to use WD40 on both removing and installing since I kept the lock tabs in place.
 03-10-2012, 07:40 AM
#2
Registered
Thread Starter
Join Date: Jun 2007
Location: Jessup, MD
Posts: 123
Likes: 0
Received 0 Likes
on
0 Posts
If you have gotten the ring off time for a beer! Now onto installing the Series II pump!
Things needed:
Series II fuel pump
Very small flat head screw driver
5 inches of 5/16 submersible fuel hose rated SAE30R10 (found 1 foot at Napa)
2 Worm hose clamps
I bought my Series II (2009) fuel pump used. There are two major advantages to this. First is obviously cost. I paid $110 shipped. The other advantage was the car the seller had was totaled and thus could cut off a connector that is attached to the car that makes this job a bit easier. I will show this connector, and if you can have your seller do the same for you it makes things a bit easier. I do my best to explain what to do if you can't get this connector.
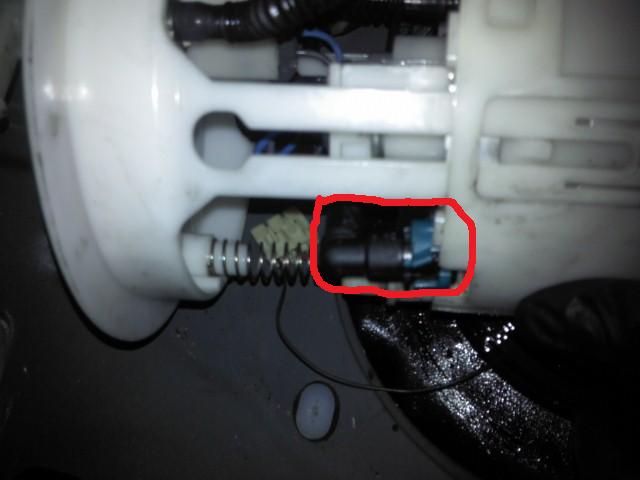
First some pictures of the Series II Pump:
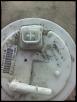
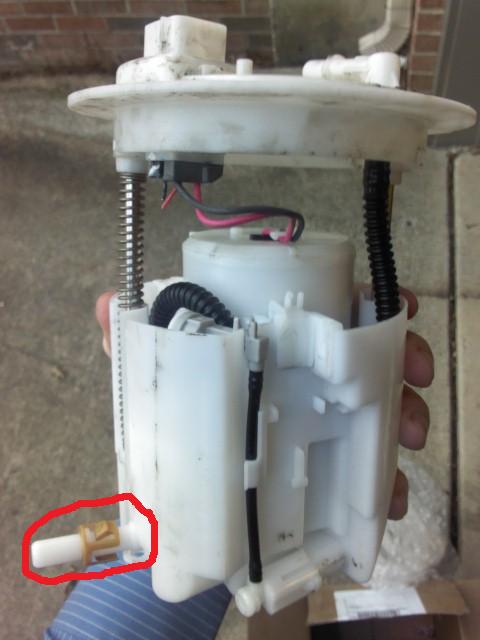
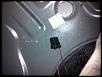
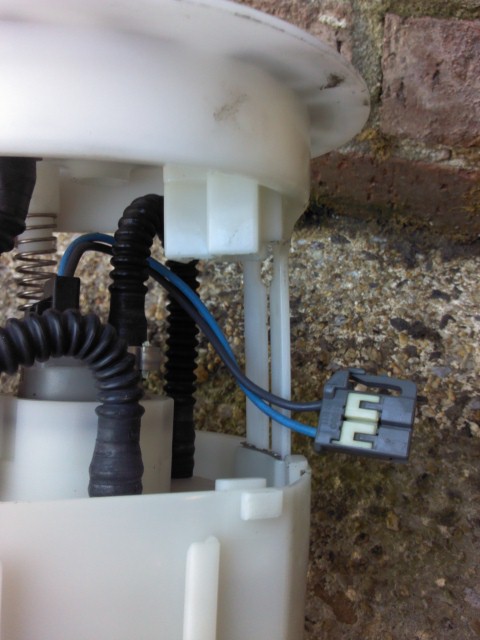
This picture shows the top of the Series II Pump. The good news is the hose that is on the top of your Series I Pump will fit right onto the Series II Pump. The electrical connector will as well. So nothing difficult here.
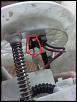
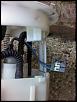
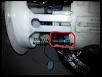
This picture has the connector circled that my seller was able to cut off of the donor car. If you but new you will not have this connector. More on this is a bit. The connector on the Series I cars does not fit the Series II pump in the location where this connector is shown.
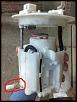
This picture is where the input fuel hose needs to go. The Series I hose will not fit this inlet (it is too small). This is why you need the submersible fuel hose.
Things needed:
Series II fuel pump
Very small flat head screw driver
5 inches of 5/16 submersible fuel hose rated SAE30R10 (found 1 foot at Napa)
2 Worm hose clamps
I bought my Series II (2009) fuel pump used. There are two major advantages to this. First is obviously cost. I paid $110 shipped. The other advantage was the car the seller had was totaled and thus could cut off a connector that is attached to the car that makes this job a bit easier. I will show this connector, and if you can have your seller do the same for you it makes things a bit easier. I do my best to explain what to do if you can't get this connector.
First some pictures of the Series II Pump:
This picture shows the top of the Series II Pump. The good news is the hose that is on the top of your Series I Pump will fit right onto the Series II Pump. The electrical connector will as well. So nothing difficult here.

This picture has the connector circled that my seller was able to cut off of the donor car. If you but new you will not have this connector. More on this is a bit. The connector on the Series I cars does not fit the Series II pump in the location where this connector is shown.
This picture is where the input fuel hose needs to go. The Series I hose will not fit this inlet (it is too small). This is why you need the submersible fuel hose.
Last edited by rx8convert22; 03-10-2012 at 08:05 AM.
03-10-2012, 08:40 AM
#3
Registered
Thread Starter
Join Date: Jun 2007
Location: Jessup, MD
Posts: 123
Likes: 0
Received 0 Likes
on
0 Posts
Onto the connector you need to modify.
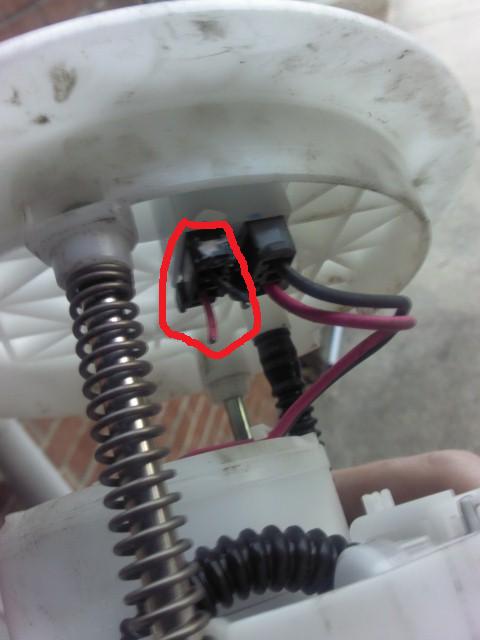
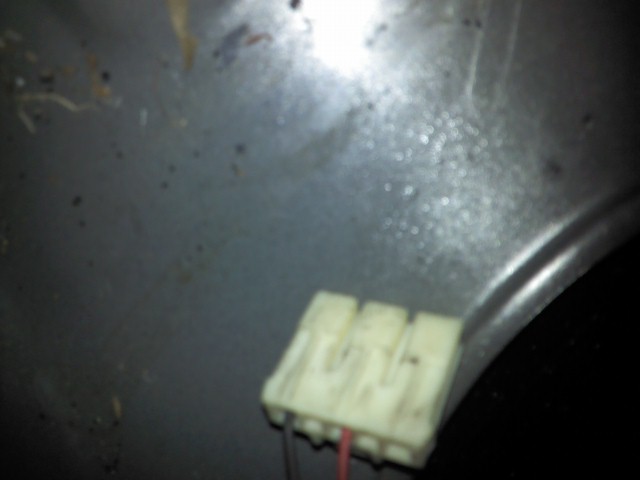
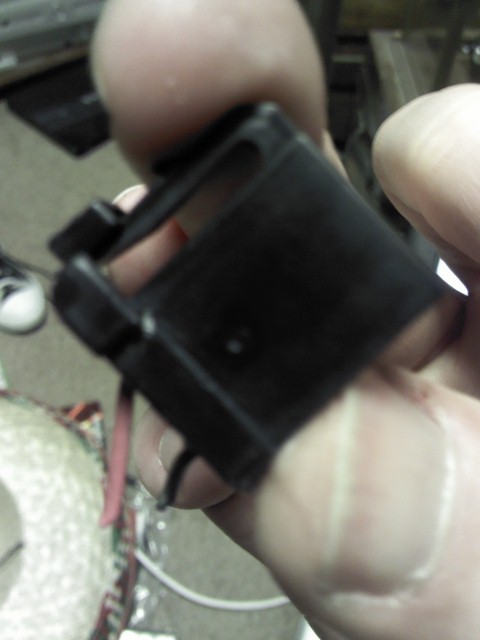
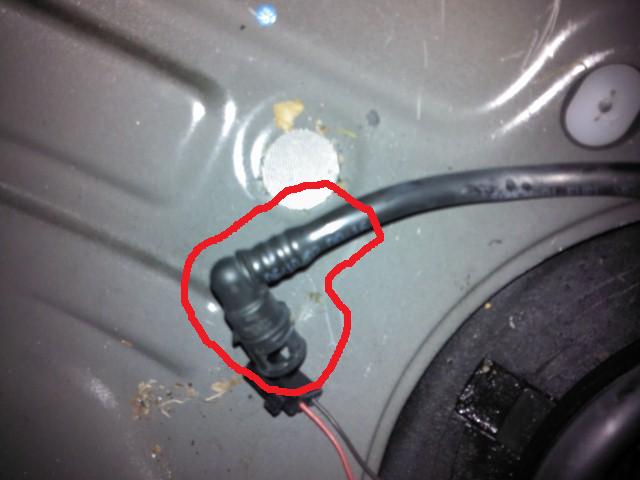
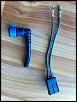
Here is the picture of the connector that should be inside of your fuel tank that you removed from your Series I fuel pump when you removed it. This connector will not fit the Series II pump. You need to remove the wires and pins from the connector.
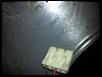
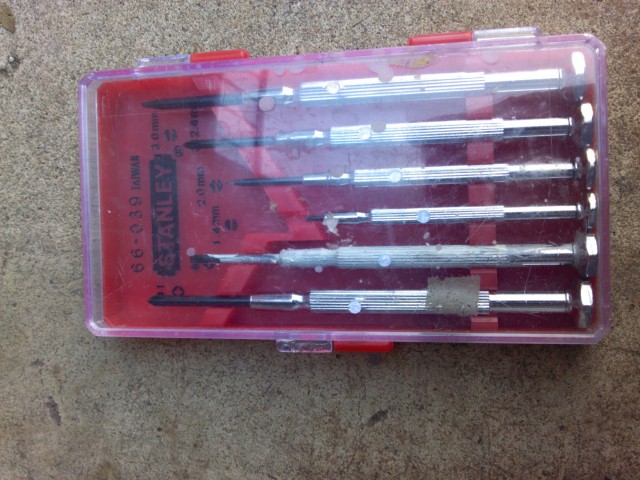
To remove the pins/wires from the connector I used a very small flat head screwdriver as pictured below. If you look inside the connector there is a small plastic tab that you have to push down with the small screw driver and then just pull on the wire. The wire with the pin on it will come right out. Do this for both the black and red wire.
Since I had the correct connector sent to me with my pump, I then removed the pins and wires from that connector using the same method. Here is the picture of the connector from my Series II pump.
I then took the wires/pins from the old connector that are in the fuel tank and snapped them into my Series II connector. Make sure you put black and red wires in the correct placement so when you plug it into the Series II pump black goes to black, red goes to red. Here is a picture of my wires with the new connector attached to it.
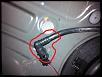
So what do you do if you aren't have the Series II connector that fits the pump? See picture below. On the Series I pump there are two connectors connected by two wires. I've tried to focus on it in this picture. Take off both connectors and one of these two connectors is close to what you need. It will require you to modify the connector a bit to make it fit in the Series II pump. I was told by Parmer8 you just need to cut off a bit of the plastic, but not too much otherwise it won't lock. Once you have modified it so it will fit the Series II pump, remove the pins and wires and insert the pins/wires from the fuel tank into it. Sorry I don't have more details, but lucked out by having the connector that actually goes to the Series II pump.
Here is the picture of the connector that should be inside of your fuel tank that you removed from your Series I fuel pump when you removed it. This connector will not fit the Series II pump. You need to remove the wires and pins from the connector.
To remove the pins/wires from the connector I used a very small flat head screwdriver as pictured below. If you look inside the connector there is a small plastic tab that you have to push down with the small screw driver and then just pull on the wire. The wire with the pin on it will come right out. Do this for both the black and red wire.
Since I had the correct connector sent to me with my pump, I then removed the pins and wires from that connector using the same method. Here is the picture of the connector from my Series II pump.
I then took the wires/pins from the old connector that are in the fuel tank and snapped them into my Series II connector. Make sure you put black and red wires in the correct placement so when you plug it into the Series II pump black goes to black, red goes to red. Here is a picture of my wires with the new connector attached to it.

So what do you do if you aren't have the Series II connector that fits the pump? See picture below. On the Series I pump there are two connectors connected by two wires. I've tried to focus on it in this picture. Take off both connectors and one of these two connectors is close to what you need. It will require you to modify the connector a bit to make it fit in the Series II pump. I was told by Parmer8 you just need to cut off a bit of the plastic, but not too much otherwise it won't lock. Once you have modified it so it will fit the Series II pump, remove the pins and wires and insert the pins/wires from the fuel tank into it. Sorry I don't have more details, but lucked out by having the connector that actually goes to the Series II pump.
Last edited by rx8convert22; 03-10-2012 at 09:18 AM.
03-10-2012, 08:53 AM
#4
Registered
Thread Starter
Join Date: Jun 2007
Location: Jessup, MD
Posts: 123
Likes: 0
Received 0 Likes
on
0 Posts
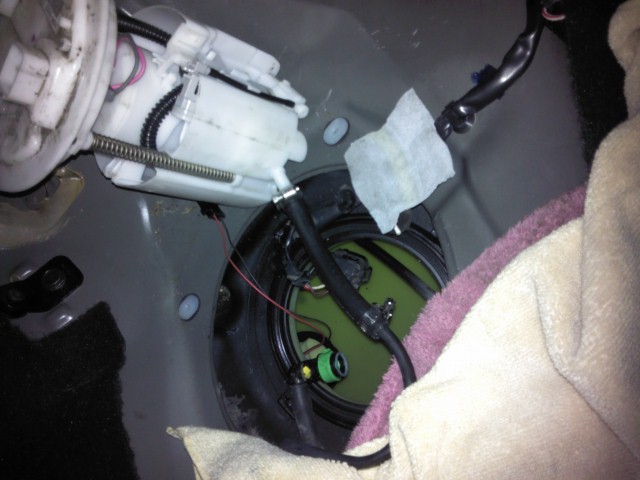
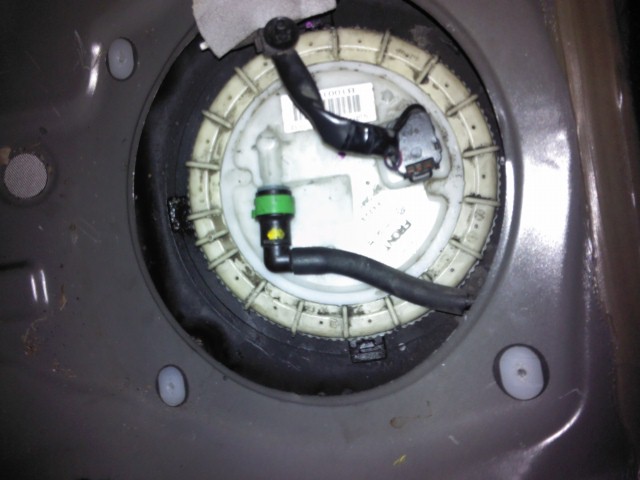
Next step is to prepare the input hose. As stated the Series I hose is to smaller in diameter to fit onto the Series II pump.
Pictured is the input hose still attached to the Series I pump for reference that you should have removed when you took out your Series I pump.
Here is a picture of the input hose detached from the Series I fuel pump that is in the fuel tank. You want to cut off the elbow with a utility knife. I've circled roughly how much I cut off.
This is what it should look like once you've cut it elbow off.

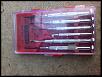
On the Series II fuel pump you should fit your new hose onto it. Here is a picture of the package of the hose I found through NAPA. It isn't cheep! It was $30 for 1 foot! Don't use any other rating of hose though! This is VERY important since this hose will be submersed in fuel.
Cut a 5 inch piece of hose and put onto the inlet of the Series II fuel pump and secure it with a worm clamp.
Pictured is the input hose still attached to the Series I pump for reference that you should have removed when you took out your Series I pump.
Here is a picture of the input hose detached from the Series I fuel pump that is in the fuel tank. You want to cut off the elbow with a utility knife. I've circled roughly how much I cut off.
This is what it should look like once you've cut it elbow off.
On the Series II fuel pump you should fit your new hose onto it. Here is a picture of the package of the hose I found through NAPA. It isn't cheep! It was $30 for 1 foot! Don't use any other rating of hose though! This is VERY important since this hose will be submersed in fuel.

Cut a 5 inch piece of hose and put onto the inlet of the Series II fuel pump and secure it with a worm clamp.
 03-10-2012, 09:09 AM
#5
Registered
Thread Starter
Join Date: Jun 2007
Location: Jessup, MD
Posts: 123
Likes: 0
Received 0 Likes
on
0 Posts
Time to install the Series II pump into the fuel tank!
Take the hose you attached to the Series II fuel pump, and put another hose clamp onto it close to the other hose clamp and slightly tighten so it won't move. Slip the new fuel hose over the old fuel hose and then slide the second clamp where the two hoses overlap and tighten.
Then you just take the connector you modified and plug it into the Series II fuel pump. Again make sure you've connected the wires correctly. When you plug it into the pump black wire should go to black wire and red to red.
You then just insert the pump into the fuel tank and attach the output hose and the electric connector both of these need no modifications. Make sure when you attach the output fuel hose you hear a click!!! I did not the first time and let's just say when I turned on the car it was not pretty. Luckily I hate a towel around the fuel pump. Arrange the fuel pump in such a way that the output hose is not kinked.
Then comes the hell which is that ring. For me since I did not remove the locking taps it was a pain to tighten. When I tightened the rings it did rotate the fuel pump a bit, but since the output hose was still not kinked I called it good enough.
At this point time for a test drive. My fuel tank was at just about empty, and things worked out great. When I then filled the tank I had a leak because my ring was not quite tight enough. After a bit more hammering with the rubber mallet (and lots of cursing), I was finally able to get it tight enough to reseal. I did not replace my fuel pump gasket. I had a friend ride in back during the test drive to look for leaks. After I was convinced all was good I put the service panel and the seat back on.
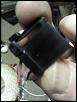
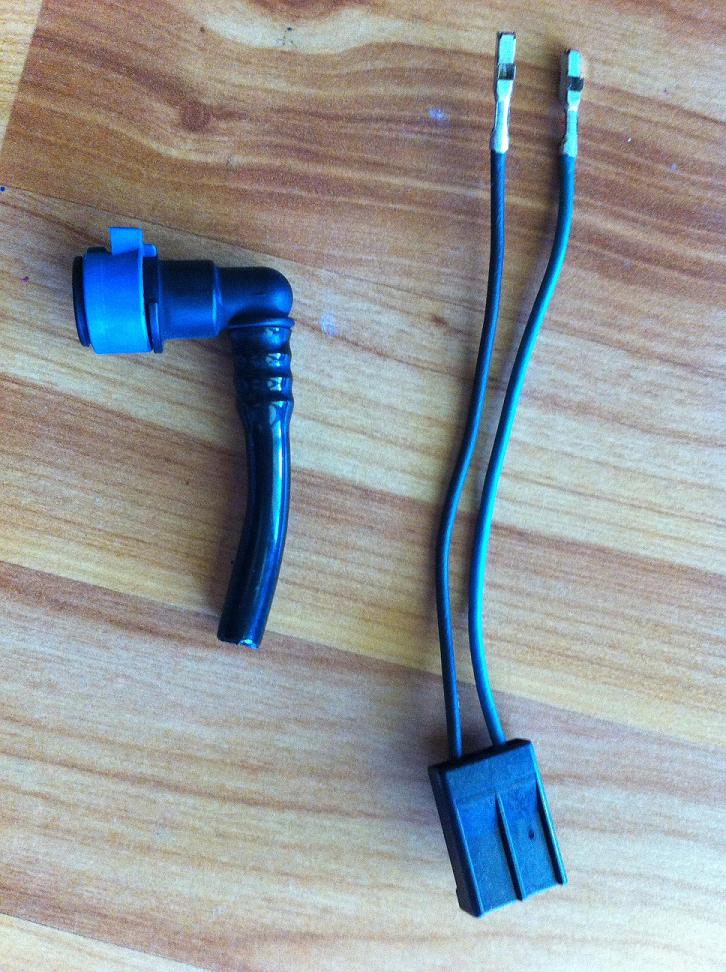
One more picture that may help. Parmer8 sent me this one. It is left over parts he had when he installed is Series II pump. It will give you an idea of how much of the elbow to cut and which of the two connectors he used based on what he had left.
Again happy to report my fuel starvation problem is solved. The job really wasn't that hard other than the ring (seriously hate that thing). Hope this DIY helps!
Take the hose you attached to the Series II fuel pump, and put another hose clamp onto it close to the other hose clamp and slightly tighten so it won't move. Slip the new fuel hose over the old fuel hose and then slide the second clamp where the two hoses overlap and tighten.
Then you just take the connector you modified and plug it into the Series II fuel pump. Again make sure you've connected the wires correctly. When you plug it into the pump black wire should go to black wire and red to red.
You then just insert the pump into the fuel tank and attach the output hose and the electric connector both of these need no modifications. Make sure when you attach the output fuel hose you hear a click!!! I did not the first time and let's just say when I turned on the car it was not pretty. Luckily I hate a towel around the fuel pump. Arrange the fuel pump in such a way that the output hose is not kinked.
Then comes the hell which is that ring. For me since I did not remove the locking taps it was a pain to tighten. When I tightened the rings it did rotate the fuel pump a bit, but since the output hose was still not kinked I called it good enough.

At this point time for a test drive. My fuel tank was at just about empty, and things worked out great. When I then filled the tank I had a leak because my ring was not quite tight enough. After a bit more hammering with the rubber mallet (and lots of cursing), I was finally able to get it tight enough to reseal. I did not replace my fuel pump gasket. I had a friend ride in back during the test drive to look for leaks. After I was convinced all was good I put the service panel and the seat back on.
One more picture that may help. Parmer8 sent me this one. It is left over parts he had when he installed is Series II pump. It will give you an idea of how much of the elbow to cut and which of the two connectors he used based on what he had left.
Again happy to report my fuel starvation problem is solved. The job really wasn't that hard other than the ring (seriously hate that thing). Hope this DIY helps!
Last edited by rx8convert22; 03-10-2012 at 02:07 PM.
 03-28-2012, 09:36 AM
#7
My 8 looks like a Smurf
iTrader: (4)

Join Date: Sep 2007
Location: Ottawa, ON, Canada
Posts: 1,742
Likes: 0
Received 0 Likes
on
0 Posts
Take the hose you attached to the Series II fuel pump, and put another hose clamp onto it close to the other hose clamp and slightly tighten so it won't move. Slip the new fuel hose over the old fuel hose and then slide the second clamp where the two hoses overlap and tighten.
03-29-2012, 06:24 PM
#8
Registered

Join Date: Mar 2003
Location: Austin,Tx
Posts: 229
Likes: 0
Received 0 Likes
on
0 Posts
I got most of my info from OD...so thanks to him.
04-09-2012, 10:11 AM
#9
My 8 looks like a Smurf
iTrader: (4)
Join Date: Sep 2007
Location: Ottawa, ON, Canada
Posts: 1,742
Likes: 0
Received 0 Likes
on
0 Posts
The problem is not the pump moving around, the problem is the amount of fuel pressure going through that hose.
Since there's nothing for the worm gear clamp to brace itself against, it basically doesn't do much. Either it puts little to no pressure on the inner hose making a loose connection - or even a leak, which could go undetected, or it puts too much pressure on it, pinching the inner hose and restricting the fuel delivery.
What you really need is some type of (brass?) coupler between the two hoses, that way you can put enough pressure on the clamp that it won't come undone or restrict fuel delivery.
07-10-2012, 12:21 PM
#10
Registered

Join Date: Apr 2009
Posts: 918
Likes: 0
Received 0 Likes
on
0 Posts

The following users liked this post:
Cano (04-26-2021)
07-13-2012, 06:11 AM
#12
Registered
Join Date: Apr 2009
Posts: 918
Likes: 0
Received 0 Likes
on
0 Posts
i believe he used the whole series II pump assembly and its pump as it is better as well as it is made by Denso not like the series I, made by Arram.

 09-24-2012, 05:32 AM
#16
Registered
Join Date: Apr 2009
Posts: 918
Likes: 0
Received 0 Likes
on
0 Posts
09-25-2012, 08:34 AM
#18
Registered
Join Date: Apr 2009
Posts: 918
Likes: 0
Received 0 Likes
on
0 Posts
09-25-2012, 09:40 PM
#21

With the changes to the wiring...and the suction assembly needed to use the Series 2 pump..it is much easier to just put in the aeromotive pump and leave it at that.
If you want you could just run it at the lower voltage setting to drop the output to a more manageable level for NA
If you want you could just run it at the lower voltage setting to drop the output to a more manageable level for NA
10-06-2012, 06:24 AM
#24
got my s2 pump, came with the level sensor and connectors so no hassle for that. only need some fuel hose to instal it. might do it this weekend and try it on monday at local track to see if it works
update :
installed, took about 1h total to do it. was very easy to do with the right parts and tools. hardest part for me was to reinstal the ring (still not very hard)
started it, works like a new one. hope it will fix my issue
update :
installed, took about 1h total to do it. was very easy to do with the right parts and tools. hardest part for me was to reinstal the ring (still not very hard)
started it, works like a new one. hope it will fix my issue
Last edited by MaD666MaX; 10-06-2012 at 12:04 PM.